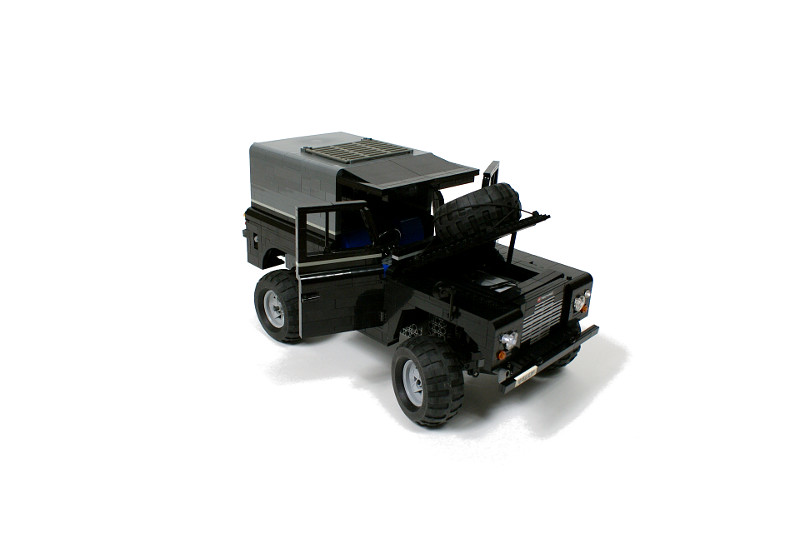
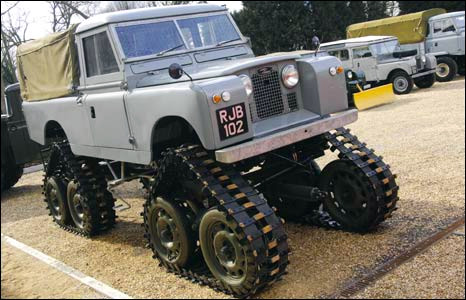
Land Rover series 2
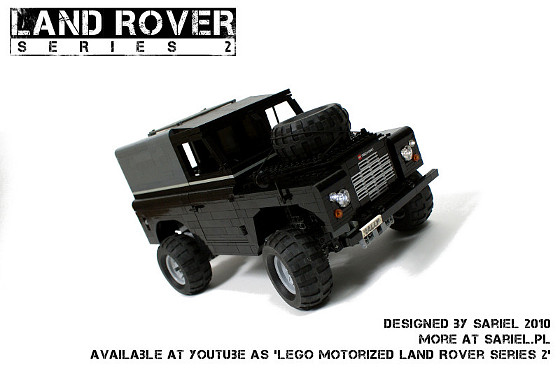
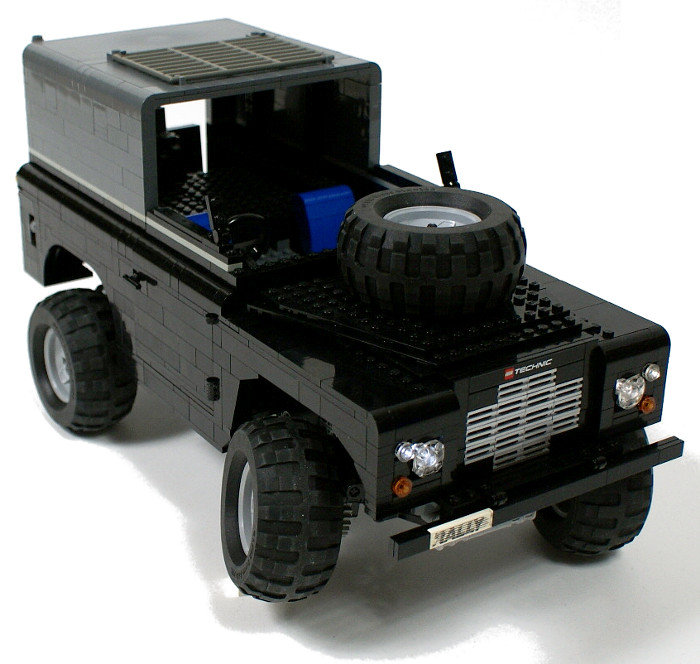
My final 2010 Truck Trial vehicle, built in less than single week after the previous vehicle failed. Features full pendular suspension, 4×4 drive, lights and opening doors, bonnet and rear board.
Datasheet:
Completion date: 03/09/2010
Power: electric (Power Functions)
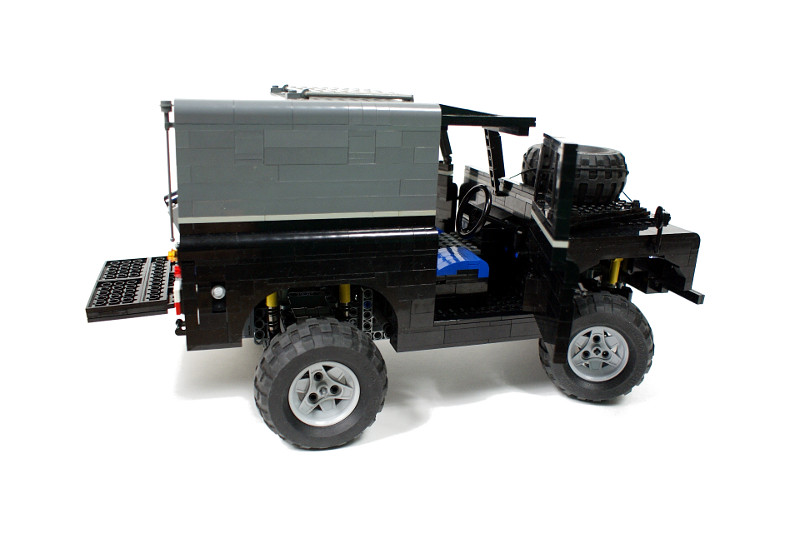
Dimensions: length 48 studs / width 26 studs / height 27 studs
Weight: 1.985 kg (1.726 kg in roofless version)
Suspension: pendular, stabilized with shock absorbers
Propulsion: 1 x PF XL motor geared down 5:1
Top speed: 0.8 kmph in roofless version
Motors: 1 x PF XL, 1 x PF Medium
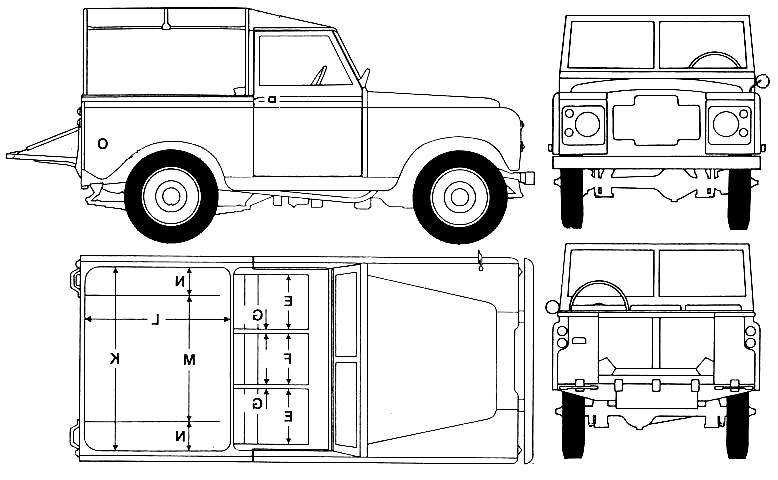
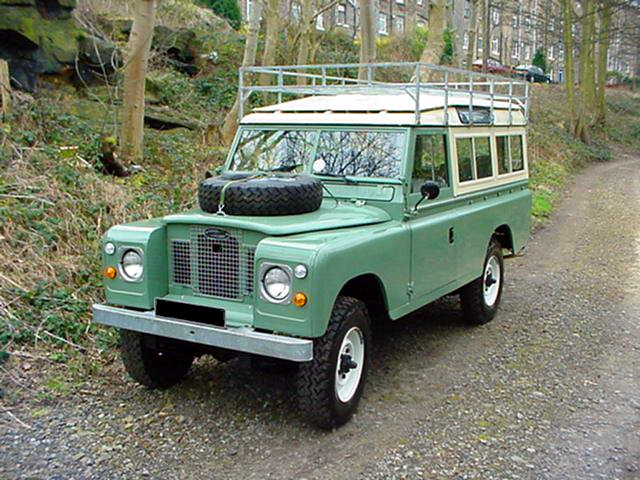
When I decided to abandon my Fiat SPA35 model, it was just a week before the Truck Trial race and my first decision was to pass on driving this time and to only take care of filming. Shortly after, I changed my mind and decided to try some simple 4×4 vehicle, just to drive something in the race. The vehicle was intended to combine the advantages of my two previous Truck Trial vehicles – Hummer H1 and Jeep Wrangler Rubicon, while also learning from Fiat’s failure. I wanted to try to model another famous 4×4 vehicle, so the classic Land Rover series 2 (dating all the way back to 1958) was pretty much an obvious choice.
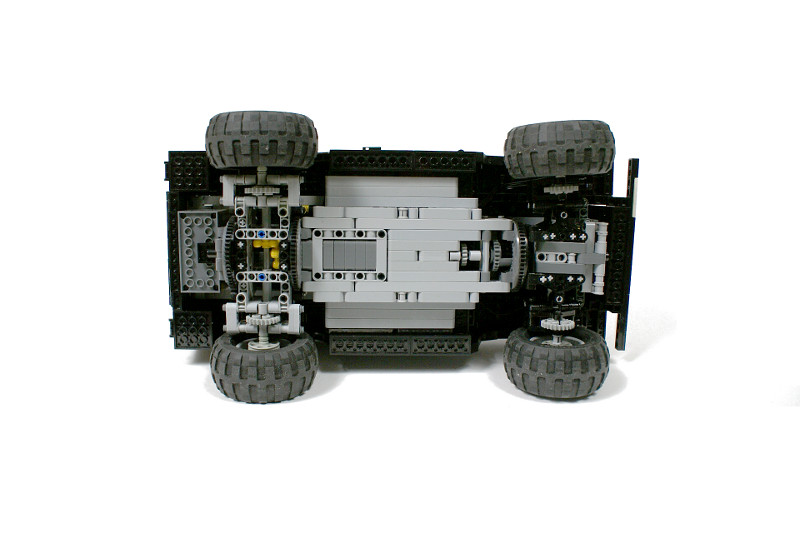
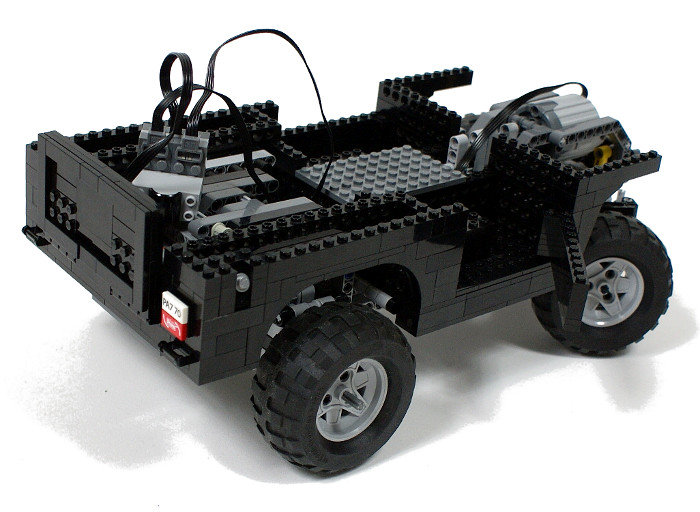
While the complete model appears much like a Hummer/Wrangled hybrid on the outside, it was internally much closer to the Fiat model. The chassis was built completely with studless parts and used large Technic turntables to hold suspension modules in place – both solutions tested in the Fiat for the first time. The Land Rover shared engine location, gear ratio and wheels with the Wrangler and a studfull body with the Hummer. In fact, the Rover used studfull body around a studless chassis, whereas Wrangler used studless body around a studfull chassis.
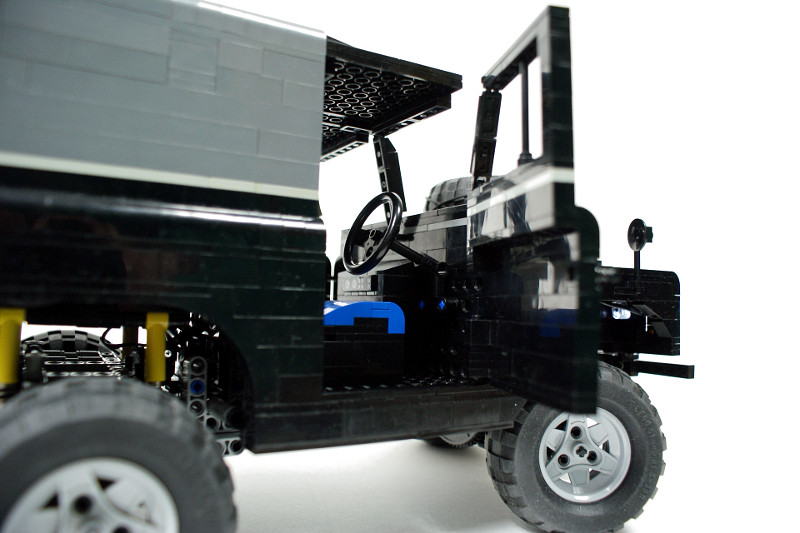
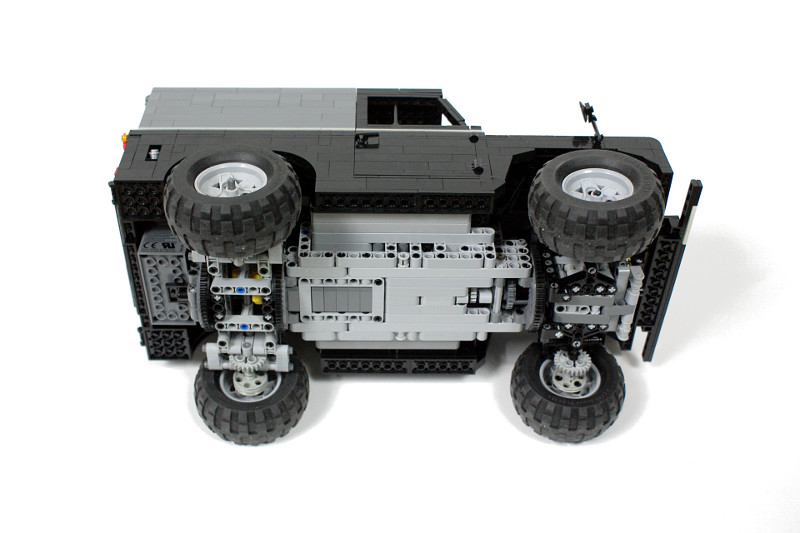
The suspension has undergone some major changes in comparison to the version used in Fiat. The front axle was reverted to the version used in the Wrangler, and then a single turntable was attached behind it and the steering system was additionally reinforced. Both drive and steering were transferred through the turntable – steering by a solid driveshaft and steering by am empty differential sitting on it. The rear axle was built from a scratch between two turntables. There was no gearbox, and – just like in the Wrangler – the drive motor was located above the front axle, right under the bonnet. The racing rules we use state that every model has to be equipped with a piston engine of accurate configuration and placement, unless the actual drive motor is located where the original engine is. Thus, locating the motor under the bonnet meant that no piston engine was needed in the model, which saved space, weight and drive motor’s power. The steering was controlled by a single PF Medium motor geared down 15:1 and located low in the chassis, in front of the rear axle. The entire underside of the chassis was covered with studless parts, in order to create a single smooth surface that was unlikely to get stuck on an obstacle, and in order to lower the centre of gravity as well.
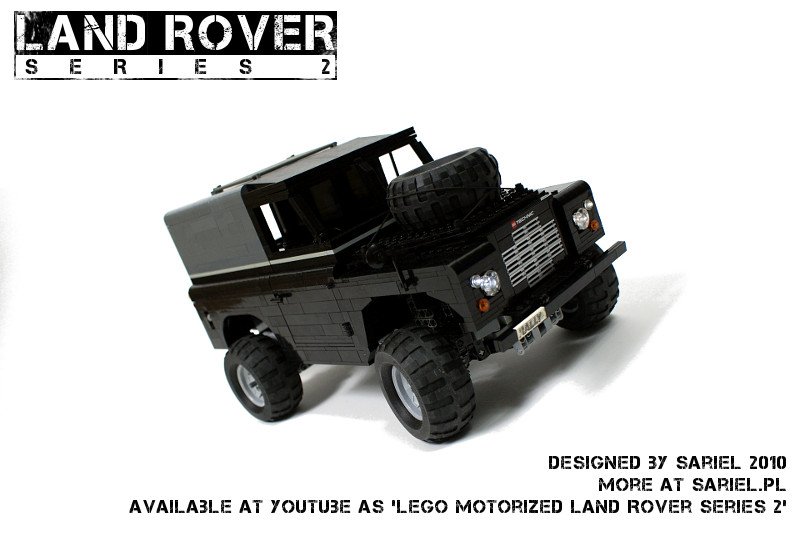
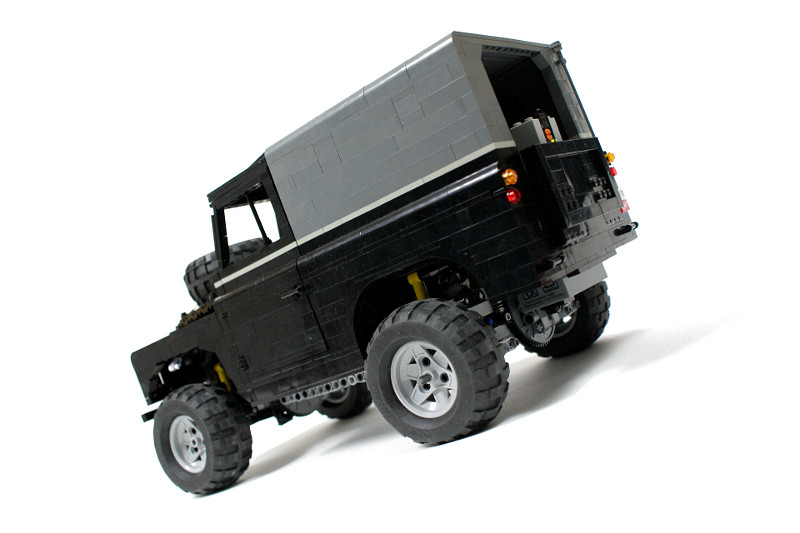
Knowing that my Wrangler model had abundance of torque, I wanted the Rover to be much heavier. Our racing rules take power-to-weight ratio of each individual model into account, therefore more weight at the same power means more points. Thus, I wanted the body to be massive, but at the same time it was my goal to keep the model’s centre of gravity low, despite its significant ground clearance (up to 7 studs under cabin’s floor). Therefore especially the lower portion of the body was built so densely that model came out almost undamaged from some crash tests I conducted later.
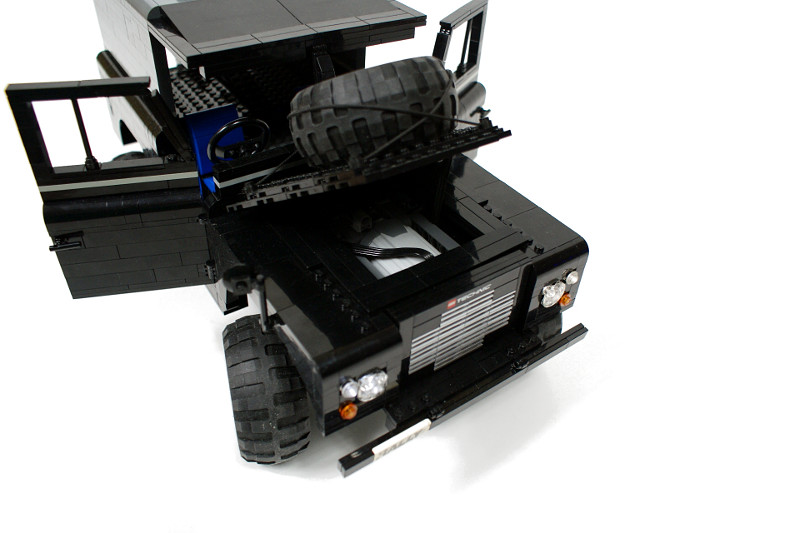
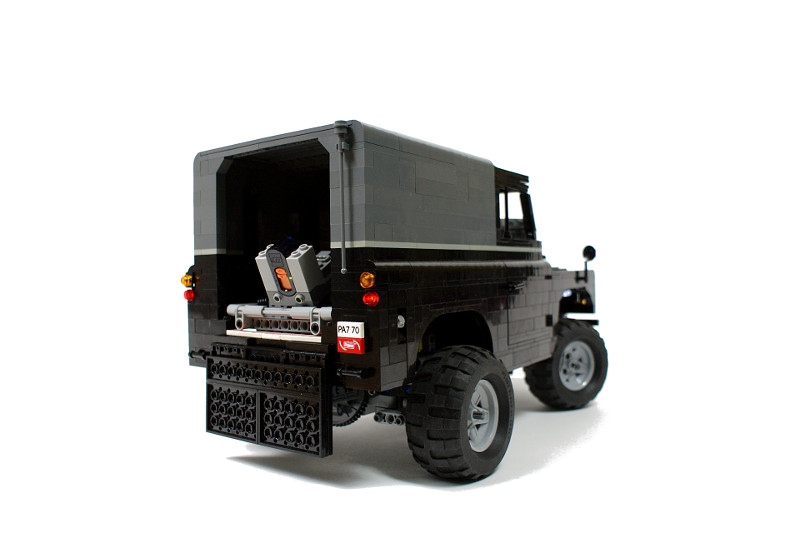
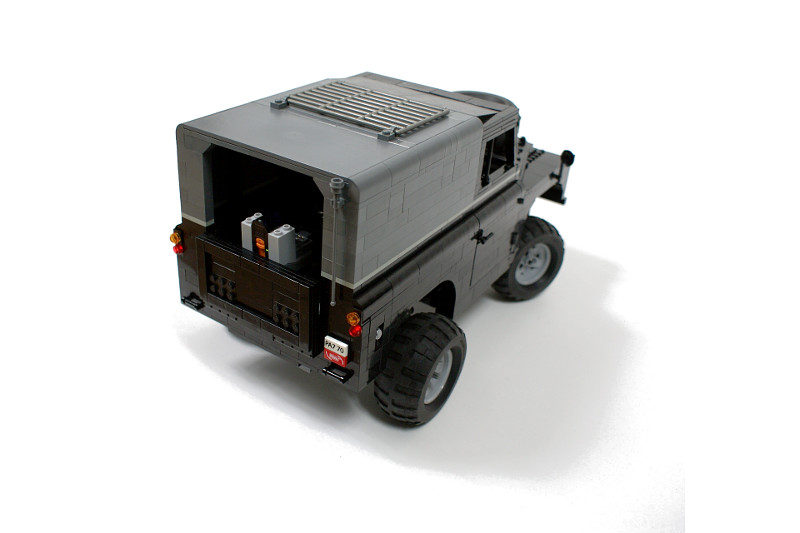
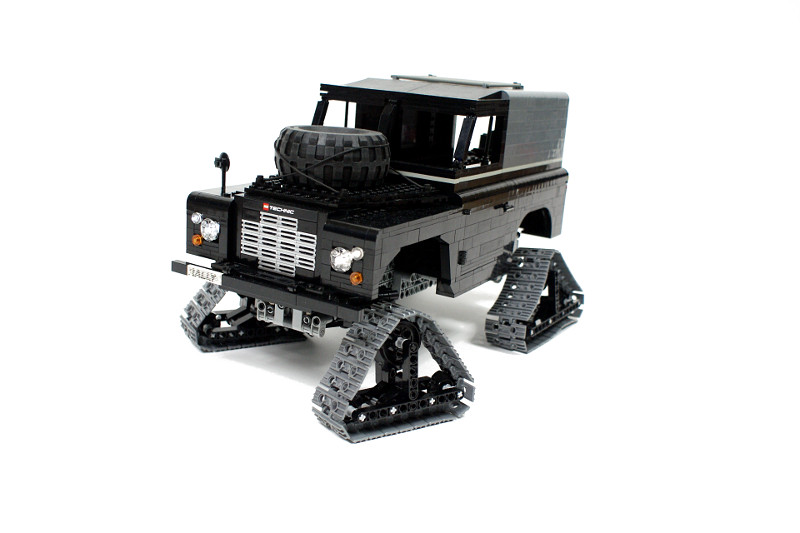
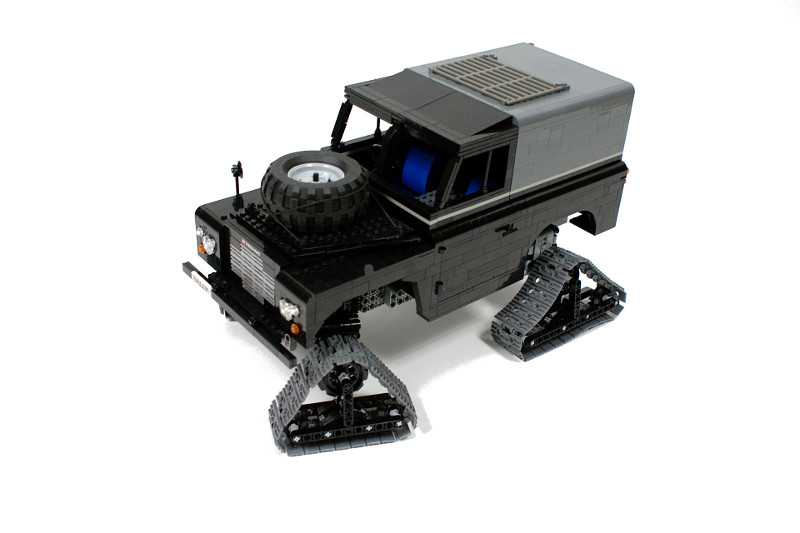
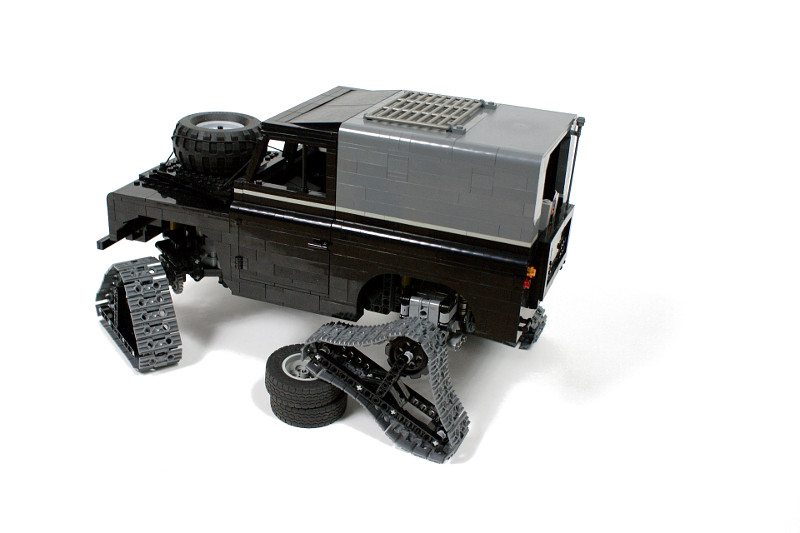
The body was equipped with a pair of opening doors, an opening bonnet with a spare wheel fixed on top of it (a common sight in early Land Rover versions), and opening rear board with the IR receiver attached to it. Most of the Land Rovers can be accessed from the back by a single door, and a board is a rarity. I chose the board over door because this way the IR receiver was more exposed, and could be pulled out from the cabin’s inside to some extend if needed. Moreover, the rear part of the cabin has been adapted to house a camera. Due to weak mounting points, this solution worked well only on flat, level surfaces, as proven during the race.
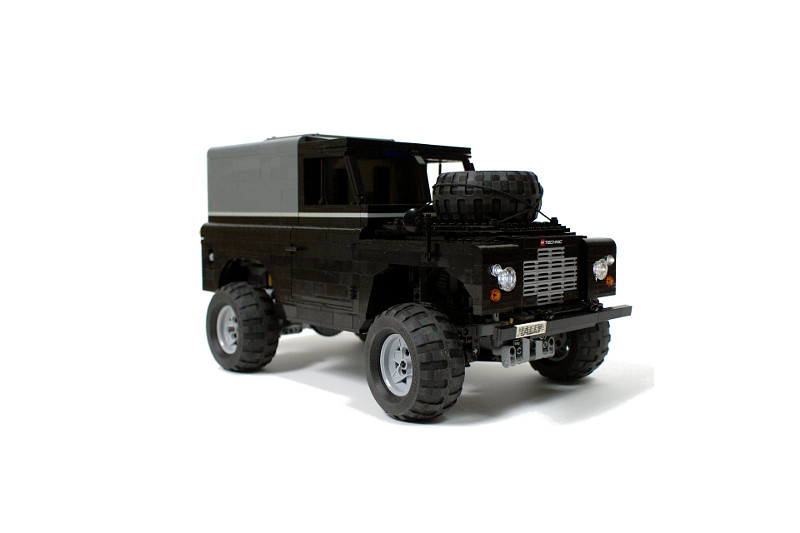
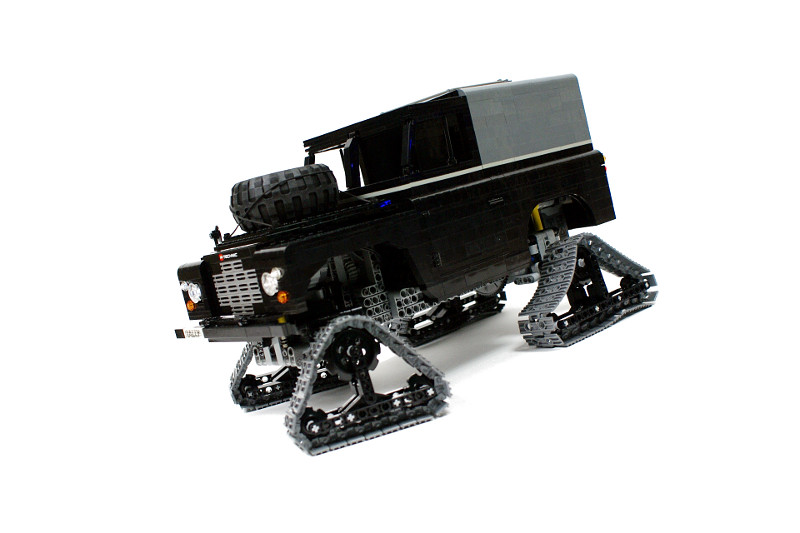
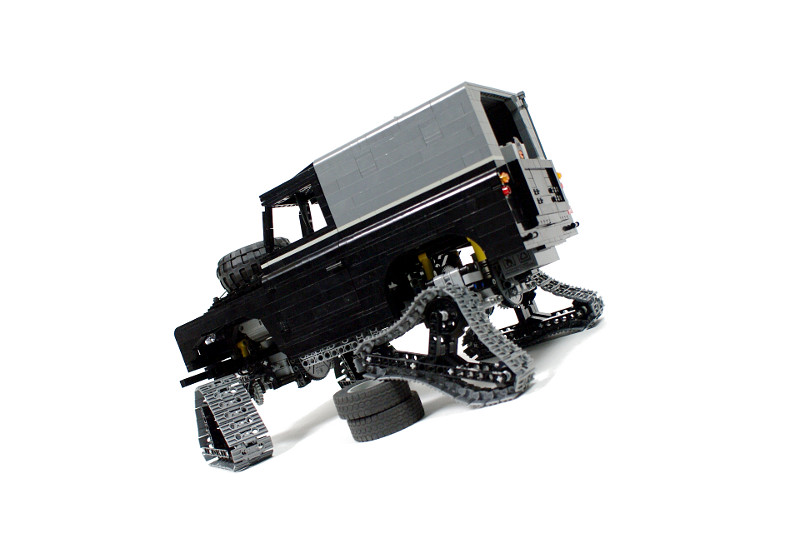
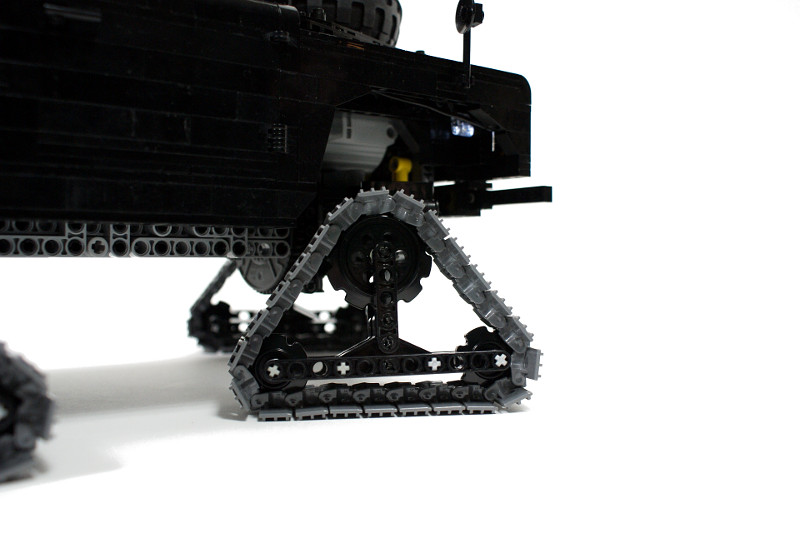
It should be noted that the model’s body was inaccurate: the front radiator grille should be put further back under the bonnet. I couldn’t model it because of the frame that braces the suspension module of the front axle. Moreover, inspired by the Inception movie featuring a tracked Hummer H1, I have created a simple set of four tracks for the Land Rover. The tracks and wheels could be easily swapped in the chassis, and while I did not intend to use the tracks outdoors (our racing rules don’t allow tracked vehicles of any kind), I have used these to drive around my apartment. The general performance was apparently inferior with tracks on, and in particular the traction was much worse than it was with wheels.
The completed model weighed a whopping 2.1 kg until I removed ballasted bricks that were mounted under the bonnet in order to shift the centre of gravity forward. It reduced model’s weight to just below 2 kg, and I decided to leave it like that because there was no time left for changes. The model performed well at this weight, it experienced no mechanical failures and displayed superb traction, but it was obvious that it will be struggling against its own weight.
Land Rover was warmly welcomed by other contestants because of its look and its very short building time. It performed well in the race, no mechanical failures occurred, but its weight turned out to be a real problem. The model ran out of power to climb on several occasions, and toppled over once. It ended up at the last place in the race, much to my disappointment. Yet still, other drivers and viewers were greatly impressed by its look, which led me to believe that it would be a waste to take it apart, and that the model should enter our last 2010 race on October, with open body design that should significantly reduce its weight.
Photos:


Work In Progress photos:


Hey Paul,
My friends and I, here in New Jersey, want to start a truck trial at a local park. Just wondering how I should set up the course, bring audiences/competitors, etc.
@LegoMaster
No, I am not making instructions for the body.
Hey Sariel! I just have a quick question… how do you attach the front and back bumper to the chassis. Also, where do the mudguards connect to the frame. Thanks in advance!
Ignore my last reply I was suffering from a severe case of being an idiot! tracks built, Thanks!
@Sariel ok I’ll try! I have no experience with the track system though, but I have set 8294 sat around waiting to be built, that should help
@Richuk
I’m glad you like it, but the tracked attachments were so simple that you can easily build them from the photos.
Hey Sariel, when you released the instructions for this my plans of using your 2 speed and orbital gear box in my on truck got scrapped, I made a chassis successfully, but under any kind of load the 2 speed auto gear box was unstable in liftarm form. So I went to bricklink, spent £25 and built this, thanks, it’s amazing! When you get some spare time could you make an instruction for the track modules? I’d love to build them.
Nice pants and shoes in your video
Please hurry with instructions, I cant wait to see how the rear chassis is constructed with suspension set up and also how you allow everything to run through your turn table with no problems with gearing.
@Mool
I only order pieces I’m missing from Bricklink. Sometimes I don’t have to order anything at all because I have enough parts.
I have a question:
when you make a model do you have every piece that you need sent from bricklink or do buy lego sets?
@bob
I’m not making instructions for the Monster Truck.
instructions of the chassis of the monster truck, wath you new have
(sorry for my bad english)
@bob
Um… what?
and the chassis, wath you new have?
@bob
No, I don’t think so.
can you make instructions for the monster truck on facebook?
@bob
Yes, I am going to publish instruction for Land Rover’s chassis sometime soon. This month, hopefully.
can you put more instructions on your website – similar to your instructions on the jeep wrangler rebicon?
Thats wonderful to hear, thanks once again and keep up the great work, amazing
@alex
Yes, I hope to do that within a month’s time. I’m glad you’re back to building, it’s truly a great hobby.
Ive been looking over your site and your work over the last 6 months and im blown away by your work and its made me to get back into building, ive been trying to build your land rover from your pictures and im finding it hard, are you still planning on releasing a part list and instructions? thanks alex
@Jasper
Still would be too large and still would need a compressor. I’m just not interested in pneumatic engines, sorry.
@Sariel
And it is very impressive!!
@Sariel
but you can also make a supercar with a pneumatic motor.
@Jasper
For instance because pneumatic engines are forbidden in truck trial. Or because it’s too large. Or because I don’t want to carry a compressor to drive my car.
Why not use one time a pneumatic motor that is cool and he is strong. would you please do one sometime.
@Jasper
Great. Now use English.
Waarom gebruik je niet een keertje een pneumatische motor dat is gaaf en hij is sterk wil je dat alstublieft een keertje doen
sweet thnx Sariel srry about ur tatra and unimog those were my favorite trtrs u made
@David
You can use it for whatever you like.
well ok but can i use ur chassis for a trtr im not going to race it just love it so much
@David
Then you did something wrong. Many people have built it and not a person had problems with it until now.
its just i look at ur trucks wit them they work very well but i built ur jeep dosent work at all like the pendular setup is locked and cant move thts all
@David
Man, these are shock absorbers, they work like springs, what difficulty is in that?
ps u made the truck on my birth day
@zwariowany
@David
can u tell how they work cuz i have them and not even a pound will work for rough terrian
Ciekawe czy gąsienicowy układ jezdny sprawdza się w terenie.
@David
Yes, they are.
@Neal
Yes, that would surely help.
Fantastic! I love Lego and Land Rover, so a perfect combination. You have really inspired me to get building again, after playing with the real thing. Would an open top or truck cab with roll cage helped to keep the CoG down and improve this?
Please build a Range Rover next!
r the shock absorbers stiff
@stefanmaster96
No, never.
wow love the studless chassis, btw, do you have any problems with the xl motor when the model gets stuck because it doesn’t look like it is secured on its side, does it twist??
@simontomi
Jeep is a brand name. And your model apparently needs some reinforcement.
@Sariel
I made a buggy, but it cant even cross the doorstep, the gears always slip.
ohh, i meant that the jeep is not the brand, its the car type. but both the jeep and the land rover you built are awesome!
@simontomi
Yes, I have built a Jeep too, but this here is a Land Rover.
Hi!
Very nice jeep!
I just keep trying making a 4X4, with the off-roader suspension parts, and its almost impossible to complete! I used the 3 studs differential casings you published, thanks for that!
im using a 22t gear with the 3 studs diff. ,but whatever i do, its just keep ticking! the steering is ok, but it the car gets stuck in small snow, and ticking in one place. Id be very happy if you could help!
Thanks and thanks and thanks thanks thanks!
No nic i tak dzięki za odpowiedz.Wielu udanych prac życzę.
Pozdrawiam
@zwariowany
Niestety nie wiem, nie jestem administratorem Lugpolu.
Witam,mam pytanie odnośnie Lugpol.Czy można się tam zarejestrować bo na stronie widnieje “Rejestracja została wyłączona.” ?
@wheeler
I will, thank you.
@wheeler
Sorry to type twice but i forgot to say that you need to go to the forum and check out the top builds, simi, and all the other sections
You are really good at building these truck and I must say, you make it look easy, I’ve trial and failed. I did what to know where you got your insperation from beacuse im apart of this rc scaler website where the guys there make custom truck, simi’s, and other things. I think you would be interested in some of the trucks we make and they could give you ideas for an upcomeing build. If your interested, heres the website http://www.scale4x4rc.org
Cant wait to see what you come up with next
@Woyta
I am going to make instruction for the chassis.
Will you publish more detailed photos of axles?
Conception looks very interesting for me.
BTW For onboard recording i recomend cheap minicam MD-80.
@mientos
Nie planuję. Trudno skrzyknąć chętnych, a poza tym na mrozie baterie nam padają.
Trochę już rozgrzebuje temat land rovera ale czy na tą zimę planujesz jak to gdzieś czytałem “snow trial” ? Nie mówie oczywiście o prawdziwym wyścigu , lecz tourialu jazdy na śniegu , doboru opon itp. (gąsienice są zbyt oczywiste , opony to wyzwanie)
Wolałbym bez dyferencjałów ale skoro się nie da to kupię je na bricklink zrobię przekładnie i będzie ubaw w zimę.
@Marq
Da się: http://sariel.pl/2009/01/subtractor/
Jeszcze jedno pytanie odnośnie gąsienic. Czy przy użyciu silników XL i M (niestety po jednym) da się zrobić podwozie z gąsienic do czołgu czy czegoś innego? Chodzi mi o to że mam zdalne sterowanie + te silniki i nie wiem jak zrobić przekładnię do jazdy prawa,lewa i obie gąsienice bez użycia 2 Xl motor lub dyferencjałów. Najprościej by było zrobić coś na kształt transportera niemieckiego z 2WŚ. LINK(http://wiadomosci.ox.pl/files/edit/Image/piknik_mil2.jpg)
dziękuję za informacje
@Marq
1. Oczywiście że się zmienia.
3. Miejsca w których jeździmy są uzgadniane tak, żeby pasowały większej ilości osób, w tym również takim które przyjeżdżają spoza Warszawy. Właściwym miejscem do takich ustaleń jest Lugpol, a nie moja strona.
Mam kilka pytań odnośnie tras truck trial:
1.trasa jest zawsze ta sama czy się zmienia
2.jeżeli się nie zmienia to gdzie ta trasa jest (pocodzę z warszawy więc raczej się odnajdę)
3.jeżeli trasy się zmieniają to proponuje pewne miejsce (można sprawdzic na mapa szukacz): wpisujemy ulicę dolną 37 jest to blok za którym jest jeziorko. Po jednej stonie stawu jest urwisko a po drugiej polana. Na tym urwisku jest trasa do rowerowego downhillu . Oczywiście znajdą się korzenie i inne przeszkody jednak zawody uphill jako jeden z odcinków to bardzo dobry pomysł. Trasę sam przetestowałem. Byłbym szczęśliwy gdyby zawody się tam odbywały gdyż pomagałem w budowie jednak moje zainteresowania zmienił sie na lego.
Land rower jak się patrzy, moim zdaniem to perfekcyjna budowla
@Black_Omega63
Thank you.
1. I’m using half-stud wide beams in between.
2. Yes, it is possible. Such vehicles actually exist, few as they are. For instance the Gama Goat or the Mercedes Hexawheel.
Hi Sariel,
I looked at this project and was astounded at the complexity and realistic features of this model and all the others before it! All your work is made to the highest standard and think you are a fantastic builder. All the mechanisms and gearboxes and pneumatics leaves me amazed!
However, I have two questions.
1. How do you get the even measurements of the bricks (2 studs, 4 studs, 6 studs, etc) to fit the odd measurements of the studless beams (3 studs/holes, 5 studs/holes, 7 studs holes, etc)?
2. Would it be possible to make a vehicle with articulated steering as well as normal steering (rack and pinion, etc) to make the vehicle’s turning very tight?
Once again I congratulate you on your fantastic building skills and look forward to seeing more creations in the future!
See ya, Black_Omega63
You know that Zil with 4ws made me think. Maybe it’s a good approach to build a vehicle with 4wd and 4ws as well, with identical fron-rear suspension-drive-steering structure. If you can balance out the weight distribution to nearly 50-50 % it might be competition for the others.
Every time You build a trial vehicle I’m more and more interested into building one of my own.
@Emil
Of course I have.
The monster truck I was referring to:
http://www.4x4offroads.com/image-files/land-rover-60-years-anniversary-342.jpg
The aesthetics are incredible! It always amazes me how you mange to build such aesthetically realistic models in such little time. The wheels look a bit big though, as does the ground clearance. It looks half way between a defender and a land rover monster truck.
I personally find truck trial vehicles a bit boring; they tend to be built mainly for performance, so gearboxes, differentials, differential-locks and realistic suspension are rarely needed.
Hi Sariel
Do you use any technic brick?
-Emil
@jason b
I’m not interested.
do you think it looks more like a modern 90”.
hey sariel,
what do you think about buildind that TDV6 discovery 4
Lego Torsen differentials are about half of this model’s size.
i not know much about lego models but i think that you should fit it with torsen diffs all round could help alot – i whacted the truck trial videos and it does slip alot.
love the series 2, like also the detail (i new here)
@Emil
Err… they stabilize the whole suspension?
Hi Sariel
What does the shockabsorber really do?
Hey, do you think you could make a video showing just the internals such as the chassis for instance. I’m very intrigued by simply just the aesthetics and would love to build something from that base or even the same model.
@TheTechnicator
No, the suspension doesn’t need to be the same type as the real one.
Just a quick question about truck trial that i couldn’t find on the net
Do you need to use realistic suspension as in the same as the real thing because i see your land rover effectively has live axels like the real thing. im thinking of building a PUMA 6×6 from the italian army and think independant suspension takes up to much space
it’s also a matter of how much load you have to move if you need to move the wheels under great weight then you need to put the cog wheel closer to the motor as you said so it won’t slip easily but when you have a light mechanism that don’t require great torque to move it then it is fine to put the wheel in the latter pair of gears, again depending on how much load there is or torque required in the mechanism, as there is simply a specific torque required to get the cog to spin on blank
@cbhs
Of course it’s better to put the clutch gear closer to the motor. If you put it close to the rack, it will slip too easily. And the gear ratio in steering mechanism I’m using is more or less constant and close to 9:1.
Hi, just wondering how you decide how much to gear down the motor that controls the steering? Ie. do you just ‘trial and error’ gear combinations until you find a good compromise between torque and time for the the wheels to turn completely?
Also, I assume you use a white 24t clutch cog somewhere in this steering transmission to save the motor [from stalling] when the wheels are turned to full extent, my question is: is it better to put the 24t clutch cog ‘closer’ to the input (motor) or output (steering rack)?
Thank you for answering my questions (and so promptly at that!).
@cbhs
I don’t feel convinced about these tags. I’m using the turntables very often and the hailfire droid wheels very seldom, and besides there is a number of Lego parts that are even more unique and interesting, and I don’t want to end up with my tag cloud including hundreds of parts or with tags for each post close to actual parts list.
Yes, the shifting center of gravity is an interesting idea, but it required a lot of internal space and makes the construction of frame much more complicated. I tend to look for solutions at the suspension level, by developing very stable suspension systems or suspensions with adjustable ground clearance.
Hi, just a couple of suggestions if they are welcome?
I think you should have tags for ‘turntable’ and ‘hailfire’. I think both are very interesting parts.
Also, I notice you often mention your models have issues with centre of gravity beeing too far forward or back – have you considered having a variable centre of gravity on some of your vehicles (especially your truck trial)? For example, having the ballast (be it the battery box or actual ballast bricks) on some sort of rack that could be remotely moved (by say a PF M motor) along the length of the vehicle. I did something simila (but laterally) on my 4511 train set as a kid so that it could go around corners at top speed without toppling over.
Let me know what you think on all of my suggestions. Thank you – and great website!
i like it and i made your jeep Rubicon and i did it kind of wrong also i wish u could make more instructions on more sets. and i know that it takes longer to make the instructions but i would like it if u can
@will
81.6 mm wheels.
@Sariel
OK and good luck in the race!
what wheels are you using
@gogolego
I think I will make instructions at least for the chassis, because it’s technically superior to the Wrangler’s one. But still, I’d like to see how it performs in the last race on October, with reduced weight.
On your facebook page you commented that you were thinking about making instructions for your Landrover if it performed well. So I just want to know what your final decision is of the instructions.
@puredeath
If you watch the video, you may actually notice that it’s been used in Truck Trial already.
When you put the track on the rear track look like the were strained and were aout to brake the axels or at least bend them beacuse all the weight was not on the rear trackes but in between them and there apeared to be nothing above the trackes i hope when you use this in truck trial that you use the wheels and not the tracks but other than that it looks realy good
i like it. all of your recent TrTr trucks look good, but my favorite has got to be the hummer.
yesterday i finished building my first working 4WD chassis. i finally figured out how to create a decent live axle.
i still need to find a way to incorporate the 4 stud wide diff. into a pendular susp.
any tips?
absolutly brilliant is the words to describe you; very well made model and very realistic. have been atempting to make a lego landrover defender for ages and you make it seem so easy haha. i will have to try harder. once again very well done.
Quite a big problem the back chassis weight, maybe making some space under the seats by moving the steering motor to a side, and putting the battery next to it would make the weight to be more distributed, withouth having to use an open body structure, which anyway would surely be the easiest way to distribute and make that beast to improve it’s performance.
maybe u should cut some weight and build 50-50 weight distribution. just my opinion