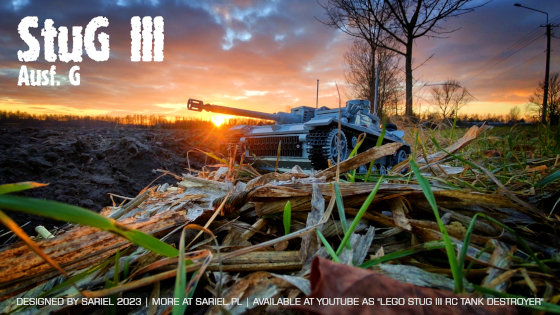
StuG III Ausf. G
Model of a German WW2 tank destroyer. Features drive, steering, motorized gun traverse and elevation, and suspension.
Datasheet:
Completion date: 14/01/2023
Power: electric (Power Functions)
Remote control: SBrick
Dimensions: length 40 studs (gun included) / width 18 studs / height 20 studs (12 studs without antennas)
Weight: 0.986 kg
Suspension: trailing arms with rubber connectors acting as springs
Propulsion: 2 x PF M motor geared 1:1
Motors: 3 x PF M, 1 x Micromotor
Stug III, originally called Gepanzerte Selbstfahrlafette für Sturmgeschütz 7.5 cm Kanone Ausführung A bis D (Sd.Kfz.142) (you gotta love German names) may not look like much, but it was actually the most produced German WW2 tracked vehicle, and second most produced German WW2 vehicle of any kind, with more than 11,000 units built. Designed in late 30’s, it entered service in 1940 as an assault cannon intended to support attacking infantry. It proved versatile enough to be continually modified (mostly by upgunning) until it evolved into a successful tank destroyer that caused severe losses to Allied armored forces. General Guderian liked it so much, he pressured German command to reduce the number of regular tanks being produced in favor of building more StuGs.
Stug’s strength was its simplicity: it was a modified Panzer III chassis with a low casemate instead of a turret, and with a total production cost equal to 1/3 that of a Tiger I. The casemate was what caught my attention, because its shape is so incredibly convoluted. Whereas later tank destroyers featured simple casemates usually built with 4 armor plates + a roof, the StuG used 10 separate plates in front armor alone, along with a collar around the gun mantlet and a convex roof that also included a complex shaping around the commander’s cupola. It’s fascinating that Germans made 11,000+ of these without trying to simplify and streamline the casemate shape.
Another funny thing about the StuG are its variants that can give any military historian a headache. StuGs went from Ausf. A to G, but between F and G there was also F/8 version, plus many subsequent changes were retroactively introduced in older variants too, and the vehicles were manufactured by several independent plants at the same time. In addition, German military plants suffered from carpet bombing and lack of materials (rubber for road wheels, for example). The final result was that e.g. when a coaxial machine gun was introduced into StuG, older StuG variants had holes drilled in their gun mantlets to accommodate it, but sometimes there were not enough machine guns and a StuG would leave the factory with an empty hole. The G variant, which was the most common, had side screens added since may 1943, but that doesn’t mean that every StuG with side screens was variant G, because the screens were mounted on some (but not all) StuGs F/8 as well, and then the screen supports proved inadequate, resulting in tendency to lose the screens in the field, which was fixed only almost a year later. To sum it up, I suspect that the easiest way to upset a military historian is to ask him to identify a specific StuG variant. Even StuG Iv, which followed the G variant, wasn’t easy to identify as it consisted of casemate from the F variant mounted on Panzer IV’s chassis.
As for my model, it was build in a little over 2 weeks, which was unusually quick for me at this point, because I needed some small leasure build after completing my Liebherr LTC 1045-3.1 mobile crane model. There are no revolutionary functions nor breakthrough solutions here, instead I focused on realistic details and experimented with a few tricks. The scale is 1/21, which was quite limiting, to the point where I would spend quite a lot of time trying to move something by 1 mm (literally – 1 mm is the thickness of the thinner side of a LEGO bracket). The model was powered by the LEGO 8878 battery, with one SBrick for remote control and with 2 PF M motors on battery’s sides driving the front sprockets with no gear reduction (believe it or not, there was no room even for a 8t gear inside). The front sprockets were made of two light gray 36t gears with nothing between them, because while these gears can’t mesh with the center of the track, I found that as long as the track tension is high, these gears can drive sides of the track just fine.
The main gun traverse was motorized by simply mounting the main gun on a Micromotor turned on its back and put inside a cradle that was tilted up and down by a PF F motor using a small linear actuator. This way I was able to fit the whole traverse & elevation mechanism inside a 4-studs wide space. The main gun’s range of motion is somewhat lower than in reality: +20° to -2° elevation (real StuG: +20° to -7°) and +/- 10° traverse (real StuG: +/- 15°), but it could be improved if the gun mantlet and casemate around it were reduced. As for the gun mantlet, I went with an older version rather than the newer and more iconic Saukopf (pig’s head), because the Saukopf would be difficult to model at such small scale and because I expect to build another German WW2 tank destroyer in the future, and many of these were equipped with Saukopf mantlet only, with no alternatives, so I expected to build it eventually anyway. Because of the Micromotor directly moving the gun, the gun traverse worked too fast, but SBrick made it possible to adjust the speed. The gun was tipped by a light gray LEGO minifigure lantern mimicking the muzzle brake. I was tempted to cut the handle off the lantern to mount it to the gun in a more direct way, but I resisted. It would be great if the lantern’s handle was removable the way a LEGO bucket’s handle is.
The model drove reasonably fast but with little torque, as the drive motors were ungeared due to the lack of space inside. Besides, the model suffered from poor traction due to its low weight and to the tracks being somewhat wider than they should according to scale). Low weight also affected the suspension, which was built by using axles held at 45° between a LEGO pin and a rubber connector which would compress under load, acting as a spring. With 12 suspension units, the average load on a single suspension unit was just 82 grams – I had hamsters that were heavier than that, and because of that it was difficult to notice that the suspension is actually working.
I’ve enjoyed building this model tremendously, even despite a few compromises (e.g. side walls were straight instead of tapering and the towing cables were made of genuine LEGO strings, which didn’t look quite right). It was a nice exercise between larger, more ambitious projects.


