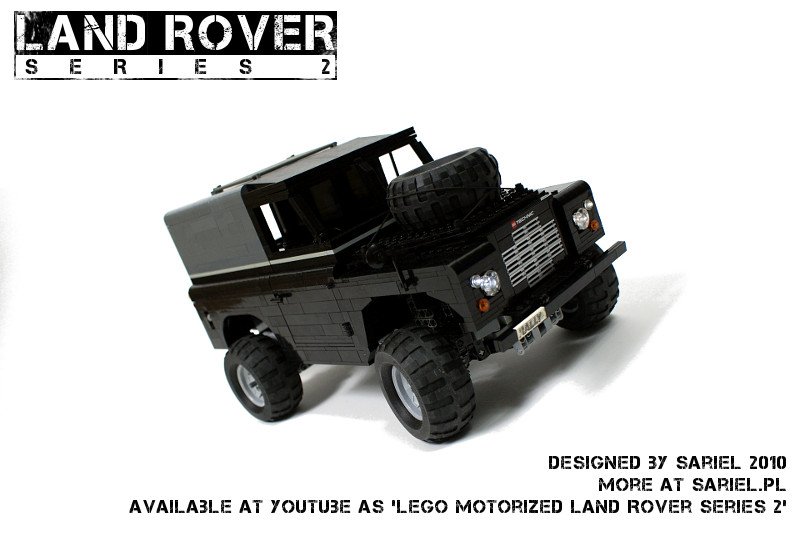
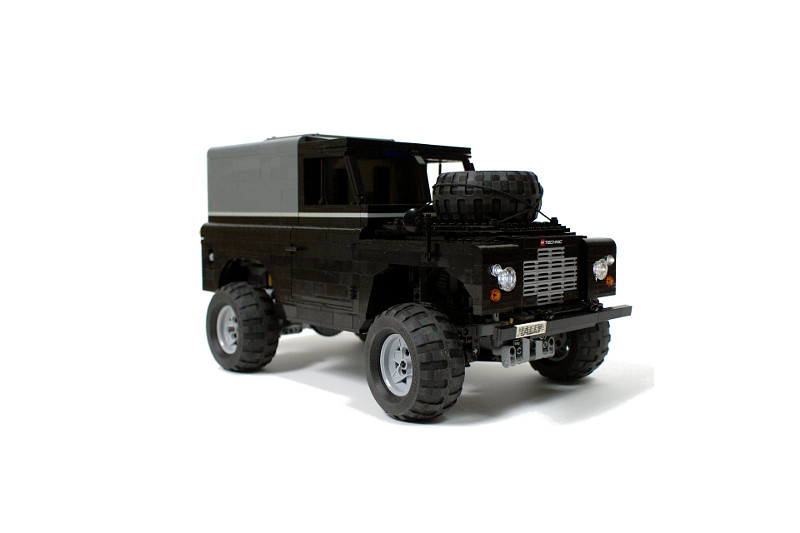
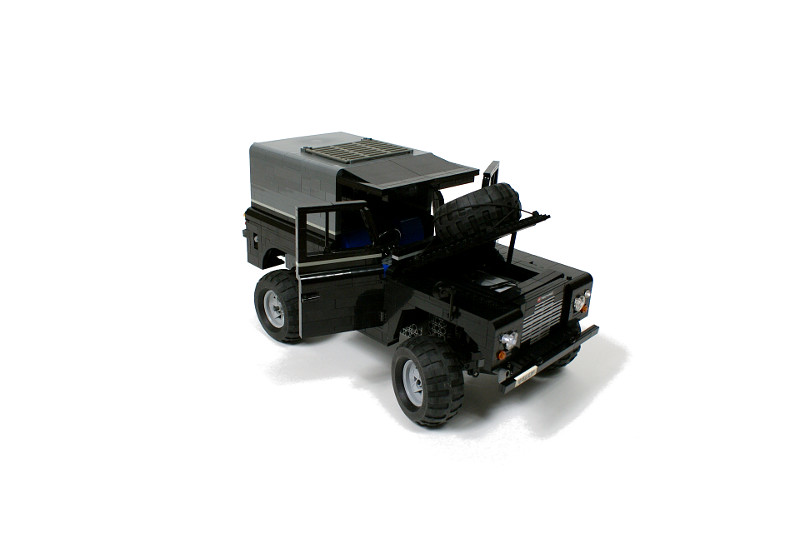
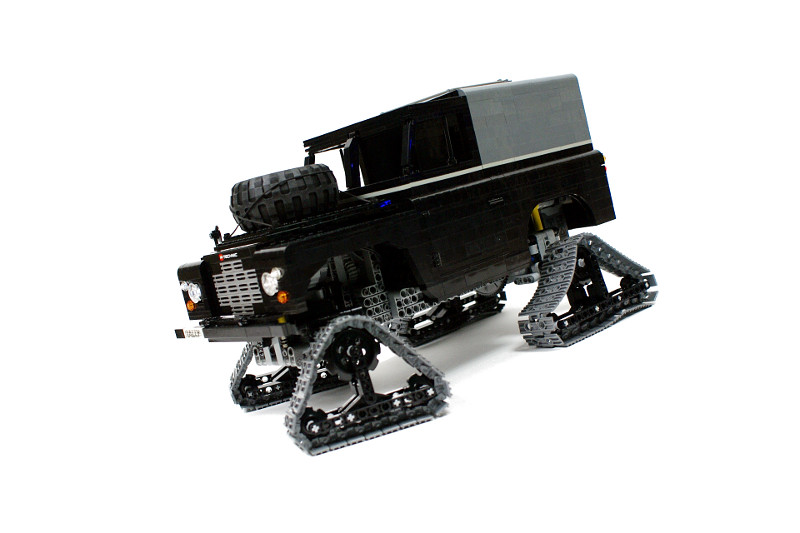
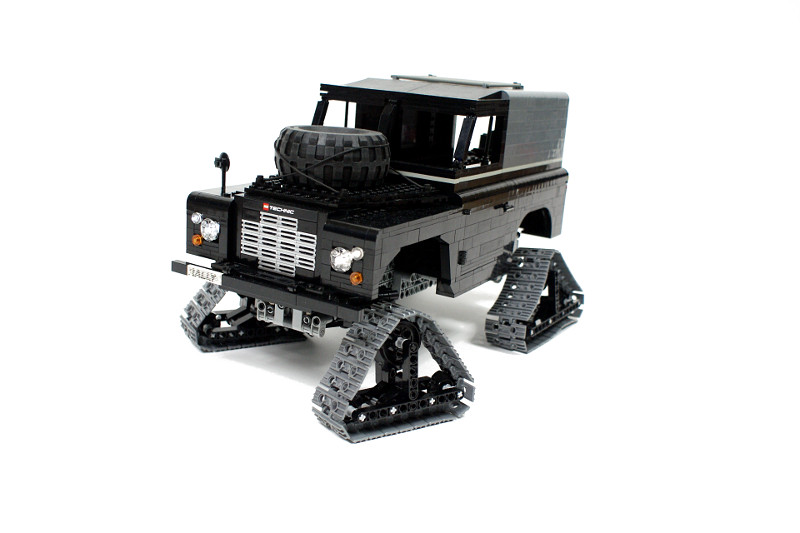
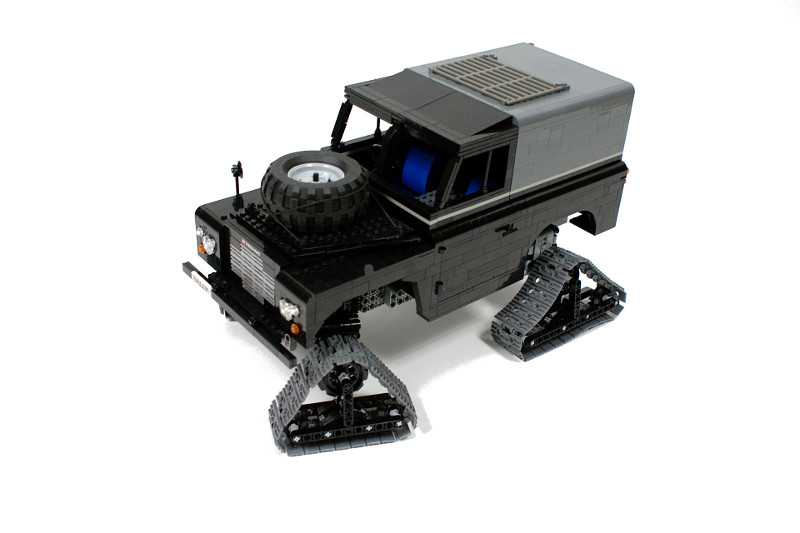
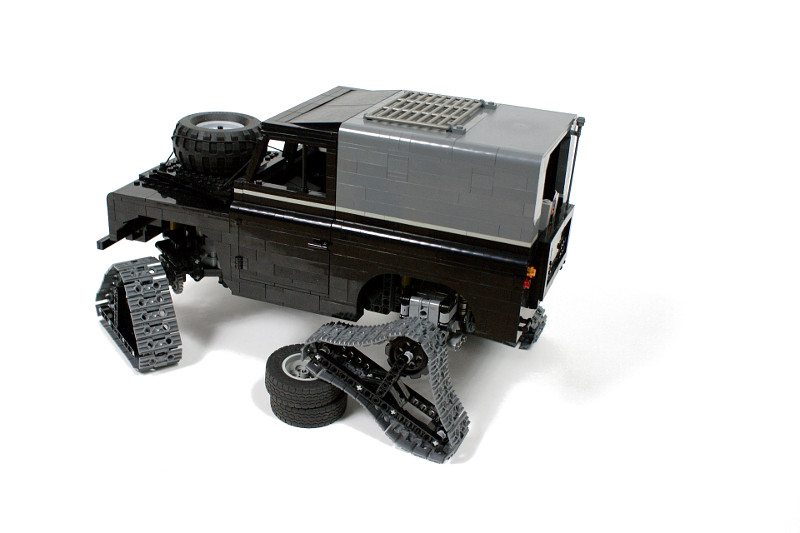
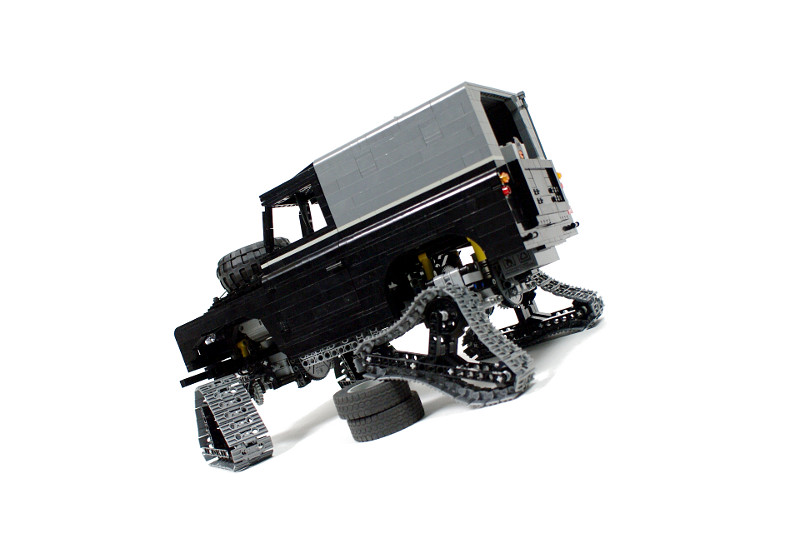
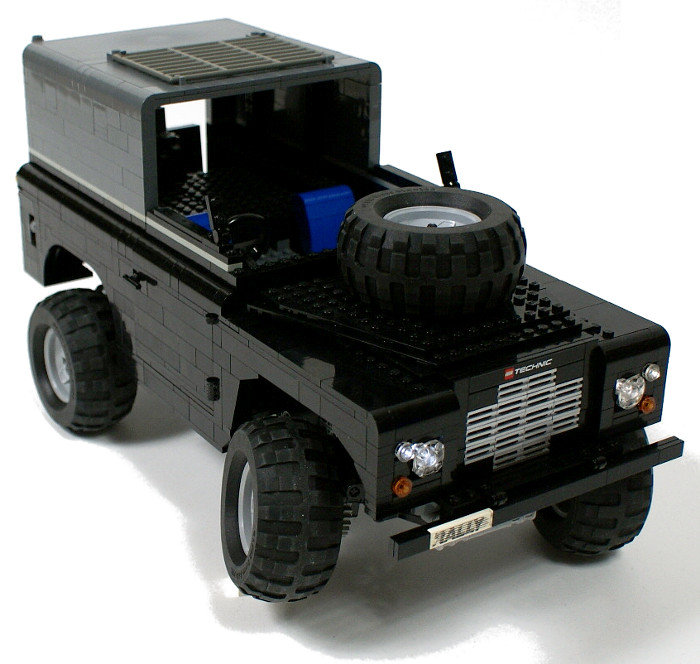
Land Rover series 2
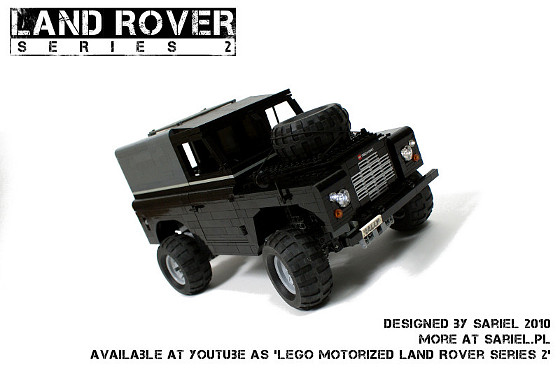
My final 2010 Truck Trial vehicle, built in less than single week after the previous vehicle failed. Features full pendular suspension, 4×4 drive, lights and opening doors, bonnet and rear board.
Datasheet:
Completion date: 03/09/2010
Power: electric (Power Functions)
Dimensions: length 48 studs / width 26 studs / height 27 studs
Weight: 1.985 kg (1.726 kg in roofless version)
Suspension: pendular, stabilized with shock absorbers
Propulsion: 1 x PF XL motor geared down 5:1
Top speed: 0.8 kmph in roofless version
Motors: 1 x PF XL, 1 x PF Medium
When I decided to abandon my Fiat SPA35 model, it was just a week before the Truck Trial race and my first decision was to pass on driving this time and to only take care of filming. Shortly after, I changed my mind and decided to try some simple 4×4 vehicle, just to drive something in the race. The vehicle was intended to combine the advantages of my two previous Truck Trial vehicles – Hummer H1 and Jeep Wrangler Rubicon, while also learning from Fiat’s failure. I wanted to try to model another famous 4×4 vehicle, so the classic Land Rover series 2 (dating all the way back to 1958) was pretty much an obvious choice.
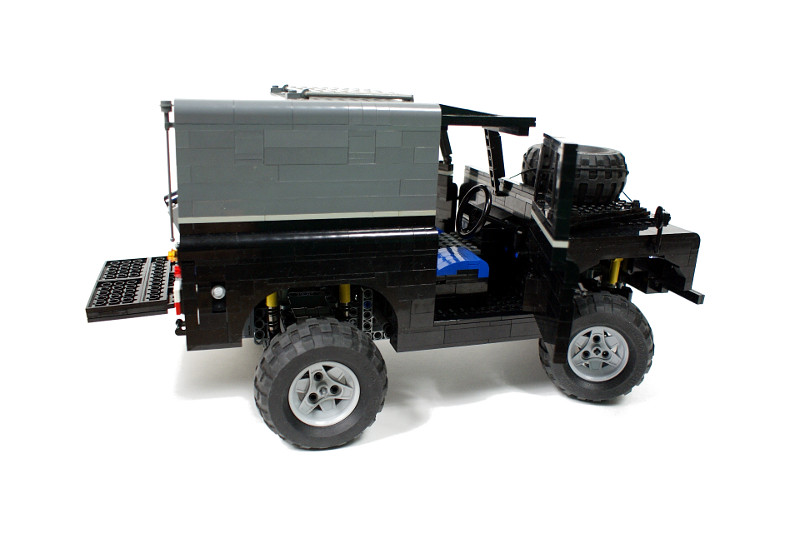
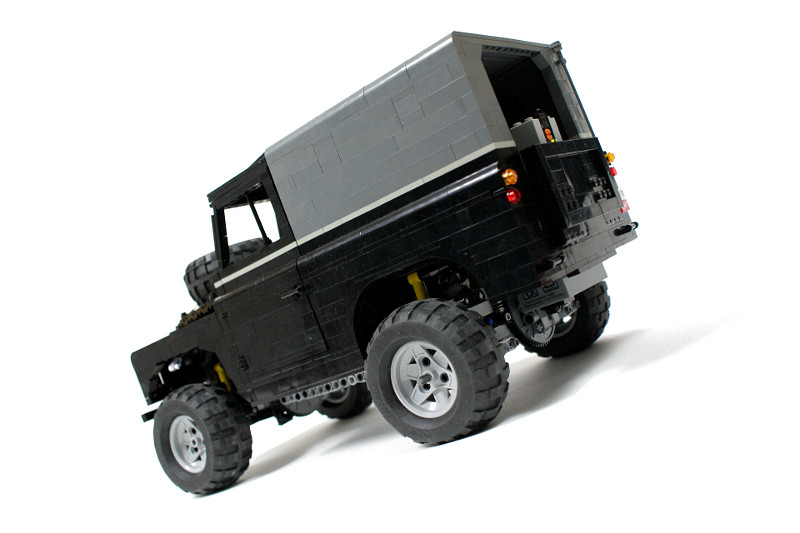
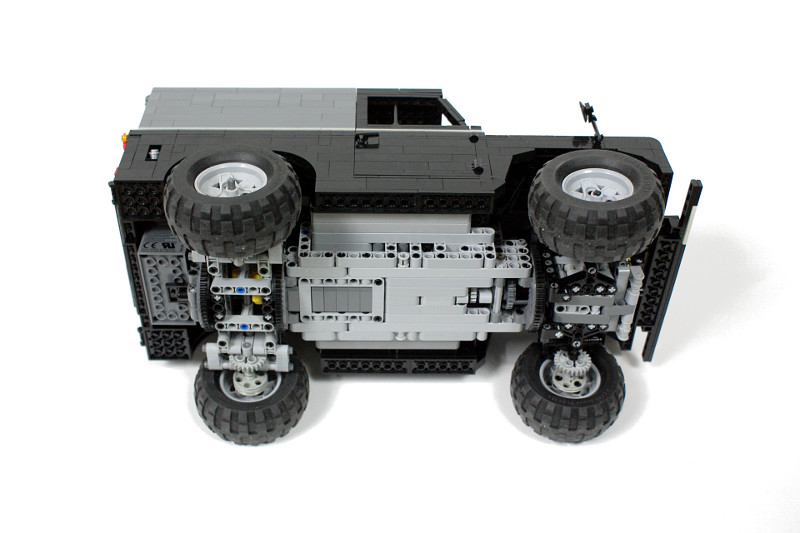
While the complete model appears much like a Hummer/Wrangled hybrid on the outside, it was internally much closer to the Fiat model. The chassis was built completely with studless parts and used large Technic turntables to hold suspension modules in place – both solutions tested in the Fiat for the first time. The Land Rover shared engine location, gear ratio and wheels with the Wrangler and a studfull body with the Hummer. In fact, the Rover used studfull body around a studless chassis, whereas Wrangler used studless body around a studfull chassis.
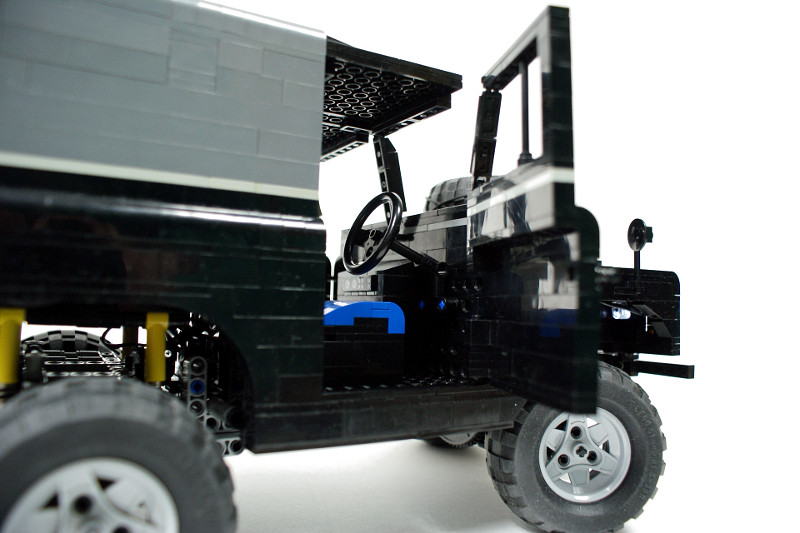
The suspension has undergone some major changes in comparison to the version used in Fiat. The front axle was reverted to the version used in the Wrangler, and then a single turntable was attached behind it and the steering system was additionally reinforced. Both drive and steering were transferred through the turntable – steering by a solid driveshaft and steering by am empty differential sitting on it. The rear axle was built from a scratch between two turntables. There was no gearbox, and – just like in the Wrangler – the drive motor was located above the front axle, right under the bonnet. The racing rules we use state that every model has to be equipped with a piston engine of accurate configuration and placement, unless the actual drive motor is located where the original engine is. Thus, locating the motor under the bonnet meant that no piston engine was needed in the model, which saved space, weight and drive motor’s power. The steering was controlled by a single PF Medium motor geared down 15:1 and located low in the chassis, in front of the rear axle. The entire underside of the chassis was covered with studless parts, in order to create a single smooth surface that was unlikely to get stuck on an obstacle, and in order to lower the centre of gravity as well.
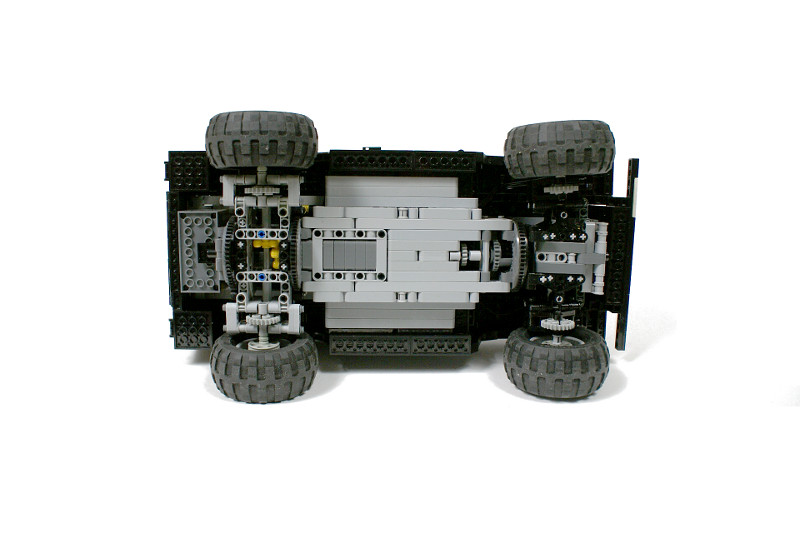
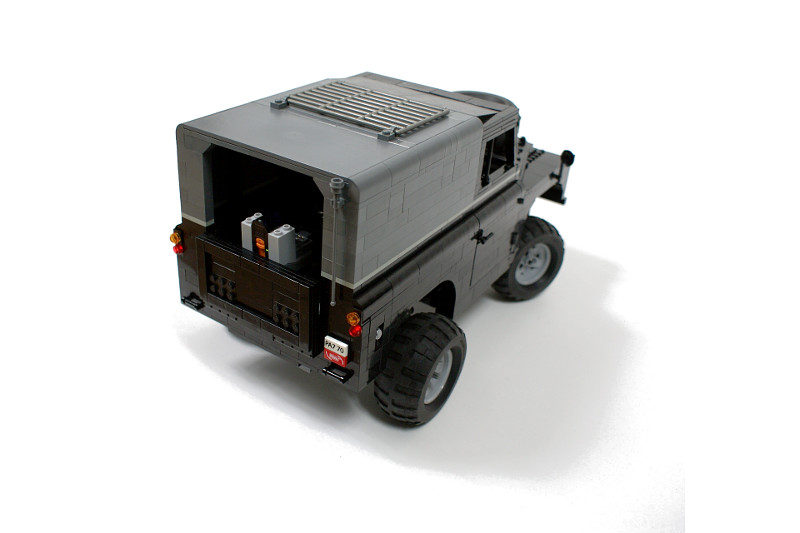
Knowing that my Wrangler model had abundance of torque, I wanted the Rover to be much heavier. Our racing rules take power-to-weight ratio of each individual model into account, therefore more weight at the same power means more points. Thus, I wanted the body to be massive, but at the same time it was my goal to keep the model’s centre of gravity low, despite its significant ground clearance (up to 7 studs under cabin’s floor). Therefore especially the lower portion of the body was built so densely that model came out almost undamaged from some crash tests I conducted later.
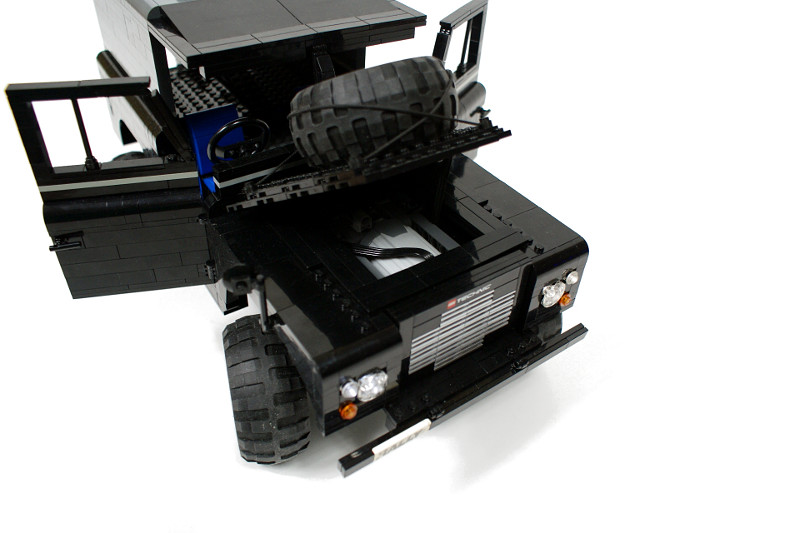
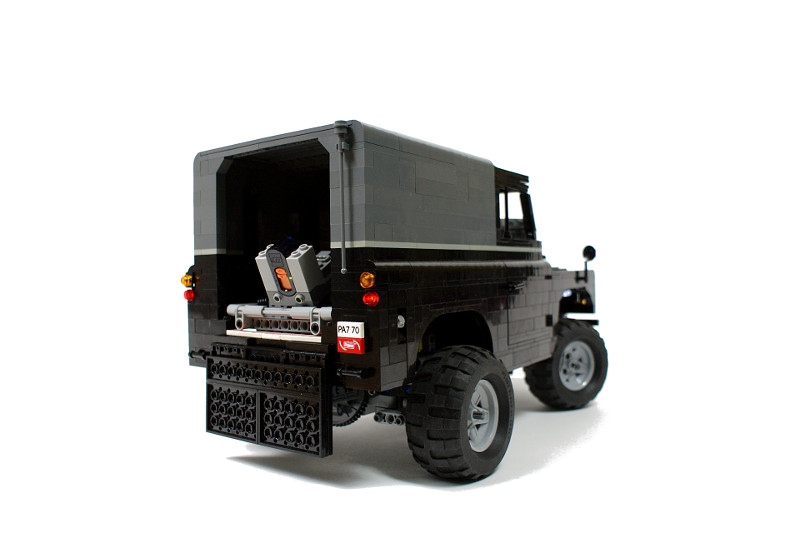
The body was equipped with a pair of opening doors, an opening bonnet with a spare wheel fixed on top of it (a common sight in early Land Rover versions), and opening rear board with the IR receiver attached to it. Most of the Land Rovers can be accessed from the back by a single door, and a board is a rarity. I chose the board over door because this way the IR receiver was more exposed, and could be pulled out from the cabin’s inside to some extend if needed. Moreover, the rear part of the cabin has been adapted to house a camera. Due to weak mounting points, this solution worked well only on flat, level surfaces, as proven during the race.
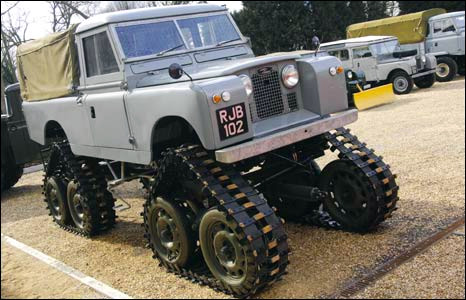
It should be noted that the model’s body was inaccurate: the front radiator grille should be put further back under the bonnet. I couldn’t model it because of the frame that braces the suspension module of the front axle. Moreover, inspired by the Inception movie featuring a tracked Hummer H1, I have created a simple set of four tracks for the Land Rover. The tracks and wheels could be easily swapped in the chassis, and while I did not intend to use the tracks outdoors (our racing rules don’t allow tracked vehicles of any kind), I have used these to drive around my apartment. The general performance was apparently inferior with tracks on, and in particular the traction was much worse than it was with wheels.
The completed model weighed a whopping 2.1 kg until I removed ballasted bricks that were mounted under the bonnet in order to shift the centre of gravity forward. It reduced model’s weight to just below 2 kg, and I decided to leave it like that because there was no time left for changes. The model performed well at this weight, it experienced no mechanical failures and displayed superb traction, but it was obvious that it will be struggling against its own weight.
Land Rover was warmly welcomed by other contestants because of its look and its very short building time. It performed well in the race, no mechanical failures occurred, but its weight turned out to be a real problem. The model ran out of power to climb on several occasions, and toppled over once. It ended up at the last place in the race, much to my disappointment. Yet still, other drivers and viewers were greatly impressed by its look, which led me to believe that it would be a waste to take it apart, and that the model should enter our last 2010 race on October, with open body design that should significantly reduce its weight.
Photos:


Work In Progress photos:


@CJ
This is not a kit. It’s my own creation and you can’t buy it, sorry.
Found this site randomly. Where do you buy a kit like this? My husband would love to do something like this and is in love with Land Rover Defenders. How do you get started in building these and where can I buy these kits to start? Thanks.
@Luca
No need to be sorry, I just think it this is the best solution to your problem 🙂 It’s easy to past photos on EB, and many people will be able to answer you.
I’m sorry Paul, until now I knew only your website because I build Lego without watching any site. I thank you for your advice and I’ll sign up to Eurobricks.
Good work for your future projects.
Thanks.
@Sariel
@Luca
Time is not the problem, I just don’t see how I can help you. It really all comes down to me designing the suspension for you – which is difficult because of communication and a number of other things. I believe your best option would be to start topic at Eurobricks, for example, where you can post photos of your work and ask for help. Did you try that?
Paul, I’m a lego builder too, and I have a question for you: I want to build a Lego version of the Land Rover Defender 90, reproducing the real mechanical parts. Particularly I want to build the rigid axle suspension system with differential lock (in front of the car with steering), like the real Defender, not using the indipendent suspension system. I have problems with steering because the axle-shaft reach out and shorten when the wheel turn. I’ve done a lot of experiments and one was successful, but it was bulky. Could you help me ? Which lego pieces have I to use ? (if you have time for my question, can you send me the codes of the pieces I have to use ?).
Thanks
P.S.: I asked you the codes because I’ll be able to buy them to bricklink. But do you have an e-mail where I can send you the photos of my work ?
@Reinhard
No, but I’m planning on building Defender.
Cool Land Rover!
Do you think you could make the Land Rover DC 100 Concept, I wanted to make one but it failed horribly! 🙁
I really love your car and you did more than a great job! Well done 😉
@Ev3fan
Listen, any sort of a lockable differential will make your truck extremely wide, and any gain from a lockable differential will be completely, utterly negligible. These are small, light models we’re talking about, not real life vehicles. People like you typically make their first TrTr vehicle full of fancy stuff like that. Two or three vehicles later they learn that simplicity is the key.
But with portal axles you could reduce the strain on the diffs and if you managed to fit a M motor Inside the axles you could make ( at least the rear axle ) electrically locked. And if you didn’t lose power to friction in corners ( which gets even more with increasing grip ) your vehicles also might be faster.
@Ev3fan
Most people with no experience in Truck Trial think like you. It changes when you get some experience. Pneumatically lockable diffs are big, complicated and fragile. And a gearbox in TrTr is there to make sure you have more torque when needed, not to make differences in speed.
Pretty nice vehicle! But i still don’t like the idea to use knob wheels instead of a lockable diff and wasting motor power on friction while turning. If I’d try to build something like this I’d use pneumatically lockable diffs with portal axles.And why do you always use a gearbox in your TT models? I can’t See a real difference at speed in your videos.so to me that would be unnecessary extra weight. I’d use the motor used for shifting in your models for locking the diffs remotely
@Witherley
Best value for money would be to just use the Bricklink to buy the individual pieces.
Hello! Inspired by this, I’d like to build a sturdy off-road vehicle as well. I don’t have any of the right pieces to build one though (especially not large off-road wheels). What sets would it be a good idea to buy for useful pieces, that are the best value for money? Thanks! 🙂
hey figured out that softer suspention can really help when crawling over things
ya that’s what I mean
@Zach
I guess you mean the differential.
What is the thing on step 32 that goes into the turntable gear?
Thanks anyway @Sariel
@Lego brick
Sorry to hear that. There are plenty of instructions for suspension systems, gearboxes, chassis and building strong, I thought that’s what you need for a 4×4 truck.
I got your book a month ago it had a lot of good tips but not the ones I need
@Lego brick
I have tons of tips in my book.
Do you have any tips for a 4×4 truck
Built the chassis, bought your book, but struggling to build the body for it? Any help? Also, i can’t access the images on this article to see your work in progress photos.
@bob
I have no idea.
who do you think is the best truck trial builder?
@Sariel
Oh so it works. That’s good. I guess the springs are more flexible than i thought.
@Zaxash
It’s a concept you’re not understanding. Build it, and you’ll see how it works.
I’ve downloaded the instructions for this model’s chassis for ideas and stuff and then realized it looked like the suspension system is completely useless in the front because the shocks can’t tilt at all and aren’t free. If you look at it you might be able to understand what I’m saying. Is it supposed to be like that, of is it a concept I’m not understanding? I’d love it if you could help me. Thanks in advance!
@SteveWandel
Yes.
Am I correct if the suspension parts from the Crawler 9398 (and some others) set could be used to simplify the suspension? Looks like its got similar gearing down on the axles between the wheels and the “differential”
@Ricardo Batista
No, I don’t, sorry.
Hello Sariel, i’m a huge fan of your work, Love all them, And everything that is about Land Rover Love more And more, because i am a great fan of Legos And Land Rover.
I have download the instructions of this LR series 2, but couldnt find the Parts list And body instructions, do you have them In your site??
Thanks And keep up the Good work!!
@Sariel
Ok, thanks; I’ll try XD
@gabry
If you rub the wheels strong enough, they surely will be clean.
@Sariel
I also do it, but sometimes the tires aren’t so clear as I’d want. Can you give me any tips?
@gabry
A brush and water usually suffices.
I have a little question: how do you usually wash the tires of your trial trucks (if you do it)?
Really cool! But if you put the battery box in the centre of the car it should have a better stability (sorry for my bad English, I’m italian…)
Isn’t it too stiff in steering?
It’s really a great model, i respect you:-)
@RR1993
No.
Hi, wow what an excellent creations, can you please send me the instructions please?
Simply stunning, man!
@Carlos
You should check the Downloads section.
Hello, I have a Land Rover serie IIA and I would like to build a lego land rover like you did, so please can you give the instrutions for the model?
Best regards
Carlos Camacho
@Sariel
i will 😉
@Ben
Thank you. Have fun.
@Sariel
parts just arrived a couple of days ago so i built the rest of the chassis and it is AMAZING!!
thanks for making the instructions it is really apreciated 😉
@Ben
The best idea would be to buy the missing pieces, for example at Bricklink.
Hi Sariel,
i have just finished building the rear drive axle of this car and i am really impressed with it.
i was planning on building the front of it aswell but i cent because i only have 4 of the 2905 peice and i cannot find any other way of building front wheel drive.
any websites i could look at or ideas?
Ben
very good struture although fist time trying it the thing broke not best pleasd
@woody
2. Because I don’t want to.
3. Yes, I’m from Poland. Hence the “.pl” in this website’s address, you know.
1.nice!
2.why you don`t make instruction for body?
3.are you from poland?
@Rochan
No.
I wanted to know whether you could give me the dimensions of the Basic Land Rover chassis
@master2708
With all due respect, driving on a carpet has nothing to do with off-road performance. Nothing – not even remotely close. Trust me – been there, done that.
@master2708
I’m not offended, I simply know what differentials do to the off-road performance. They simply kill it. Try and you will see.
@Sariel
I strongly disagree. Anyway, I didn’t mean to offend you, cause I sincerely admire your work and maybe I’ve exaggerated a little bit my disappointment.
Keep building 😉
@master2708
To tell you the truth, my rack stays in place, I never glued a thing. And crappy turning without differentials is still way better than getting stuck on every possible obstacle with differentials.
I have to say that it’s a pretty curious construction, but it has several drawbacks. First of all, because it has no differentials, the turning is crappy as hell. This in turn causes the gear rack change its place, unless glued. What is more, the suspension idea is also hopeless. Therefore, to tell you the truth, I expected something more and I must say, that I’m really disappointed. The only satisfaction I got, was the fact, that I managed to combine this chassis with your 2-speed heavy duty linear gearbox (although controlled manually) and it was fantastic experience for me.
Best regards master2708
@chris henningsen
English?
hej kan i vise meg om en video vån man byker Land Rover series 2
@Ozzman
No. You will have to be creative with the body.
Hi Sariel
Do you not have the rest of the Land Rover S2 instructions?
I can only find the chassis.
Fantastic!
@Felix
Check the Downloads section, the instruction is already there.
Hi Sariel
can you publish the instructions for Land Rover series 2 please?
thanks Felix
@Felix
English please.
Hallo Sariel,
kanst du mal bitte eine Anleitung für den Land Rover Serie 2 reinstellen?
Würde mich sehr freuen.
thx Felix
stokrotne dzięki
;]
@Michał
Myślę że w przedziale 500-1000 zł. Gdybyś dobrze poszukał i kupił tylko używane części, myślę że mógłbyś zejść poniżej 500.
Ile kasy mniej więcej kosztowało Cię jego zrobienie?
@Cars2cool Interested! im in AZ however….
@Mike Doiron
No, I don’t sell anything.
Ser “2” that should have indicated… thanks
This Ser @ is great, are any “kits” created for sale btw ?
mike
oh, ok. I see, thanks anyway
@Cars2cool
It’a hard for me to help you, honestly, because I do none of the things you’ve mentioned. Here, we simply have a single person who organizes the whole thing and acts as a judge for the race, sets up the course and calls dates and places to meet.