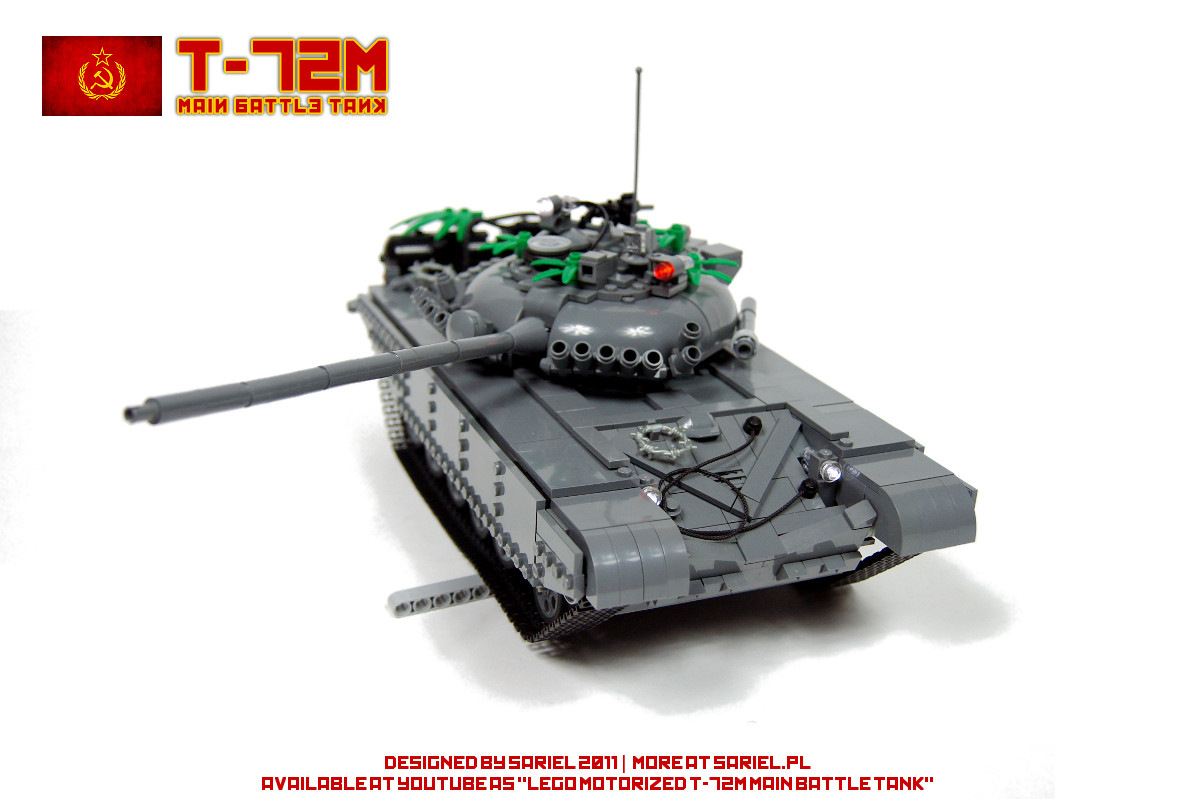
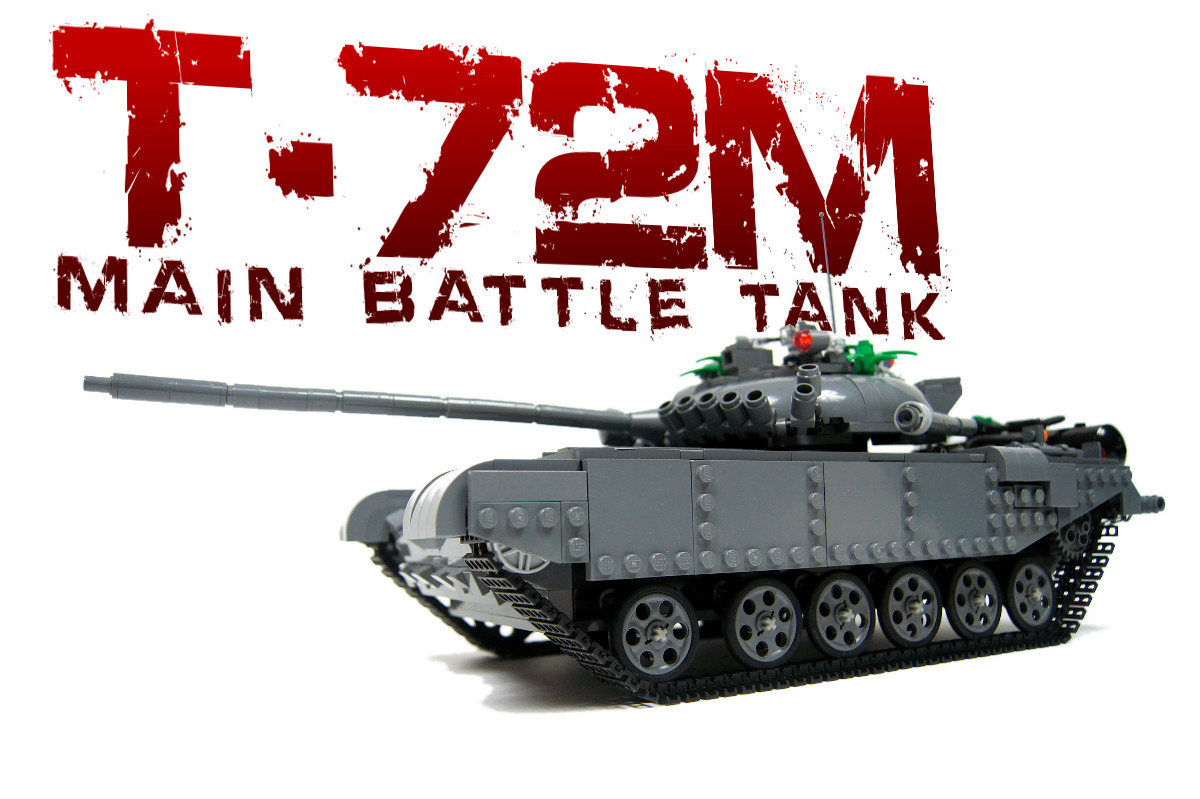
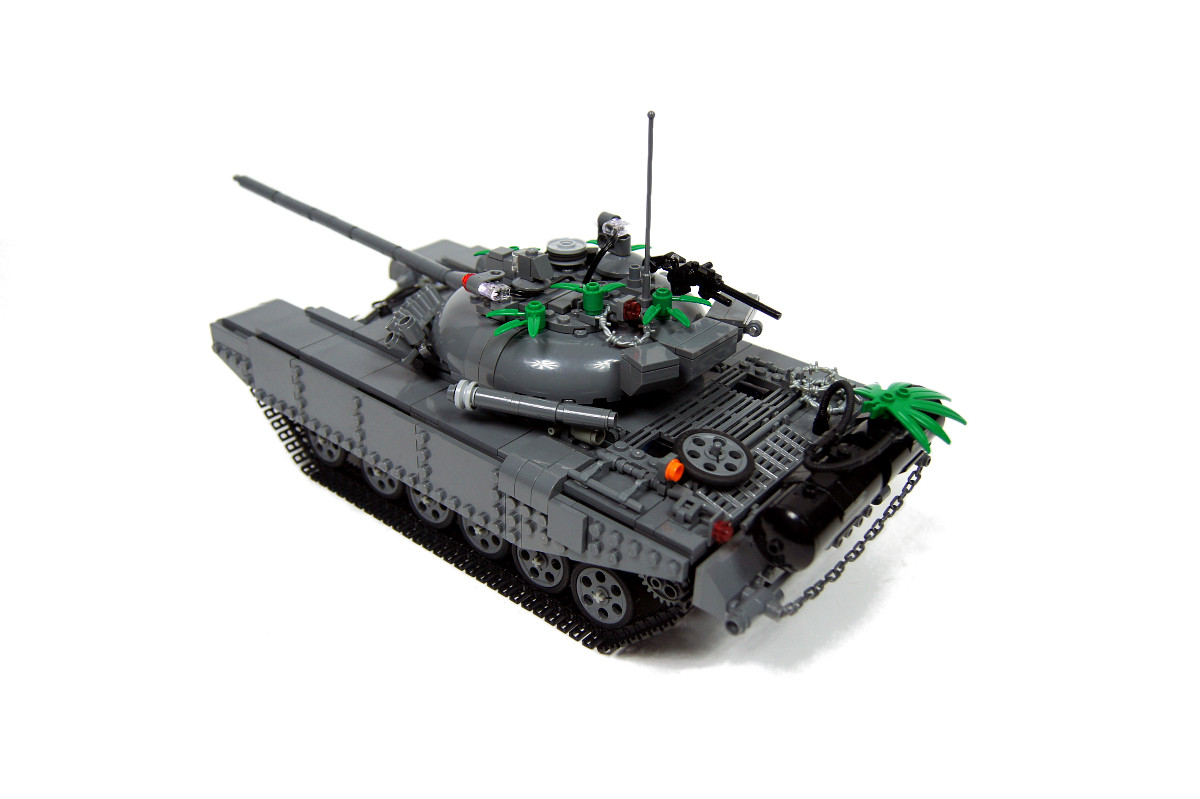
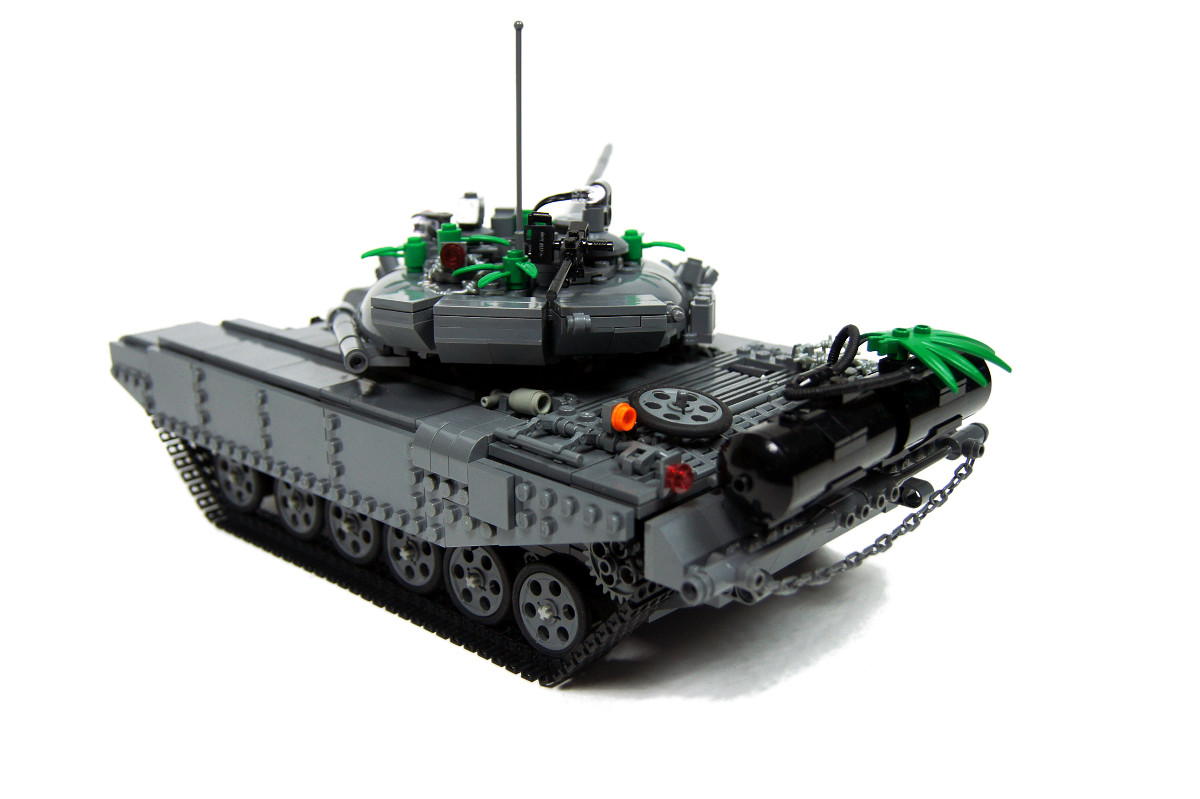
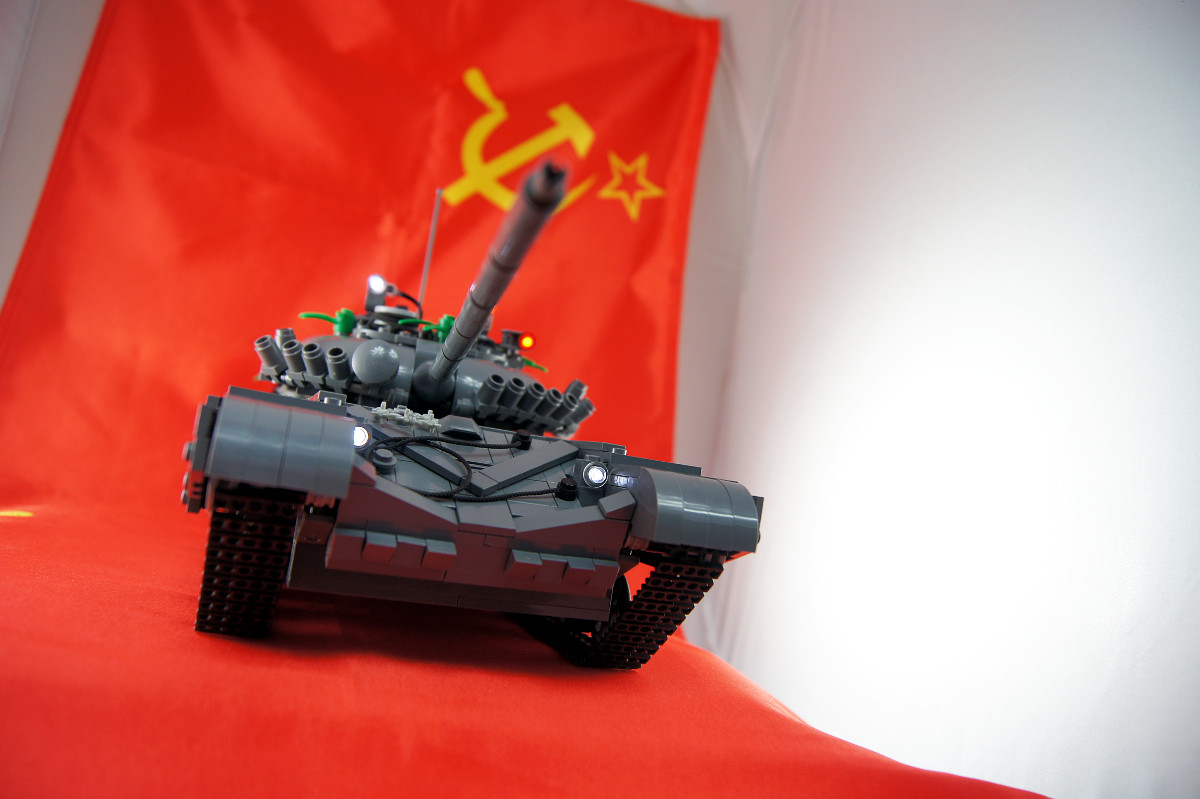
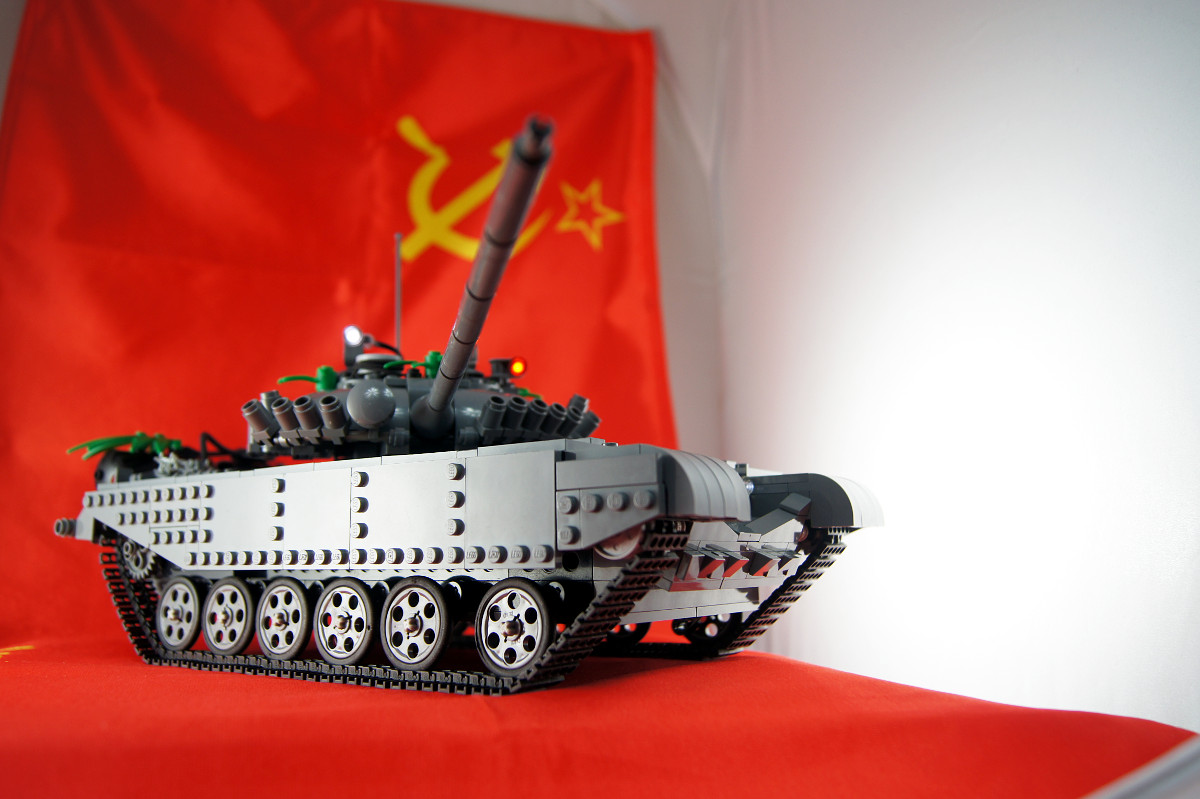
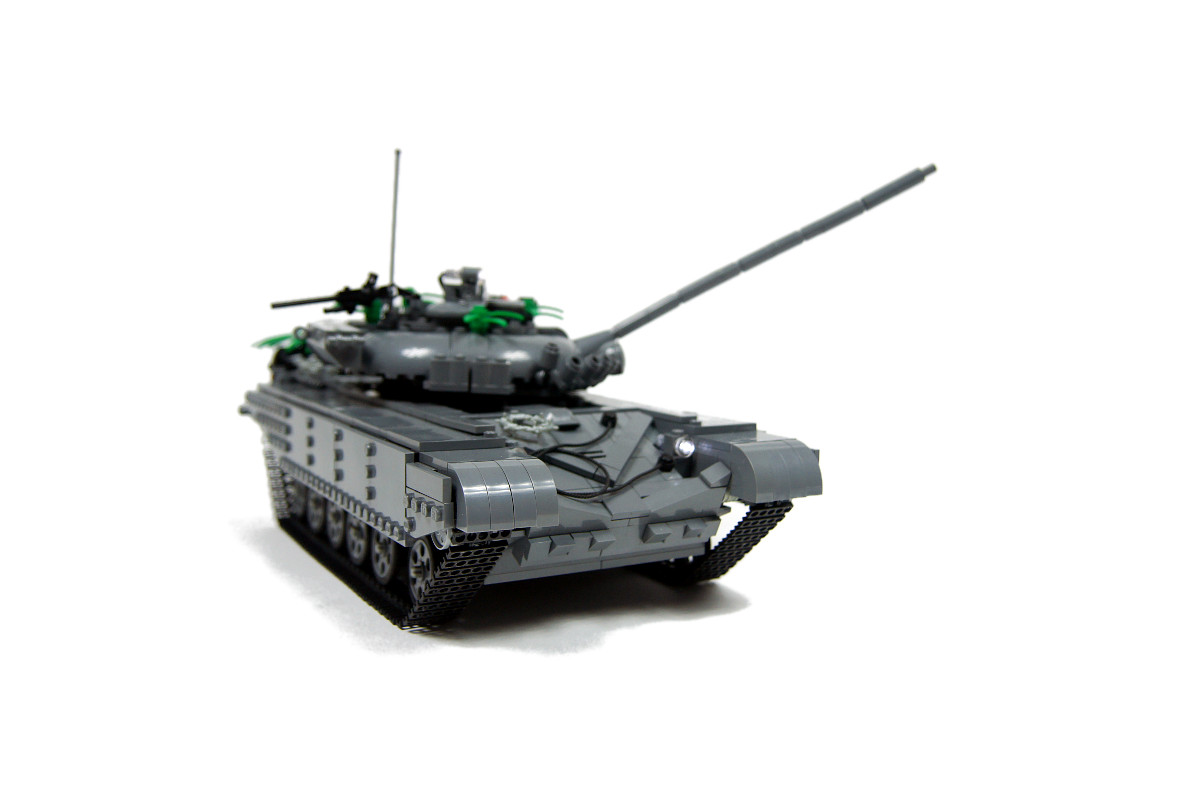
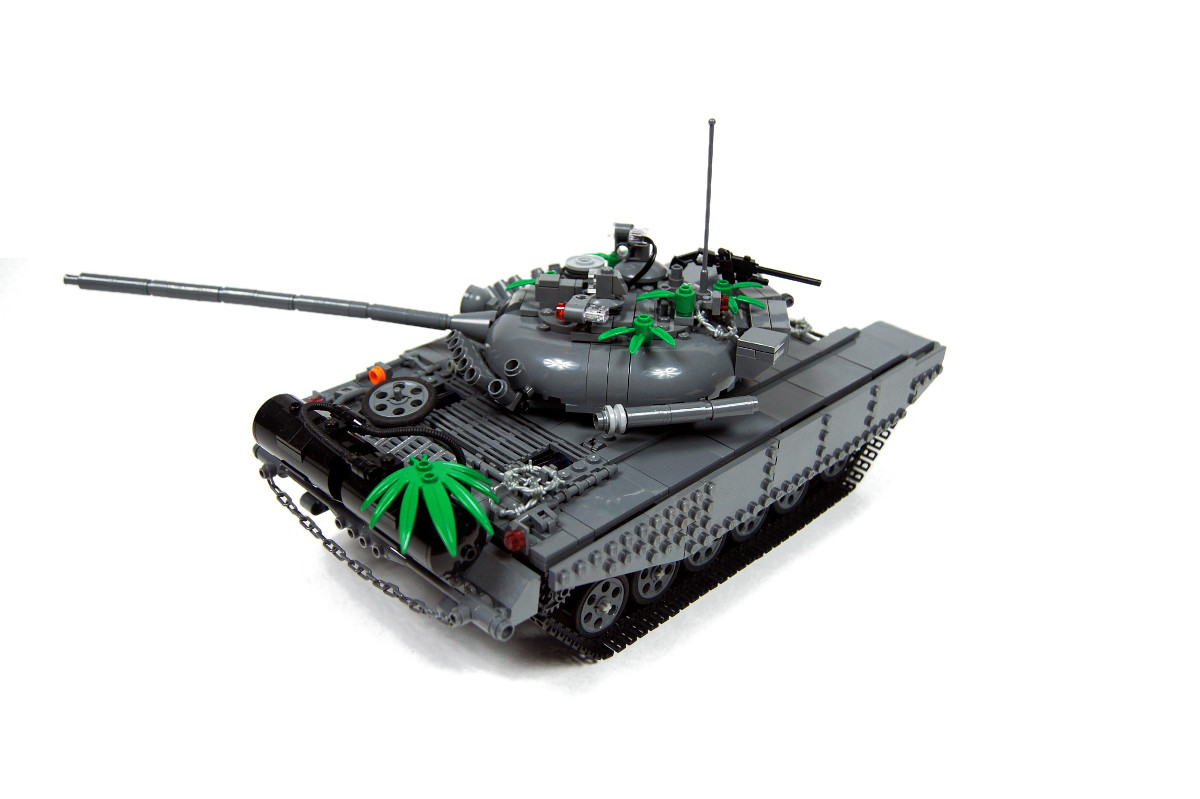
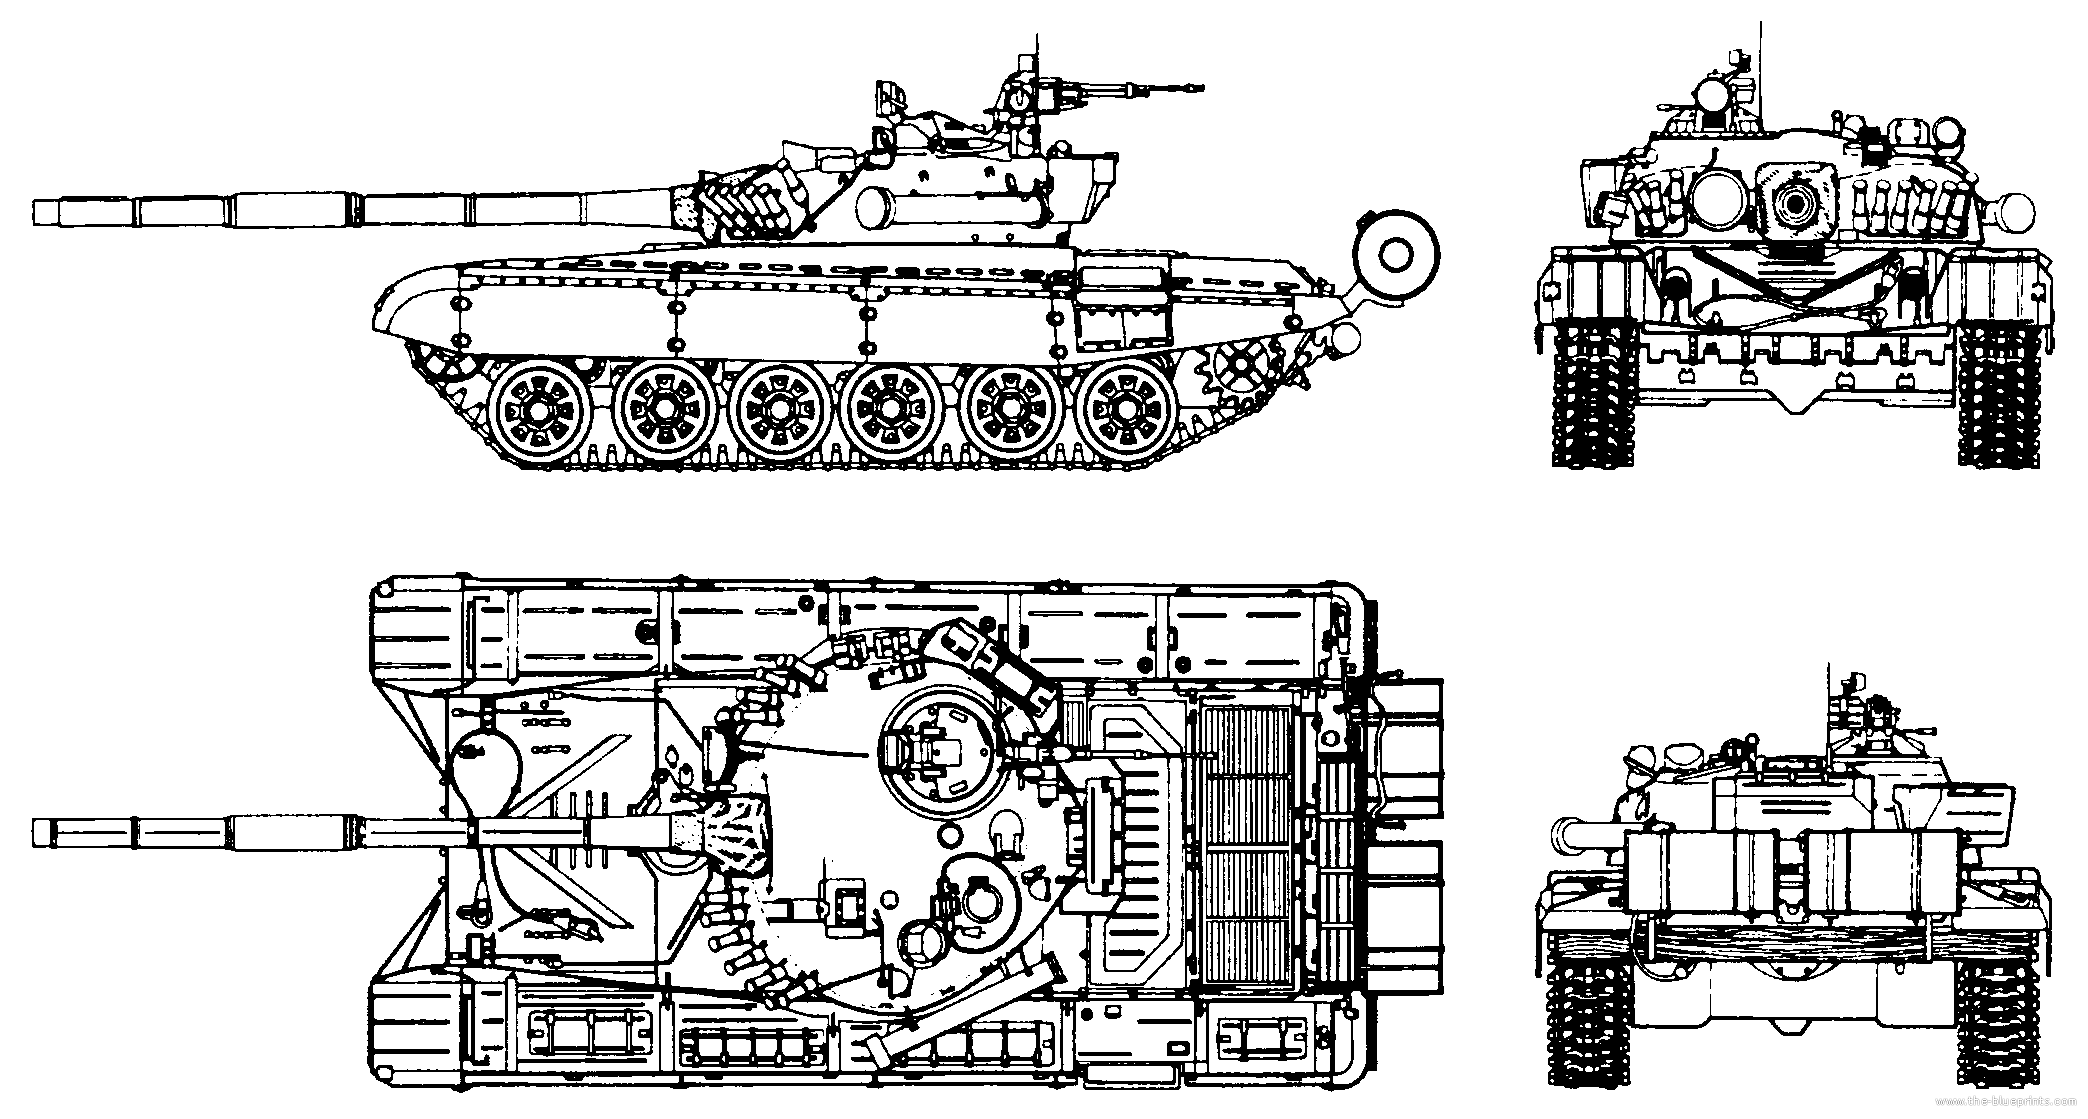
T-72M

Model of a Cold-War era Soviet main battle tank. Features suspension, rotated turret, elevated main cannon and lights.
Datasheet:
Completion date: 10/09/2011
Power: electric (Power Functions)
Dimensions: length 39 studs (52 studs including main cannon’s barrel) / width 19 studs / height 16 studs (not including antenna)
Weight: 1.057 kg
Suspension: torsion bars
Propulsion: 2 x PF Medium geared 1:1
Motors: 3 x PF Medium, 1 x micromotor
Top speed: 1.14 kmph
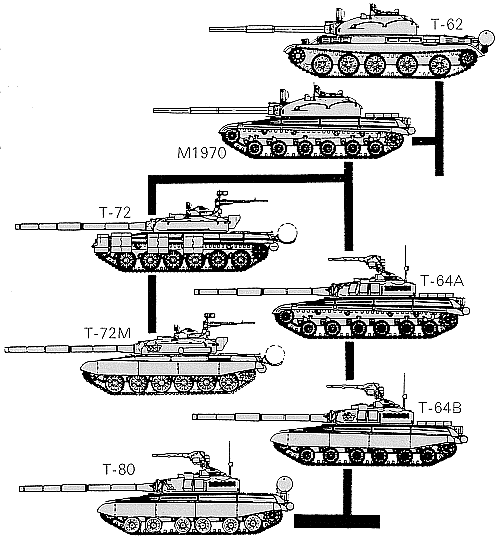
T-72 is one of the most popular tanks in the modern world. It has been produced for 40 years now, and the production still continues with over 25,000 total tanks built. It was designed with cheap mass production and maintenance in mind. It offers interesting blend of simplicity and good characteristics, and it generally follows the Soviet doctrine of focusing on quantity rather than quality of tanks. While the T-72s can be easily gathered in large numbers, they usually lose 1:1 encounters with Western tanks.
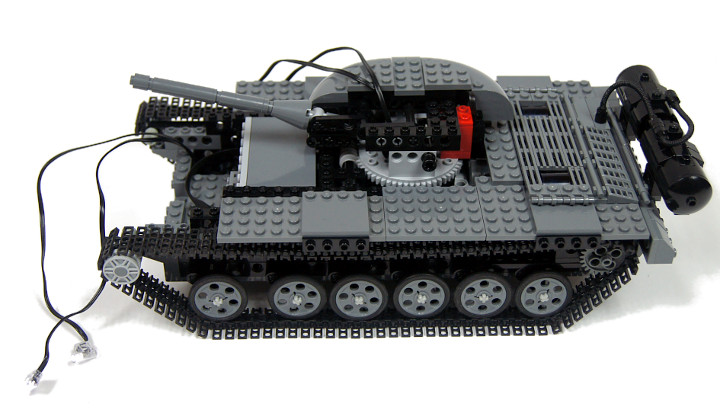
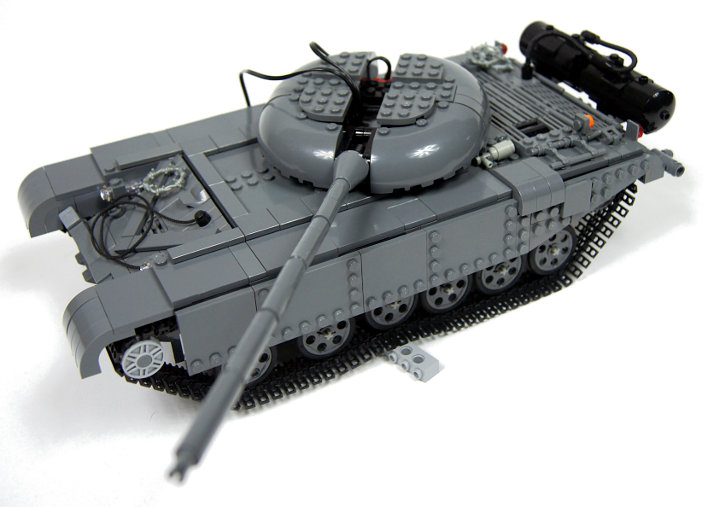
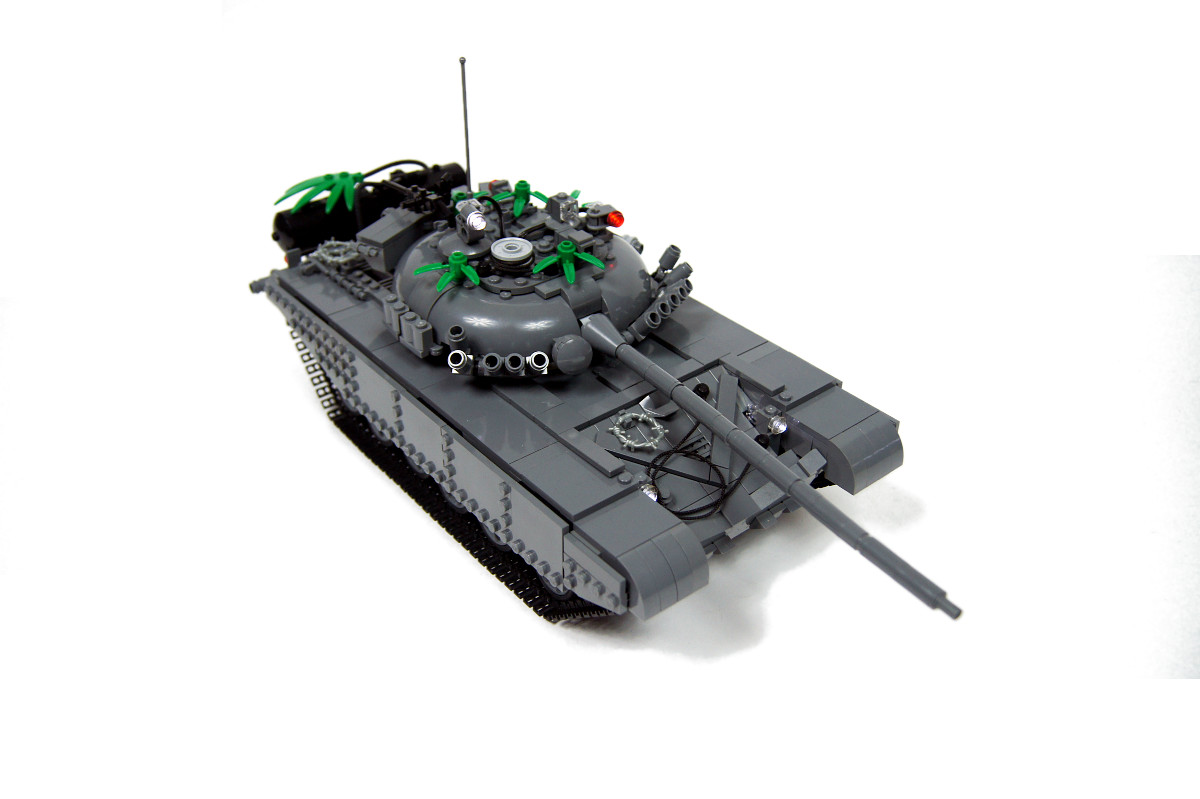
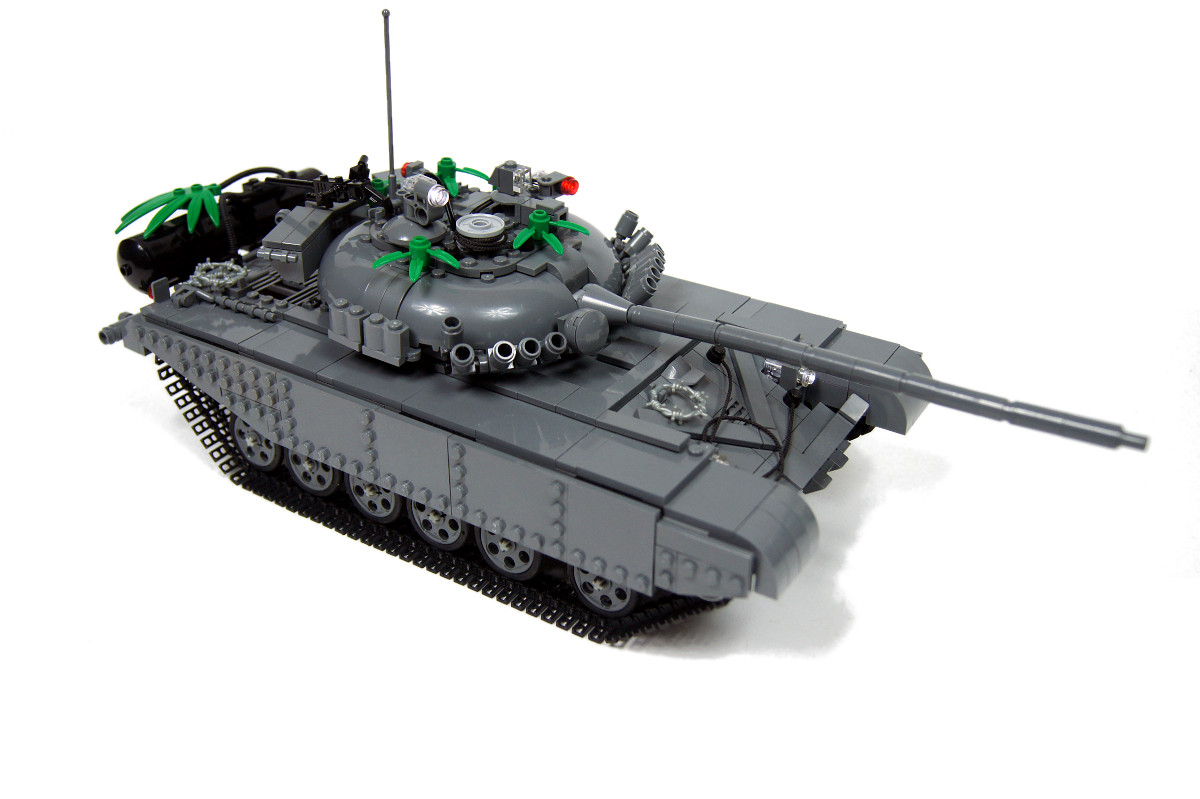
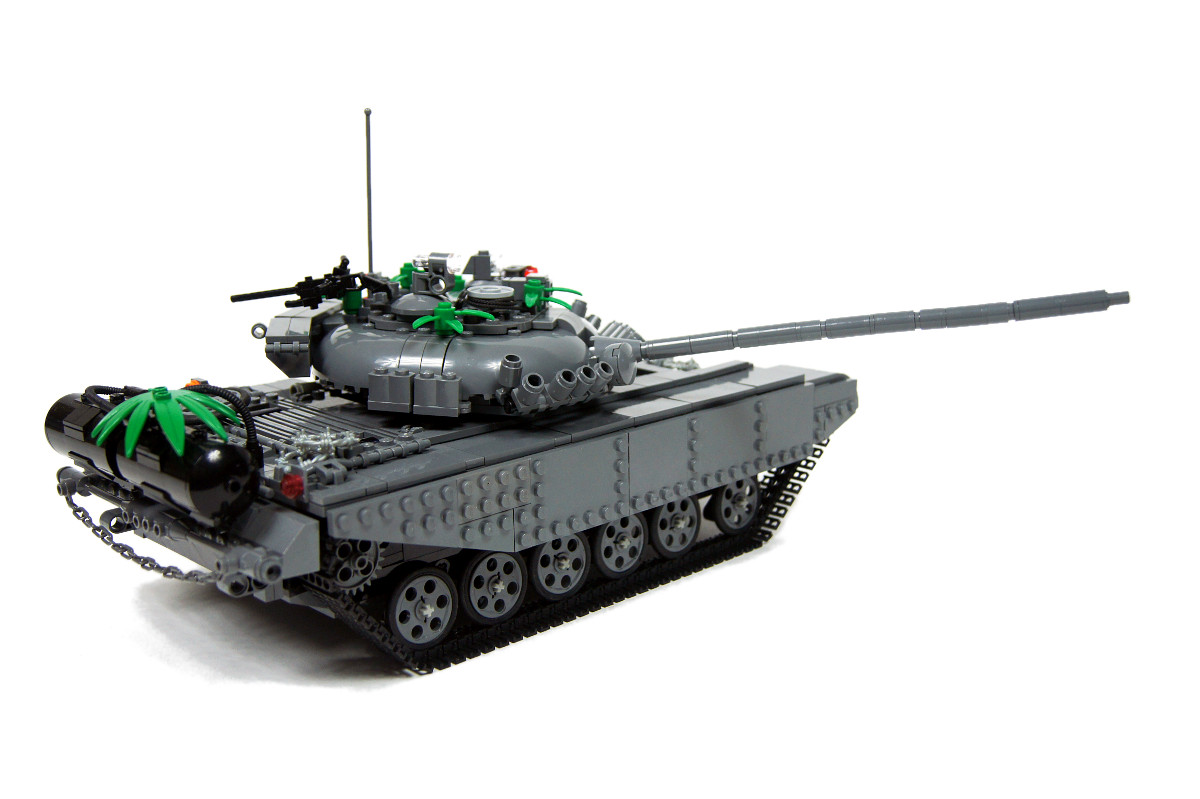
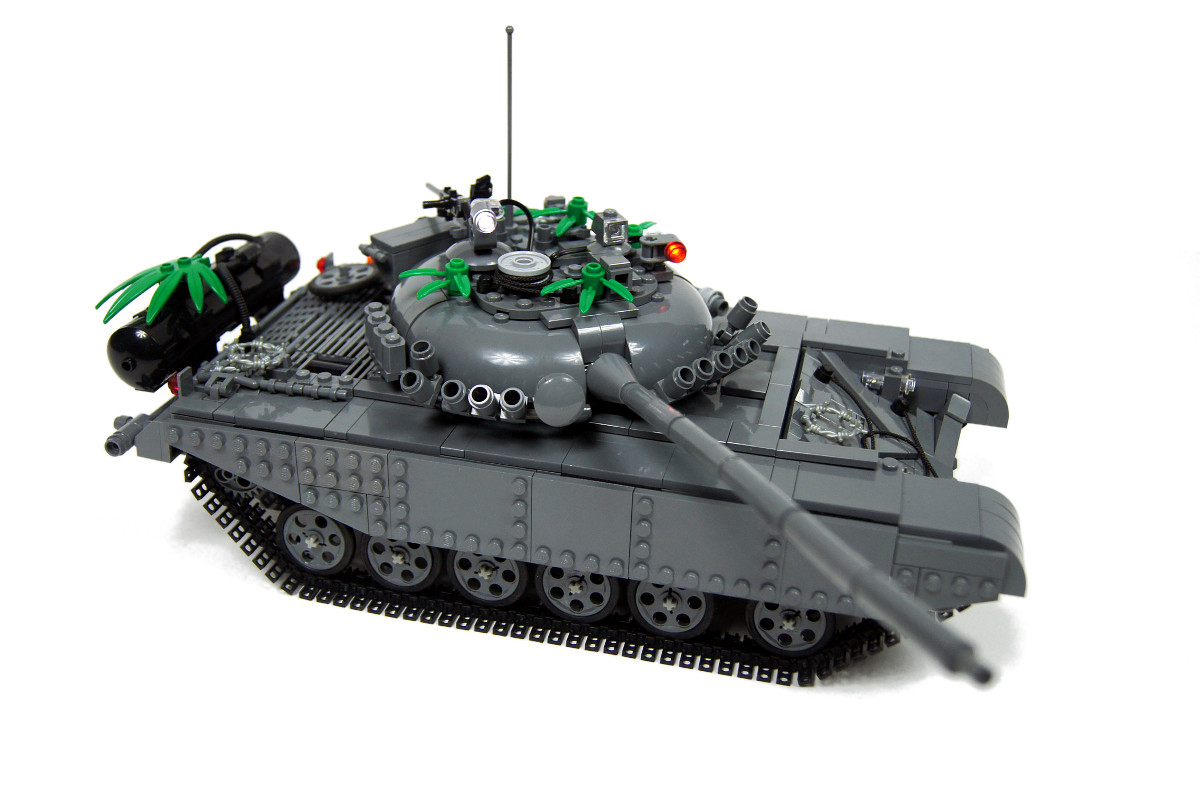
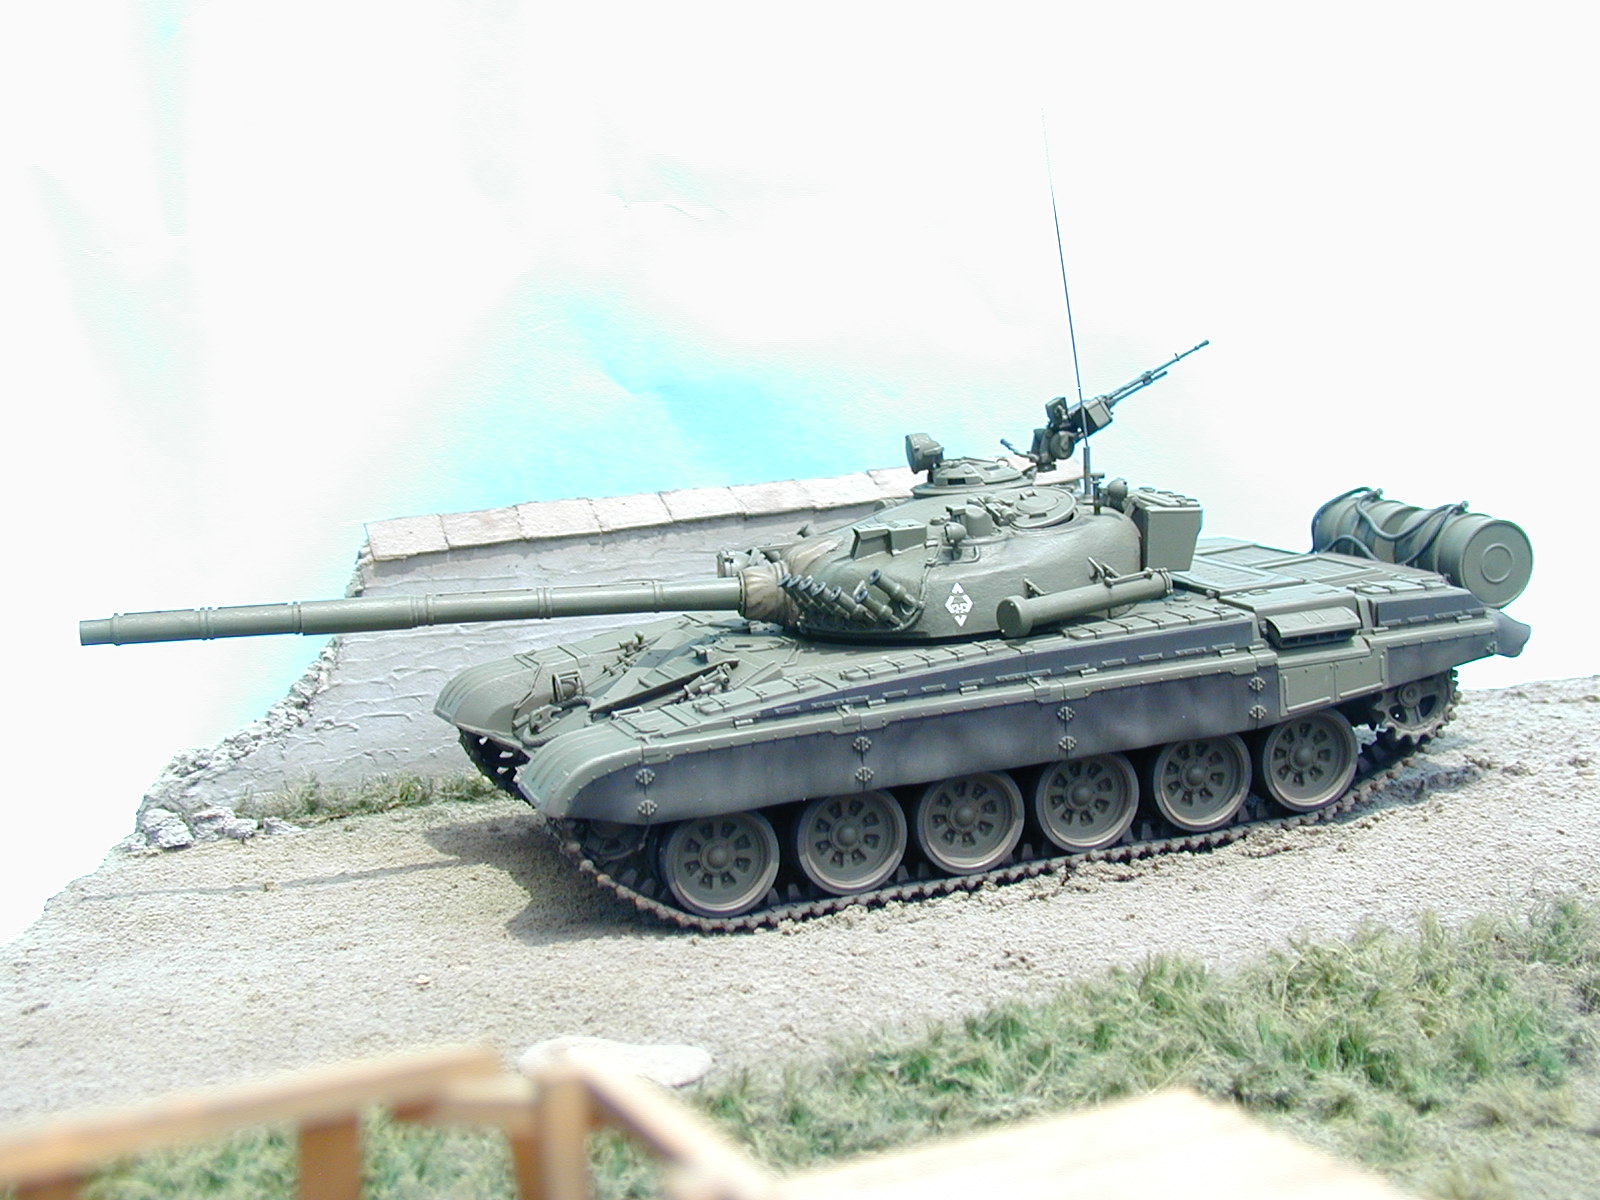
I have chosen this particular tank because it’s a great example of Cold-War era Soviet tank design, with flattened hull and small, bowl-shaped turret. The US intelligence nicknamed the turret “Dolly Parton” because its shape supposedly reminded her breasts (you are strongly advised NOT TO search for photos of Dolly Parton, for the sake of your good taste). I had two goals while building it: to test the torsion bars suspension in a lightweight model, and to see how small fully motorized tank model can I build.
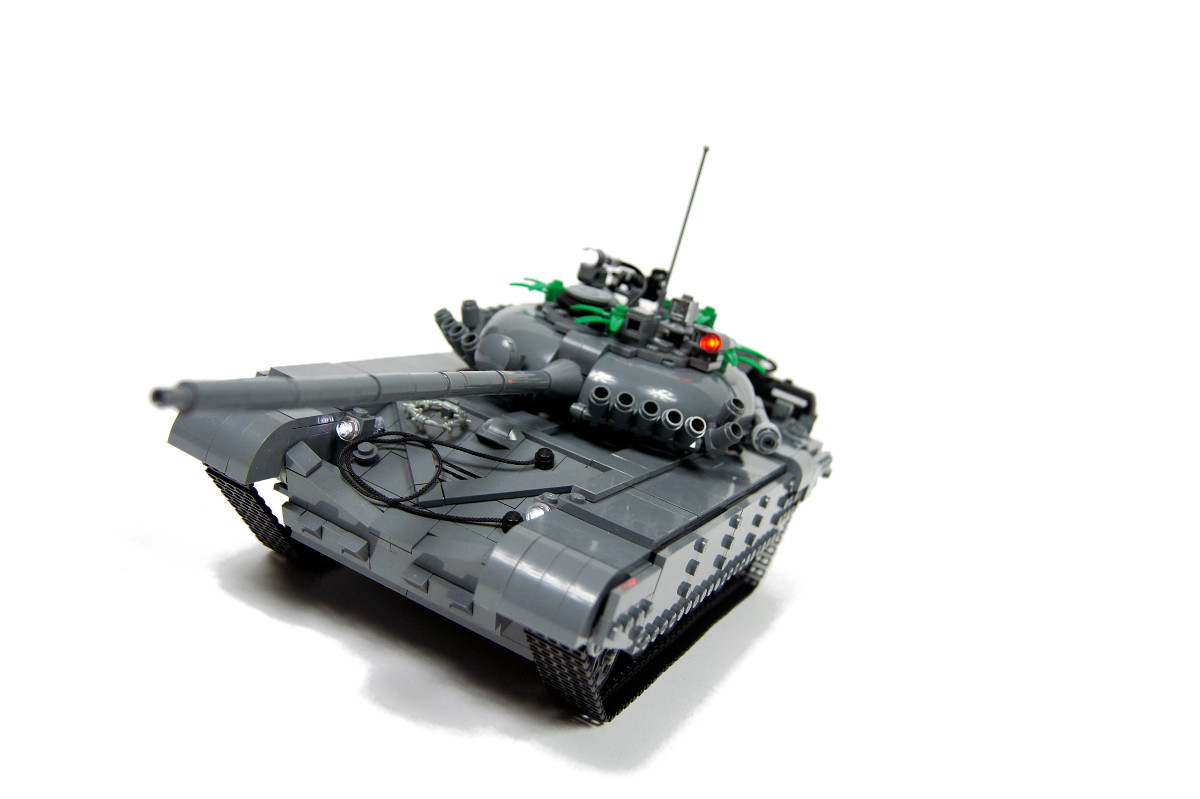
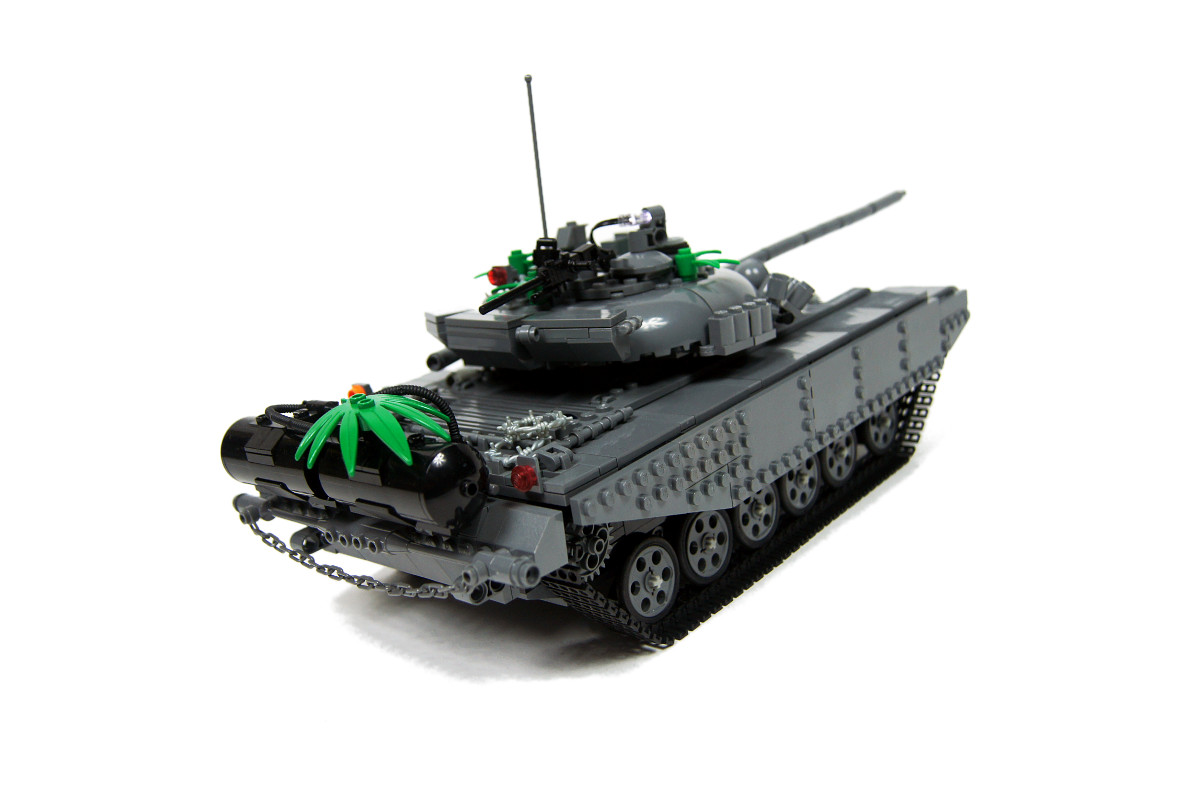
As for the aesthetic side, there was a number of minor shortcomings. I wanted to properly model the distinctive shape of the turret, because Lego models of the T-72 usually have turret shaped like a slightly gnawed disc. I think I achieved that, at the cost of attaching some details to the bottom of the turret, thus increasing the gap between the turret and the hull’s upper surface. The turret also had very little space inside – so little, in fact, that the majority of the main cannon elevation system had to fit in a 2 studs wide gap.
Other than that, the central section of the main cannon’s barrel should have been slightly thicker, but the only idea that occurred to me was to wrap it in a paper of similar colour and let it pass for a sticker. I also had the impression that the hull is slightly too tall, even though I was sure it had the right proportions. I could have remedied it easily by decreasing the suspension’s angle and thus the ground clearance, lowering the entire tank, but the large ground clearance is distinctive for the T-72. Perhaps the reason was that the side skirts started a little higher than they do in the real tank.

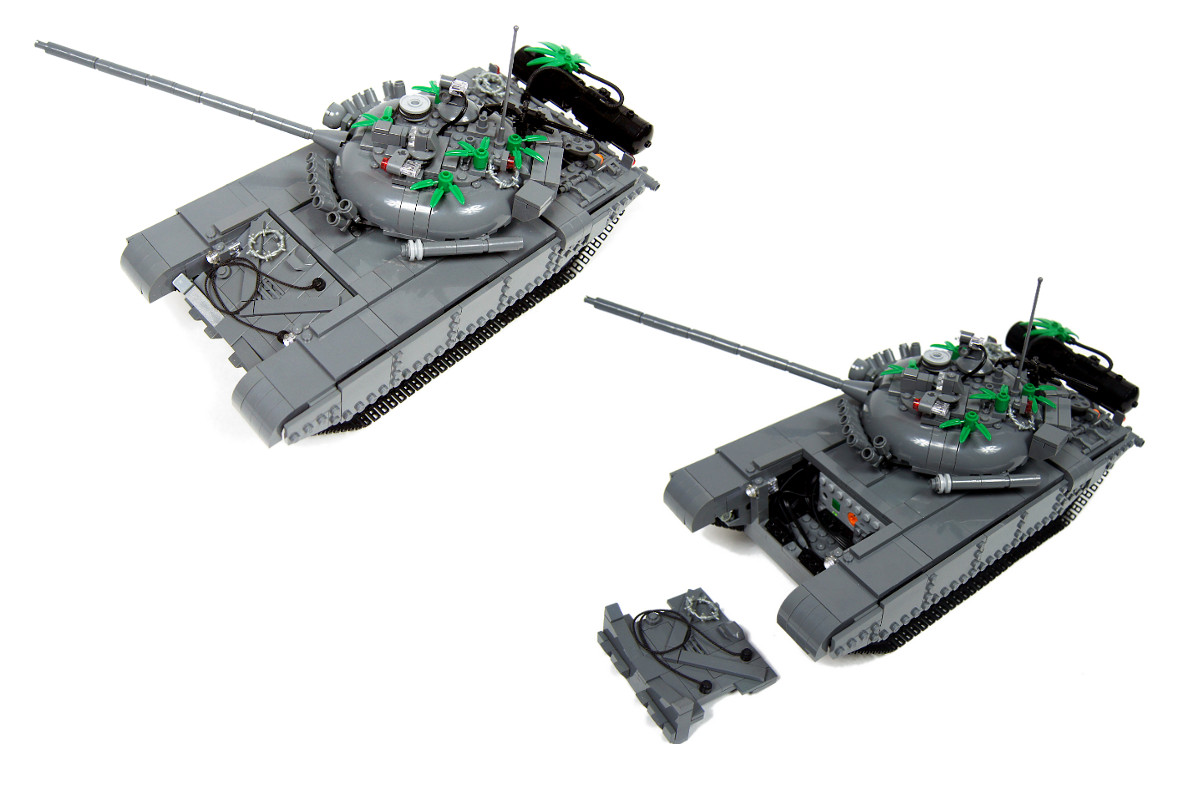
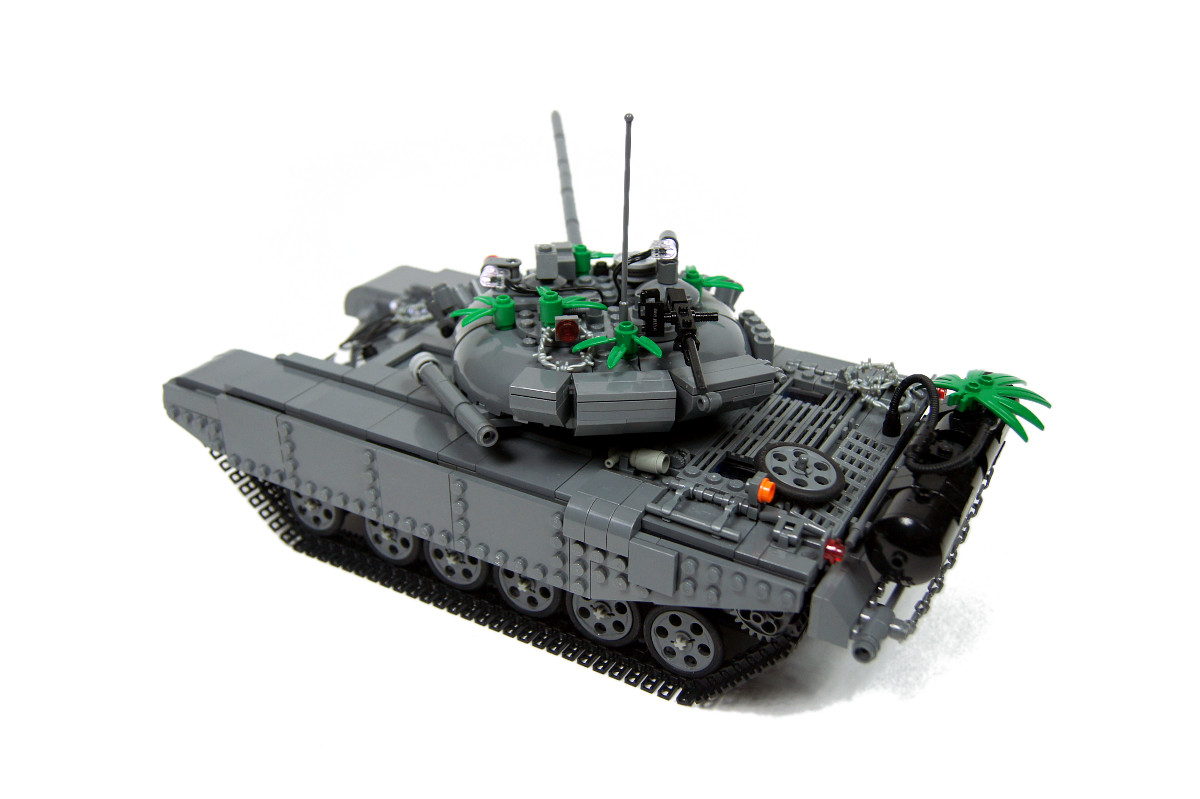
The T-72 is unusual in how its details are distributed: there is a lot of details on top of the hull’s rear, but almost nothing on the side skirts and above the tracks. I have added some extra details to simulate the kind of “luggage” that some tanks carry on them – in some cases it seems that the tank’s crew grabs virtually anything that comes around and attaches it to the armour. I have also used Lego LEDs to emphasize the large number of searchlights on the turret, which is very distinctive for the T-72, and I used some Lego plants to simulate the so-called environmental camouflage, just to see the result.
The model was very simple technically. There were two PF Medium motors in the back, connected straight to the rear tension wheels. Together they provided reasonable speed and a surprisingly high torque. The were also two IR receivers in the back, and another PF Medium motor between them, used to rotate the turret. Because of how small the turret was, its entire rotation system along with the turntable was located in the hull. The central part of the hull was taken by the turntable, and the front was taken by the 8878 battery lying transversely on its side. The battery could be accessed by removing the entire glacis plate. The remaining space, which was sparse, was taken by wires and the suspension system.
This was my second tank to use torsion bars suspension – the previous one was almost 3.5 kg heavy, with nearly 0.25 kg load per road wheel, and its suspension worked perfectly. Here the suspension was very similar, except that the axles used as the torsion bars were kept at fixed angle by the toothed half-bushes and toothed connector joints. It saved some space, but it wasn’t working really well because there were gaps at the half-bushes, which I had to fill with tiny scraps of paper. The average load was less than 90 grams per road wheel, and the entire suspension was therefore very hard – it was actually difficult to notice that it works.
I was happy with how the model turned out, even though its aesthetic side had a few compromises to it. It was a good, very agile model to play with, but I think it proved too light for this kind of suspension.


@Cody
That’s called color tresholding, and then I put some texture on it. Kind of hard to explain without good knowledge of the Photoshop.
In your photos Album, How did you accomplish the graphical (Red/White) Design of photo #6? Would love to learn how to do this.
@Ev3fan
These are rare pieces and I’d rather not risk damaging them.
I counted the width of the Chassis shown on your first work in progress photo and from the left to the right liftarms it’s 14 studs so it would protude just one stud from the arm (I think that’s ok).Why don’t think about using it in your Next Tank after the Tiger NXT?
@Ev3fan
Because they’re too long.
Why don’t use the very soft 16l axles for Suspension on such a light Model? Just an idea.
Thanks, I bought it, it’s very useful for building my own tank. Probably the Leclerc tank, trying to improve yours 😉
@BF Nelis
I did. Check my book.
Hi Could you do some tank suspension toturials for us? i would really appreciate that
@Rijk
Maybe in the future.
Hi Sariel. Did you consider offset road wheels? If you place the road wheels offset, the torsion bars can be made longer, resulting in a less hard suspension. I haven’t tested it since I don’t have the pieces, but it might be an idea for future models. It’s a technique used in real tanks as well.
@Jirka
I don’t sell any models, thank you.
You have a lot of great models in stores and you earned on it. Would you create your business?
Hello, I would like to ask if you could sell for a price guide. thank you
@Jirka
It’s not for sale, just like all my models.
Hello, I would like to ask when the tank T-72M for sale. Thank you.
Hey! Awesome machine ! You are an awesome builder Sariel,I love both military stuff and legos as well but you must have been mistaken abaout that particular T-72..
The T-72M is an export version of the T-72A (the real Dolly-Parton) and no,the T-72A wouldn’t be killed by any western tank in a 1:1 fight(theoretically of course) ,but either ways I love your builds so thumbs up!
@Sariel
Ok, thanks a lot.
@Ali
The wheels are definitely too close to each other. If the tracks keep falling off, try replacing wheels with 24t gears, they come in black too.
Hi again Sariel,
What do you think about this kind of suspension? http://postimage.org/image/489ebz11d/
The problem is I can’t steer the tank on carpet so well, someitmes the tracks fall off, is it the design faulty or the tracks are not robust enough?
Also if the tank needs to override larger obstacles, the first wheel hits the 2nd wheel from front and the wheel falls down, cause the tracks don’t follow their course anymore… If I try to make the tank larger and make a 1 stud space between them may it help? I can move the front gear as weel, but I don’t think that would change anything, what do you think about it? Your answer will save me precious time, thank you! 🙂
@Sariel
Ok, thanks for the info.
@Ali
Torsion bars can twist and untwist, so they work in both directions, but to a limited degree. And they have to be twisted before they can untwist. As for the battery box – sorry, it’s impossible to tell.
Hello again Sariel, does the torsion bar suspension work in each way ( forward and backwords)? Also if I would install a small battery box in a similar sized tank as yours with 3x medium motors, lights and 1 micro motor, aprox how much time would it last? Less than 30 min?
Hi Sariel,I have managed to find a brick built alternative for the turret and my tank will be on youtube soon
@Robert
Thank you Robert! 🙂
@Sariel
thanks 😀
@Robert
ps you need 2 of the gears
@Ali
you would need a barious range of peices including:
http://www.bricklink.com/catalogItem.asp?P=4716 and
http://www.bricklink.com/catalogItem.asp?P=2856c03 or any similar pieces
so then you biuld a frame around this, attach the moter to the worm screw, which then in turn powers the turntable
@Ali
you would need for the drive:
http://www.bricklink.com/catalogItem.asp?P=6589
so you can transfer the drive round the corner and then you need
http://www.bricklink.com/catalogItem.asp?P=32324 to hold the gears in place
@Robert
Thank you Robert, but I already have those two pieces, what else would I need?
@Ali
you would need a barious range of peices including:
http://www.bricklink.com/catalogItem.asp?P=4716 and
http://www.bricklink.com/catalogItem.asp?P=2856c03 or any similar pieces
so then you biuld a frame around this, attach the moter to the worm screw, which then in turn powers the turntable
@Sariel
Of course I did, but I don’t know how you built the mechanism.
@Ali
Why don’t you look at the Work In Progress photos of my tanks? There’s a turntable shown right on this page.
Hi Sariel, I am making my own tank, already bought tracks, I don’t know how to drive the power from the motor for the turntable and what pieces to use, could you kindly help me? I am a bit confused about this one, thank you!
@Robert
I think it can be hard to find a good-looking alternative for them.
Ihave just started making my own T-72 but I do not have any of the peices for the turret that you have so what do you suggest, buy them or find a brick built alternative
@Antony
It’s called chain link.
Hey sariel i love your creations. im making an LAV but i only got 2 motors so im making the rest of the weels powered by chain from the motor( idk if is clear :P) but i cant find the chain you also used in the drone in your APC. its like these ones caterpilars but without the length added. How is it called in bricklink?
@Sariel
Thank you :3 I really needed that xD
@Cody
At Bricklink.
I was wondering, Could you please tell me where you get the pieces for the rotation of your tank turrets? Im making tanks myself, Not based of real ones, But itd really help. Thanks.
@dragonifos
On jest o wiele za miękki i za mało elastyczny.
Witam
Chyba na Lugpolu ale teraz dokładnie nie pamiętam pisałeś, że to zawieszenie nie działa zbyt dobrze. Chyba mam rozwiązanie tego problemu. Mianowicie axle od wachaczy nie montuj na sztywno tylko poprzez: Axle Connector Double Flexible (Rubber). Co o tym myślisz?
Pozdrawiam
Marcin
@jostein
Sorry, I don’t make instructions. And this model has been taken apart a while ago.
hello my dad love trains from the war an he want this whith his collection of tanks so can you make a instruction to me and my dad if somone ask we will say thath you maked it do can you sen a instruction please
@Josh
Sure. Rammstein rocks my socks! 🙂
Sariel- Do you really like Rammstein? I hear their songs in your videos. If you do, awesome!:)
@Kshomiv
I have absolutely no idea.
How many track links are there in each track?
@David
No.
Hello, Great model !!! do you have instructions, I’d like to build it,
many thks, BRgds David
I hope to build a tank soon. I just need more parts.
I have found it.
Many thanks to upload your videos.
@Kars
I have shown it in the video and described in the text. Use your eyes.
How did you make to elevat the main canon.
MVG Kars
@Kenneth
I believe you’re referring to a minifigs’ camera.
what is the piece attached to the side of the gun that’s fixed on the rear of the turret?
@capmalo
Somewhere where you can’t get one anymore.
Where you bought it ?
Thanks
@capmalo
It’s a micromotor. And it’s extremely rare and expensive.
What is the reference of the motor you are using to go up and lower the gun ?
thanks for your reponse
Hm, skoro tak to rzeczywiście musi być mocna. W życiu bym takiej chyba nie wymyślił. 🙂 Muszę to dzisiaj przetestować. ;D
@AS_PL
Pęknie? Wolne żarty. Tyle samo osiek miałem w modelu Leoparda 2A4 który ważył 3,5 kilograma, tam naprawdę mocno pracowały i nadal były w stanie idealnym.
Bardzo dobry podkład muzyczny, idealnie komponuje się z moim gustem. ; ) Mam nadzieję że będziesz podobny stosować jak najczęściej.
Wracając do modelu – wg mnie jest piękny. Tylko razi mnie trochę ta… Hm… Amortyzacja? Nie ma przypadkiem ryzyka że któraś ośka pęknie? Czy coś? I jak dla mnie trochę ubogi ten “kamuflaż” jest. Tzn. te liście… No ale może to może tylko moja natura do narzekania. ; )
Powodzenia w budowie przyszłych konstrukcji!
Pozdrawiam,
Karol M.
@Gamali1el
Mam luźny pomysł na zawieszenie tego typu. Ale strasznie razi mnie w oczy wieża produkcyjna Tygrysa Królewskiego. Zwykły Tygrys jest dużo zgrabniejszy.
Wiem ale żaden nie spełnia moich oczekiwań… Ich zawieszenie jest albo sztywne, albo nie przypomina prawdziwego. A Królewskich tygrysów z Lego jest mało.
@Gamali1el
Grałem, znam. Jest już całkiem sporo Tygrysów z klocków.
Aktualnie gram w grę MMO World of Tanks, jest tam sporo czołgów a następne będą wprowadzane. Myślę, że niektóre modele mogą być inspirujące. Chciałbym zobaczyć Tygrysa Królewskiego wykonanego z Lego… 😉 Zwłaszcza jego zawieszenie.
T-72 przecudny, zresztą jak wszystkie Twoje modele 😉 Chętnie pobawiłbym się klockami, niestety swoje oddałem kuzynowi a na nowe mnie nie stać… Pozdrawiam i czekam na nowe cuda 😉
@Ghone Bannon
Sure, would you like some fries with it?
Make a lightweight tank with a 2-speed gearbox and twin RC motors
@john
Not permanently. Once the load is gone, the axle is perfectly fine.
interesting. it doesnt twist the axle used for it too?
@john
You mean the torsion bars? No, they wouldn’t break easily. They survived in my previous 3.5 kg heavy tank without any damage.
ahm ok, sorry for not following rules. i wasnt try to brag or anything. btw shocks for your t-72 is compact and easy but wouldnt it break easily too?
@john
Good for you, but this really has nothing to do with the T-72, does it? Please keep comments on the topic.
im so happy! my unimog was chosen as the 10 finalists for “take the challenge’! you should check mine out and of course the others to vote! my username is kusogaki
No, but it is a craft that destroys, and there was destruction that day. (I’m not american, by the way.)
@shawn
Is it? Last time I checked the Soviet tanks weren’t involved in 9/11.
Ironic the day that you posted it.
@jade2448
Here: http://www.bricklink.com/catalogItem.asp?P=3873
what is the piece # for the treads?
@john
No. I don’t participate this competition at all.
did you upload unimog for the “take the challenge”?
@Tholias
Oh well, I just changed my mind 🙂
I was under the (perhaps mistaken) impression that you would not make Soviet/Russian tanks?
Not that i complain, i merely find it curious…
nicely built
@Michal
Niewykonalne. Drążki są wtedy zbyt blisko siebie i nie ma miejsca żeby je zablokować pod kątem.
Co do zawieszenia na drozkach skretnych – jezeli estetyka za bardzo nie ucierpi, to mozna sprobowac drazkow na cala szerokosc kadluba – na przemian dla lewego i prawego wahacza.
Spowodowaloby to asymetrie kol, ale dwukrotnie zmiekczylo zawieszenie.
@mr32bit
Um… external fuel tanks. Most modern tanks can use these, you know.
What are the barrel looking things hanging off the back?
@Konrad
Gąsienice są za delikate na teren. Rammstein – Moskau.
Super.
Fajnie Jeździ po książkach ciekawe jak w terenie? Może nakręć coś w terenie?-Było by miło 🙂
Zielsko się sprawdziło. ;D
Dobre dopasowanie piosenki. Mogę prosić nazwę?
Pozdrawiam