Kenworth T600
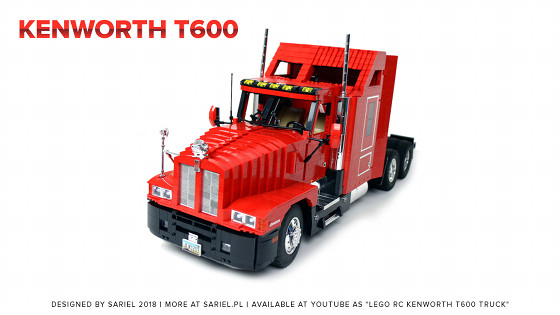
Model of a legendary US truck. Features remotely controlled drive and steering with virtual pivots, fake engine with moving parts, advanced Brickstuff lighting kit, openable hood, doors opened by motors, cabin seats adjusted by motors, dashboard with working indicators and rotating steering wheel, sleeper with inner lighting and interior, including a motorized microwave with light, 4-speed remotely-controlled transmission, remotely locked fifth wheel, a 1+ meter long trailer with motorized outriggers, flip toe ramps and a winch, and custom stickers.
Datasheet:
Completion date: 30/03/2018
Power: electric (Power Functions)
Dimensions: truck – length: 98 studs / width 29 studs / height 43 studs, trailer – length 132 studs / width 30 studs / height 22 studs
Weight: truck – 5.7 kg, trailer – 3.07 kg
Suspension: none
Propulsion: 2 x PF XL motor via a 4-speed sequential RC transmission
Motors: 2 x PF XL, 1 x PF L, 9 x PM M, 2 x Micromotor
A small project, quickly finished over the last 3 years 😉 Back in 2014 I have come across this big-scale Scania truck, and it has inspired me. I was always a fan of big American trucks, but I felt like I hit the wall after my Kenworth Road Train truck. The Scania has convinced me that the problem was the scale: I have kept all my earlier trucks at small to medium scale and I felt like I was running out of ideas, but now it occurred to me to try a bigger scale, which would surely open up new possibilities. I have started working on my big-scale truck in early 2015, but the size and weight of the model proved so inconvenient that it has taken 3 years to finish. It’s been through many places during this time, it moved from my old apartment with me, and until recently it was sitting on a shelf right behind me, like a remorse, and I have completed dozens of other models in the meantile.
The model itself wasn’t really complicated or time-consuming, I think that all things told it could have been completed in a matter of a few months. The problem was mostly my limited living and working space, which prevented me from simply keeping the model permanently in my workshop, and my own laziness which on many occasions made it easier to start something new and small rather than go back to this big lump of LEGO pieces that was so huge that simply moving it to my desk was a whole complex operation; it would also taken my entire desk space, and require advanced planning just to be turned around.
Anyway, my primary goal was to build a nice, detailed model of the Kenworth T600 truck, vanilla version – that is, with as few stickers as possible and without any unusual additions. Just a regular stock hauler you can see on the road. I’ve picked Kenworth T600 for its importance. Back in 80’s it was one of the first trucks whose design broke away from the classical angular appearance towards something aerodynamically efficient. It was quite a change, and the truck was disliked by drivers who dubbed it “an anteater” due to its sloped nose. At the same time, the truck proved so efficient that 2 years into being on the market, it constituted 40% of all Kenworth trucks being sold. When compared to its predecessor, the W900, it used nearly 25% less fuel, and the reduced aerodynamic drag meant that it could use smaller, less powerful engines just as efficiently. Not to mention that the sloped nose proved great for driver’s visibility. Thus the T600 changed the American trucks forever.
My model was mostly about looks, but some Technic bits such as wires were showing at the back. The scale has somewhat affected the looks, too. The primary example was the hood built using “steps”, which proved necessary because of its size and weight. The hood was large, needed to be hollow and to stay in one piece when being opened and closed. Using bricks was the only solution that proved strong enough – angled plates simply did not have the strength necessary to stay together when being opened without some large reinforcement from the inside. If there was no engine model, and no need to open up the hood, then, of course, it could be shaped more freely.
Model’s weight and size affected its technical side too, obviously. The load on the front axle proved to be a major problem, for instance. I have initially put 1.9″ Dirt Grabber tires by RC4WD on front and rear wheels, but as the weight of the model grew, I had to put LEGO 94.3 x 38 R tires on the front wheels. The RC4WD tires were simply too soft, even with foam inserts inside them, and were getting squashed from all the weight. Another major challenge was the frame that kept the model together – I have built it so strong that the model could be easily carried around when held by its bottom. I believe, however, that the frame got slightly bent after 3 years of being pressed on (even more during the building process). Finally, adding the suspension proved impractical. I have assumed right from the start that the front axle will be too stressed for any kind of suspension to work properly, but I put a heavy-duty pendular suspension on both rear axles. And again, as the model’s weight increased, at some point it become difficult to drive because the rear axles would start tilting to one side and their wheels would slip. I ended up locking the rear suspension – in theory it could still be unlocked.

What do you do when a model is too big for your studio space? You improvise and go check if the vodka boxes you keep stashed for your wedding make supports of required height 😉
Starting from front to rear, the truck’s functions were:
- a lighting kit custom-built by Brickstuff, with 38 LEDs, adjustable brightness, remotely controlled turn signals and emergency lights, as well as automated reversing lights (connected to the propulsion motor’s PF plus so they would detect when reverse is engaged)
- openable hood with a fake engine inside, loosely inspired by the real Cummins engine. The engine had a rotating chain belt and two rotating rubber belts, all driven by truck’s propulsion motors bypassing the transmission.
- “Angry Hamster” custom 3D-printed hood ornament, designed by Seven Studs and chromed by Chrome Block City
- front wheels steered by a PF L motor using a virtual pivots steering system, so that they could turn inside realistically-sized mudguards without rubbing against them
- a cabin with doors opened by two PF M motors (left and right independently), with a dashboard including turn signals / emergency lights indicators and a steering wheel rotated by a Micromotor connected with the steering motor, as well as with two seats adjusted forward / backward by two PF M motors (left and right independently)
- a 4-speed sequential remotely controlled transmission of my earlier design, connected to the gear stick inside the cabin so that the stick would tilt forward when shifting up and backward when shifting down
- a sleeper module with interior, with interior lighting, a bed, some cabinets, windows etc., accessible via openable rear wall
- a microwave in the sleeper, built just for fun. It was really just a tiny box with a light and a Micromotor in it. When activated by a lever in the nearby wall, it would get lit up and the turntable in it would start rotating. I just wanted to see if I could fit something like that in.
- a fifth wheel, remotely locked and unlocked by a PF M motor below the sleeper pulling a string that was countered by a rubber band
- both rear axles driven by two PF XL motors via transmission described above
A few functions were quite unusual, such as the doors opened by motors or adjustable seats. The reason was simply abundance of space to use and the fact that it was just a regular truck, without any features such as cranes, outriggers, etc. I simply hated to see all that space unused, so I’ve added some rather otherworldly functions. Also, I was happy with the doors which were opened using gears with clutches, so the motors weren’t strained, and which were able to close all the way into the cabin because they were just a little less than full stud long. Instead of making the entire doors with bricks (which would make them fit exactly into the openings for doors in the cabin), I replaced the last “stud” in the doors with one layer of vertical plates with one layer of vertical tiles on it. These two layers were 6 mm tall, or – in case of being oriented vertically – 6 mm wide, whereas a full stud is 8 mm. Thus the doors were 2 mm shorter than the opening they were supposed to fit in, and that margin of 2 mm allowed to close them all the way without hitting the cabin.
The truck wouldn’t be complete without a trailer. I have considered several trailer variants, including stretchable lowboys and multi-axle steered trailers. In the end, I’ve picked something I was sure can be build strong enough to not break under some load: a regular flip toe trailer with 3 axles. The trailer had its own power supply in form of a LEGO 8878 battery, and its own PF IR receiver.
The trailer’s functions were:
- parking outriggers, two sets of these. Since trailer’s length put a lot of stress on its front end, I was unable to make outriggers that looked like the real ones and were able to support the trailer. Perhaps using pneumatics would achieve that, but I wanted to avoid pneumatics because of its mismatched yellow color and of the pneumatic tubing, which would be visible from outside. So I just made one set of fake outriggers that looked like the real ones but didn’t work, and another set of outriggers that worked but didn’t look like the real ones. The working outriggers were operated by two small linear actuators driven by a PF M motor.
- a heavy-duty winch driven by another PF M motor and operated by a lever. Trailers of this type don’t really have winches on them, I just decided to add one so I could pull some vehicles up on the trailer instead of putting them there by hand.
- two flip toe ramps operated by two large linear actuators driven by yet another PF M motor
- a LED beacon created by Brickstuff
To match the truck’s scale, the trailer was over 1 meter long and the key to prevent it from breaking in half was a frame built using three layers of interleaved Technic frames braced from the sides by Technic 3×11 panels. It proved so rigid that the entire trailer could be carried around using one hand below its center, and it didn’t bend under loads above 2 kg on it. I didn’t test how much weight would it take to break the trailer (but my dog weighing 8 kg stepped on it once).

An emergency battery charging, assisted by a pug, of course. A typical pug behavior is like: is that a wire? Can I get one too? How about two wires? Please?
Finally, there was a matter of how much the model’s weight affected its performance – and it affected it a lot. There was nearly 3 kg of load per one PF XL motor to move just with the truck alone, and well over 4 kg with the trailer added. The transmission worked splendidly and handled all that stress without any problems, even when I started hauling the trailer with the Tumbler Batmobile LEGO set on top of it, totaling nearly 11 kg with truck’s weight included. The truck was able to move all that load successfully for a while, until an universal joint on the driveshaft snapped in half. The transmission had four speeds, but due to model’s weight and soft rear tires with high rolling resistance, the first two speeds looked pretty much the same. The third speed worked, but it worked better going backward than going forward. The fourth speed was only good for going downhill – trying to make the truck start on 4th gear would result in power cutting out (which was pretty much what would happen in reality ;)).
This brings us to the issue of power supply, which seemed insufficient. The entire truck was powered by two LEGO 8878 rechargeable batteries, one powering drive and steering, and the other powering everything else. However, the Brickstuff lighting kit needed a connection to the propulsion motors to detect reversing, so it ended up being powered by the first battery too. Now, a single LED doesn’t need much power, but 38 LEDs apparently do, because I had to recharge the battery 3 times in 1 day of filming, and the propulsion motors worked noticeably better with the LEDs turned off. One can only wonder how much better would the truck perform if powered by BuWizz units instead.

A view of my workshop in the final month of work on the Kenworth.
I found it hard to look at this model with fresh eyes after 3 years of intermittent work. I was bored with it and tired with it, and I also hoped that something more than just its size would be appreciated. There was definitely some room for improvement, e.g. more interior details. Also, the amount of custom elements was probably unacceptable to some people, but I actually tried to limit it. The non-LEGO tires were used because double LEGO tires of this size are way too wide, and I didn’t want to have single rear tires. Chromed and engraved pieces are nothing new, and I consider them a simple continuation of what LEGO company itself was doing with the Model Team sets. The hamster hood ornament was purely for looks and fun and would never look anywhere as good and funny when built with LEGO pieces. Finally, the Brickstuff lighting wasn’t necessary – I could have, and I was initially going to, use LEGO PF LEDs. But when I have considered the cost of 19 sets of LEGO LEDs, their varying colors (LEGO LEDs tend to provide slightly different colors unless they come from a single production batch), and the amount of wires and plugs necessary (19 PF plugs and 18 forking bricks for the LEGO LEDs), I decided to try the Brickstuff LEDs. In the end, it’s something new, and I have already used LEGO LEDs with automated reversing lights and turn signals achieved mechanically in many of my earlier models – for example my Tow Truck 2 had all of these as early as in 2011. And let’s keep in mind that everything that mattered for the actual performance – the power supplies, the remote control system, the motors, the differentials, the universal joints – was all 100% original non-modified LEGO. Custom elements were used purely in decorative capacity.
Special thanks for crucial help with this model go to Chrome Block City, Brickstuff and Seven Studs!


