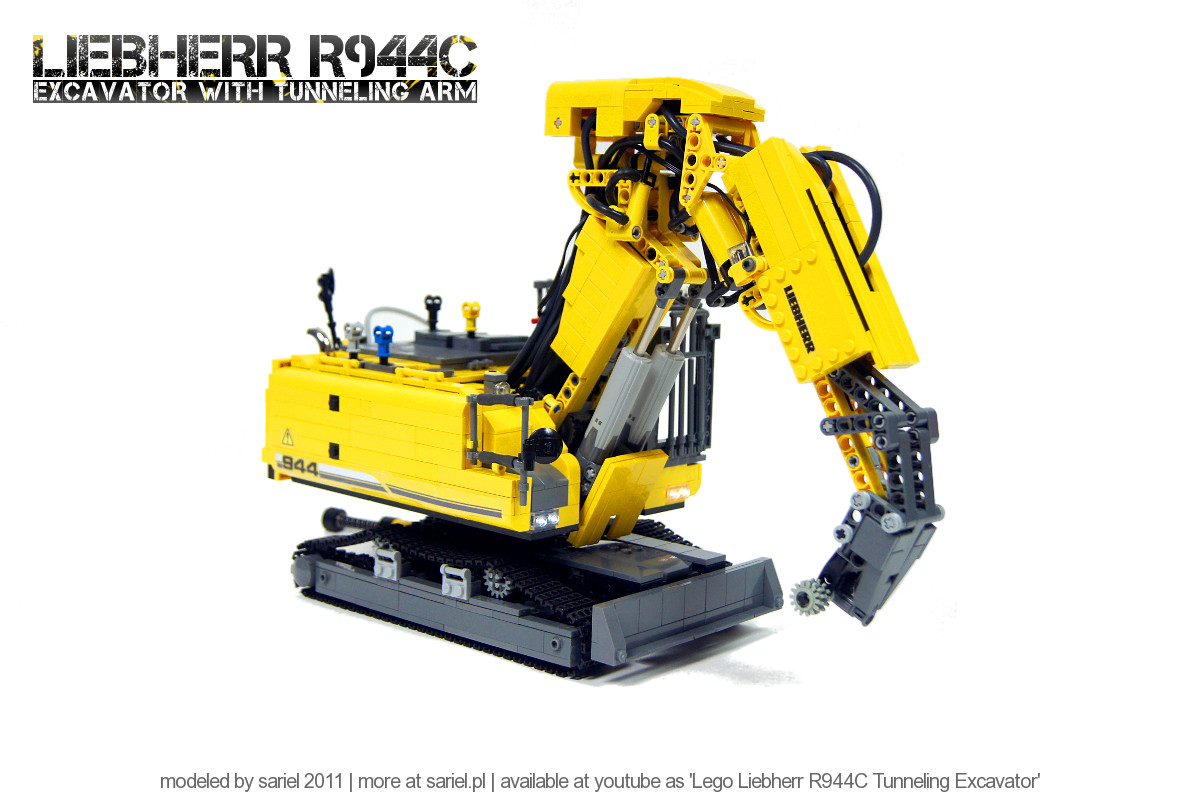
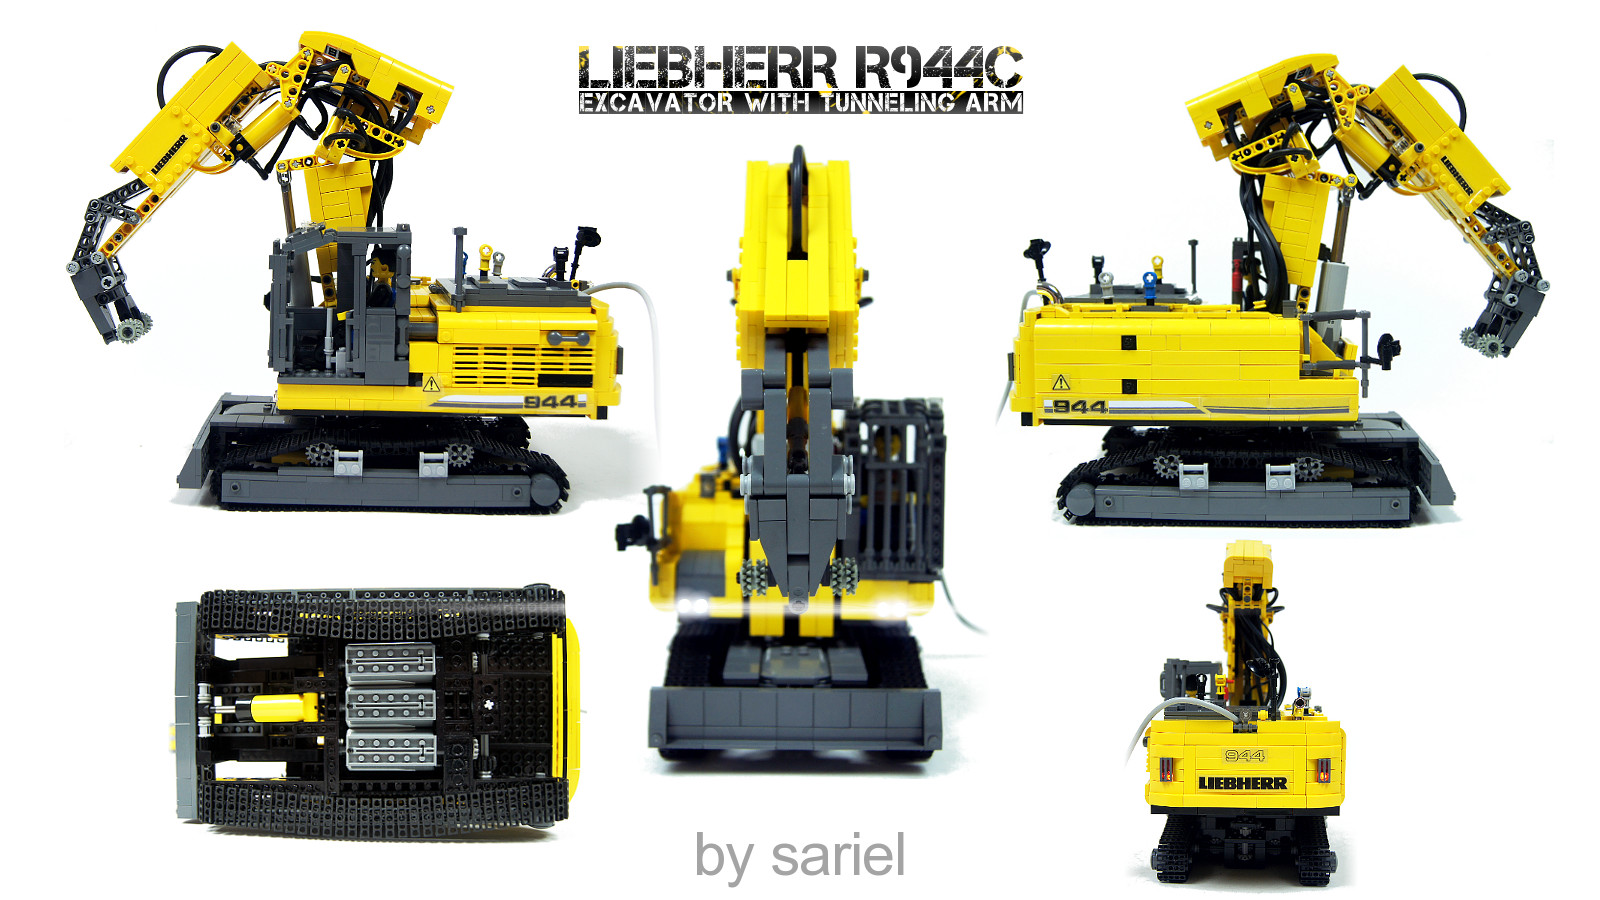
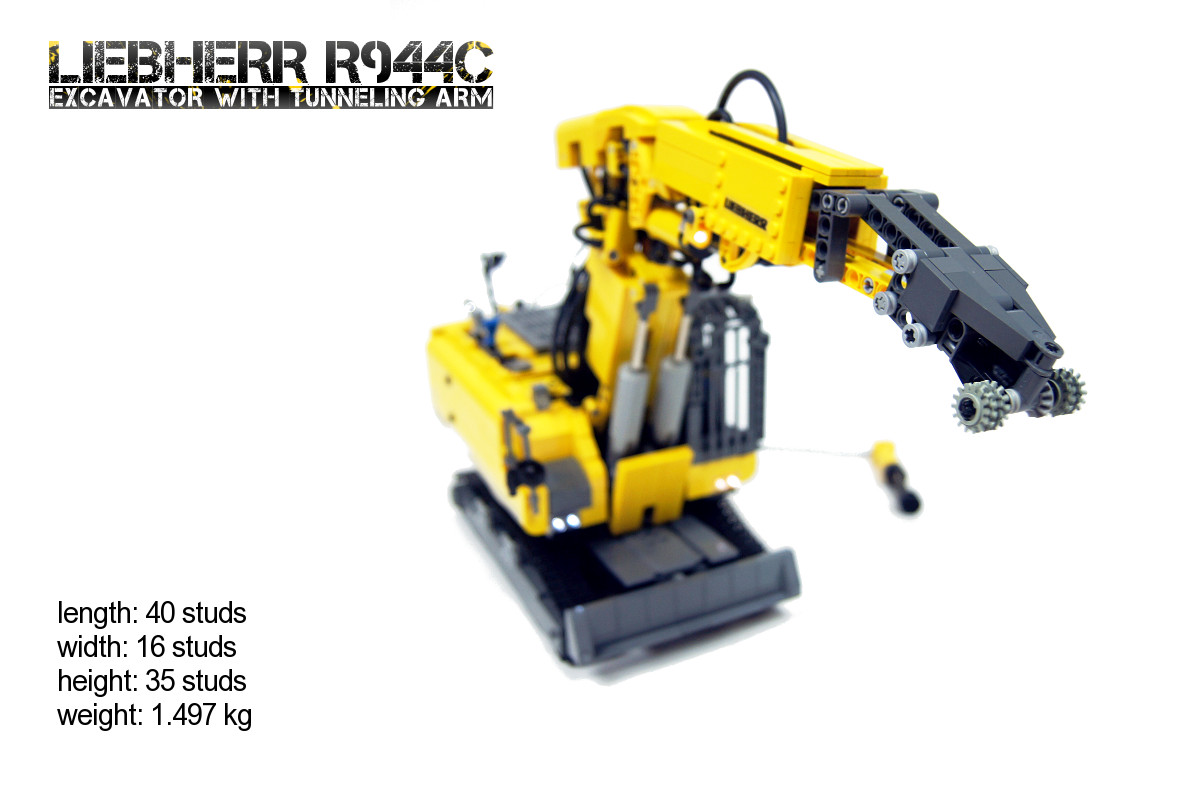
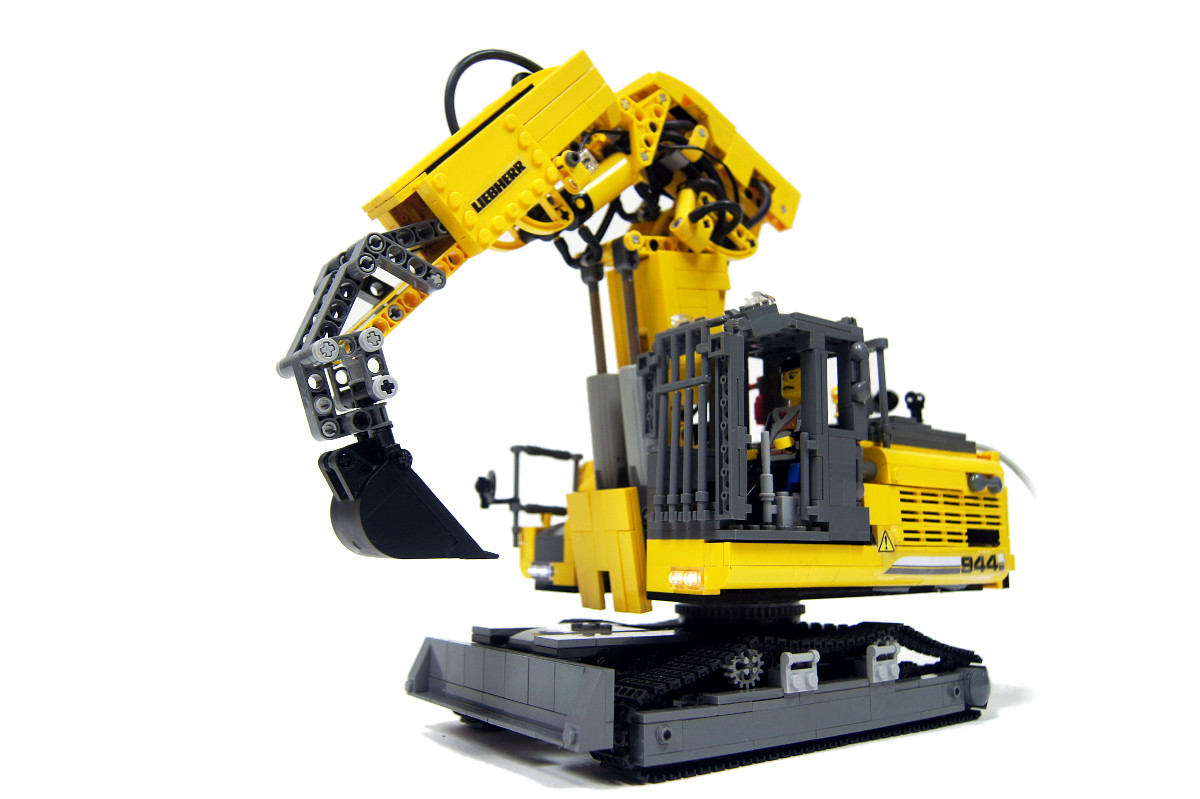
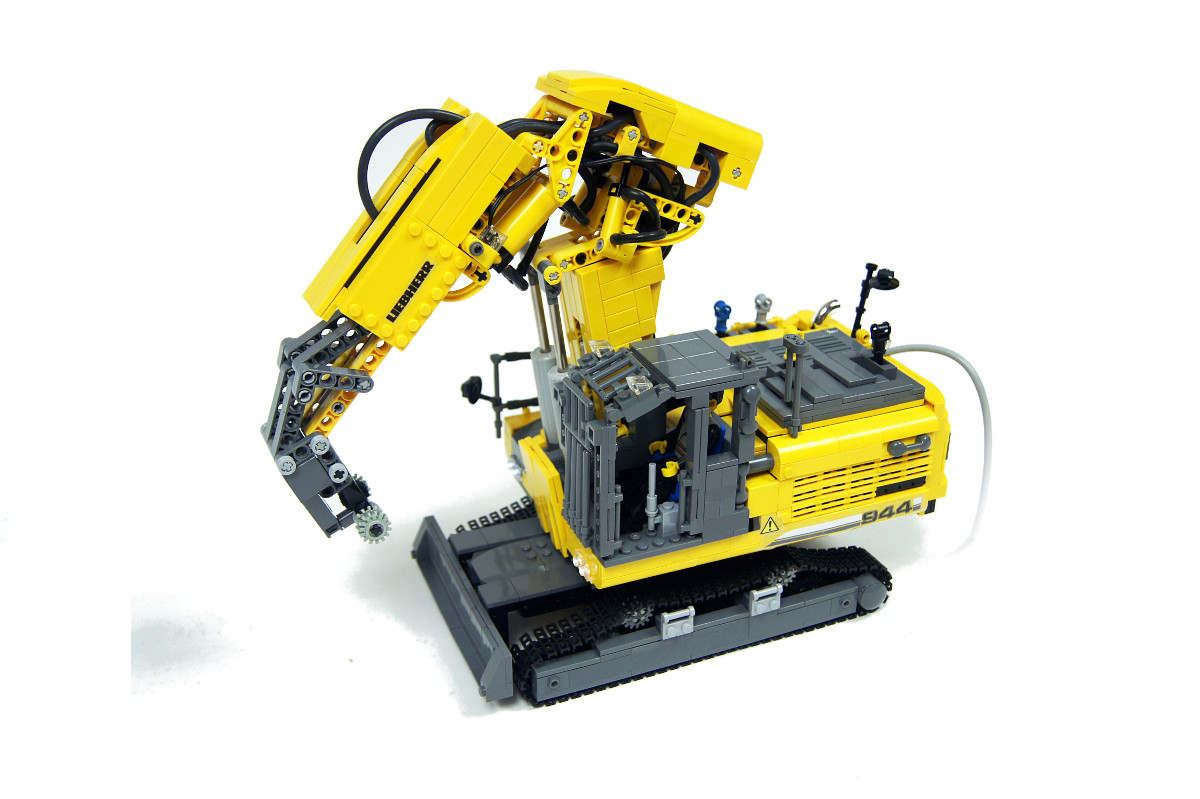
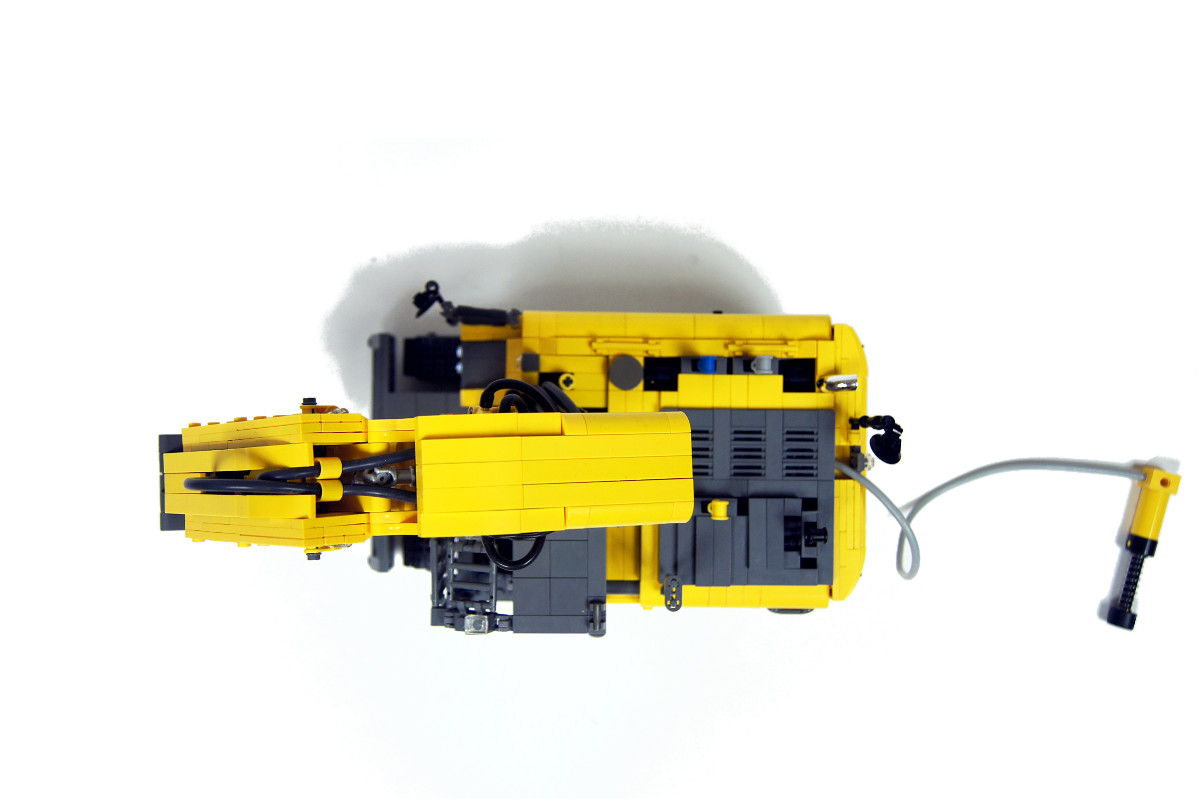
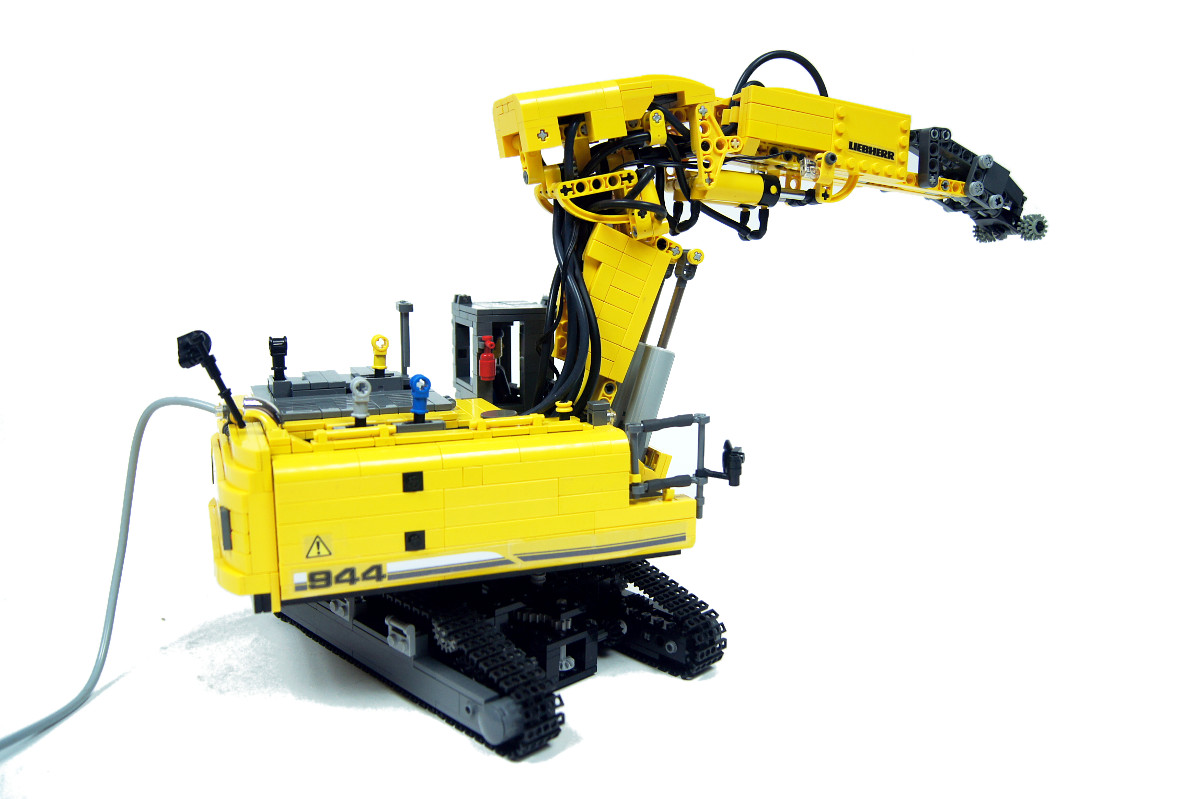
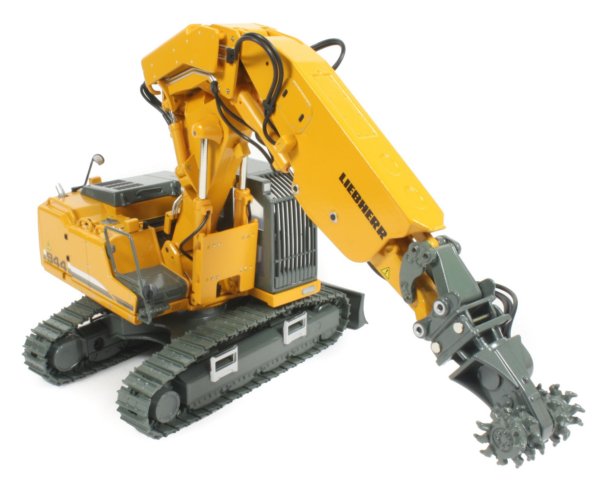
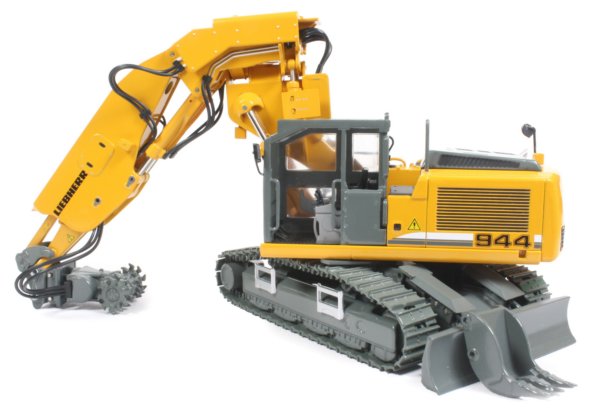
Liebherr R944C Tunneling Excavator

Model of a Liebherr excavator with tunneling arm. Features a blend of electric and pneumatic functions, custom stickers and lights.
Datasheet:
Completion date: 17/06/2011
Power: electric (Power Functions) / pneumatic (external manual pump)
Dimensions (with arm in driving position): length 40 studs / width 16 studs / height 35 studs
Weight: 1.497 kg
Suspension: none
Propulsion: 2 x PF Medium geared 1:1
Motors: 4 x PF Medium, 1 x 71427
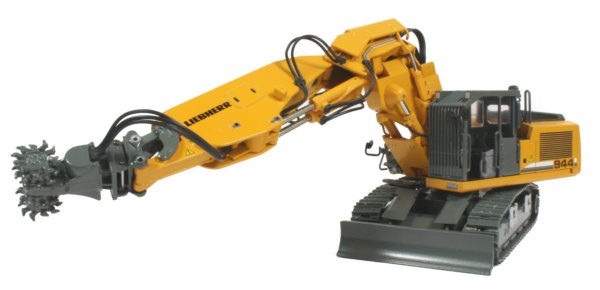
Model of a regular Liebherr excavator with an uncommon tunneling arm. Model of the very same machine created in larger scale was released in 2010 by my fellow LUGPol member M_longer and is available here. M_longer introduced me to this excavator before he started to build it, and I liked it so much that I intended to build it first. Eventually my timing kind of failed, because my model was finished 10 months after his 🙂
My version of the excavator was intended to be much smaller than M_longer’s: his was scaled to the new tread system, and I decided to use the old one for mine. The resulting difference in scale means that my model is roughly 40% smaller. Seeing that the model would be quite small for its number of functions, I have been planning to use pneumatics wherever possible and to have an external pneumatic controller permanently attached to the model. This solution is sometimes called a ‘pneumatic leash’ and it was used in many of the models created by my idol builder, Jennifer Clark. I have never really used it before and I thought of this as of opportunity to feel like Jennifer 🙂
While I was in the process of cramming the mechanics inside the hull, it occurred to me that I will be able to integrate all four pneumatic valves into the hull at the cost of making its upper surface uglier. I decided it was worth it, and eventually the model’s only external element was a single manual pump, which allowed for more accurate control of the pneumatic system than a motorized compressor would.
As for the aesthetic side, I didn’t want the hull to look like a box, which was pointed out with my earlier Caterpillar excavator, so I decided to build the sides and the back of the hull using body panels and SNOT (studs not on top) technique. I think the model looked generally worse than M_longer’s version, which is disadvantage of the smaller scale, but it did include a number of details that were omitted by M_longer in his model – such as e.g. the side and rear view mirrors.
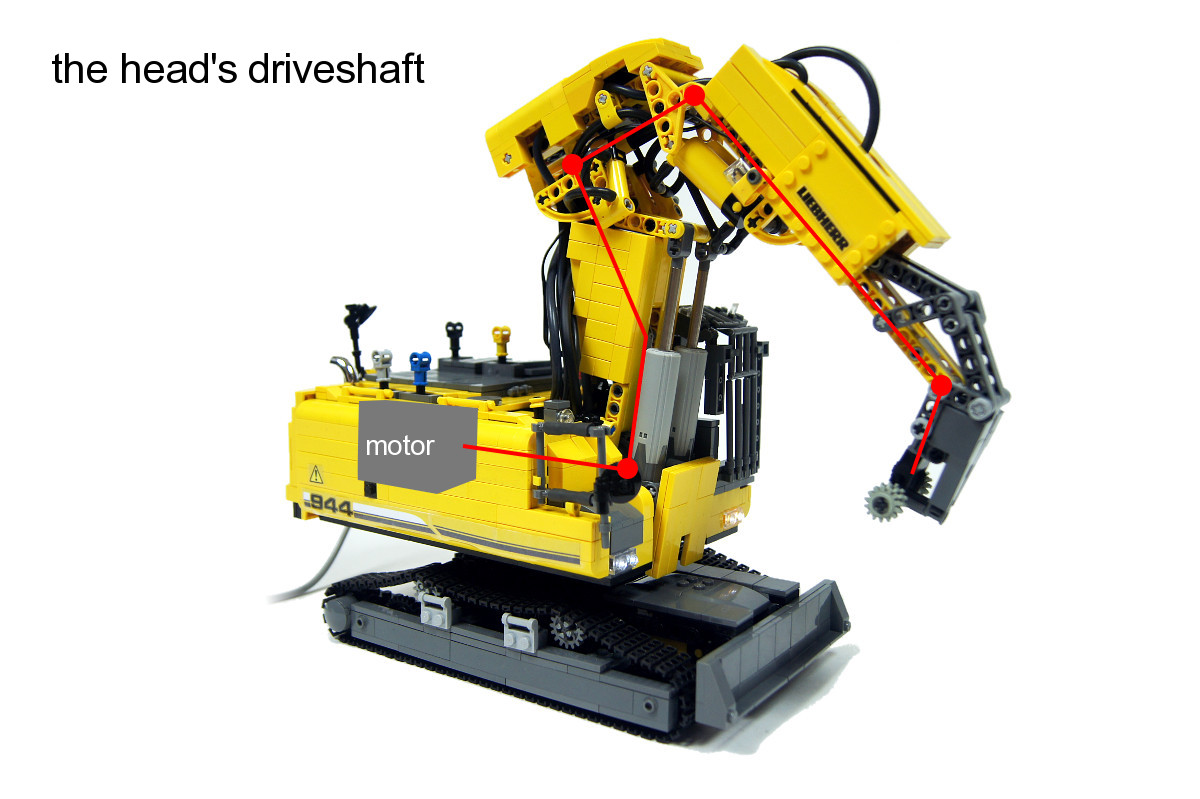
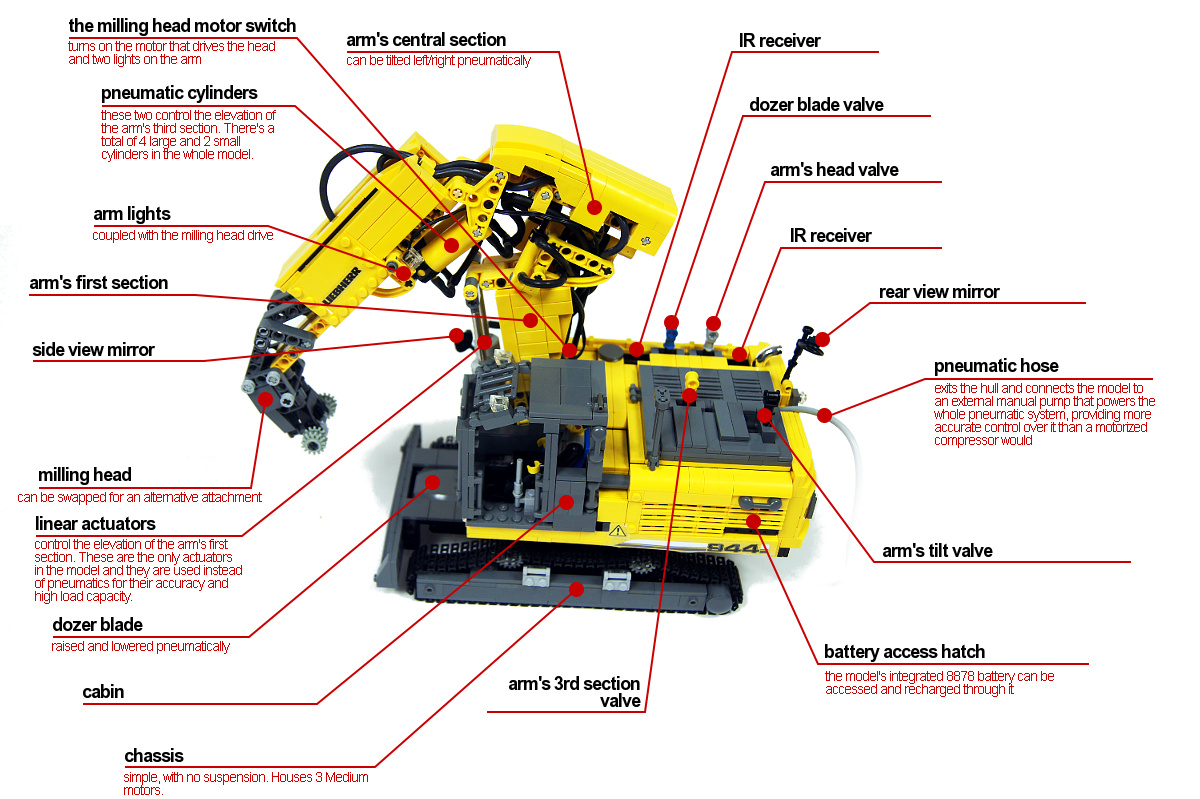
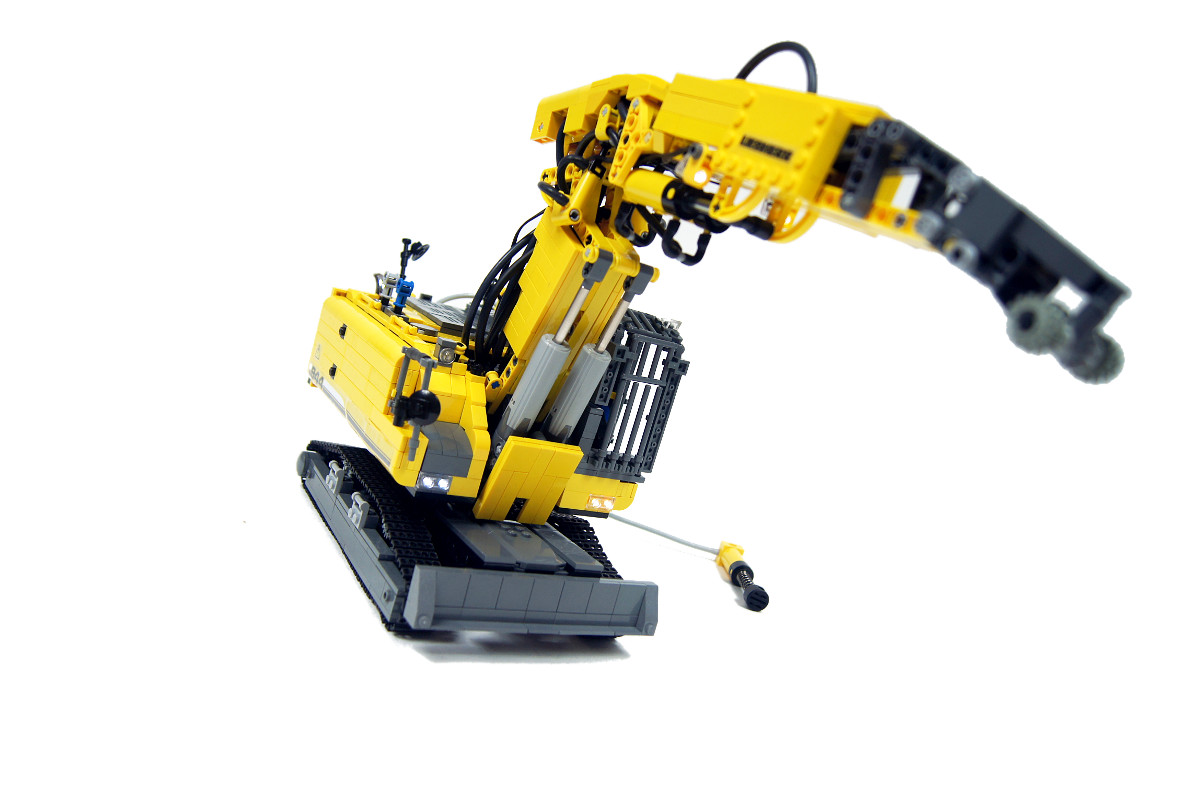
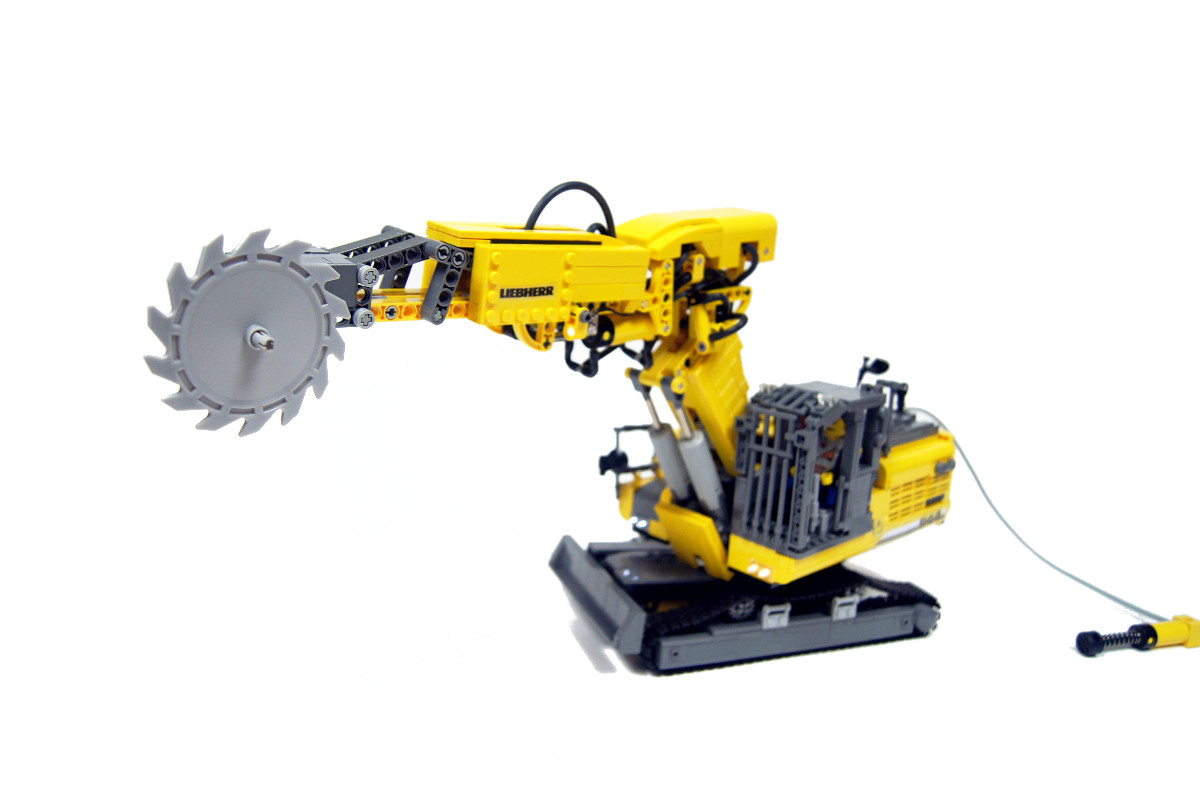
The model had 5 motorized and 4 pneumatic functions. The propulsion system was obviously motorized and consisted of two PF Medium motors geared 1:1 and located in the chassis. The chassis also housed a third PF Medium motor, which rotated the superstructure. The fourth PF Medium motor was located inside the superstructure and drove two large linear actuators that controlled the elevation of the arm’s first section. As the actuators were effectively handling the weight of the entire massive arm, I have assumed that pneumatic cylinders would be too weak or too inaccurate for this task. Finally, there was a 71427 motor located at the back of the hull, and it was chosen because it’s shorter than a PF Medium motor. Its function was driving the milling head, which was done by a single long driveshaft that went all the way from the back of the hull to the tip of the arm and which was articulated in five places.
The 71427 motor was not controlled remotely, like the other four motors, but was instead connected to a switch located in the front right part of the hull. The same switch controlled two lights on the arm, as there was simply not enough space inside the hull to connect them together with hull’s front and rear lights. As a result, the lights on the arm lit up as the milling head works.
The whole electric system was powered from a single 8878 rechargeable battery located in the rear left part of the hull. The battery was accessible through a hatch in the left side of the hull, and was lying on its side in order to stay aligned with the side body panel.
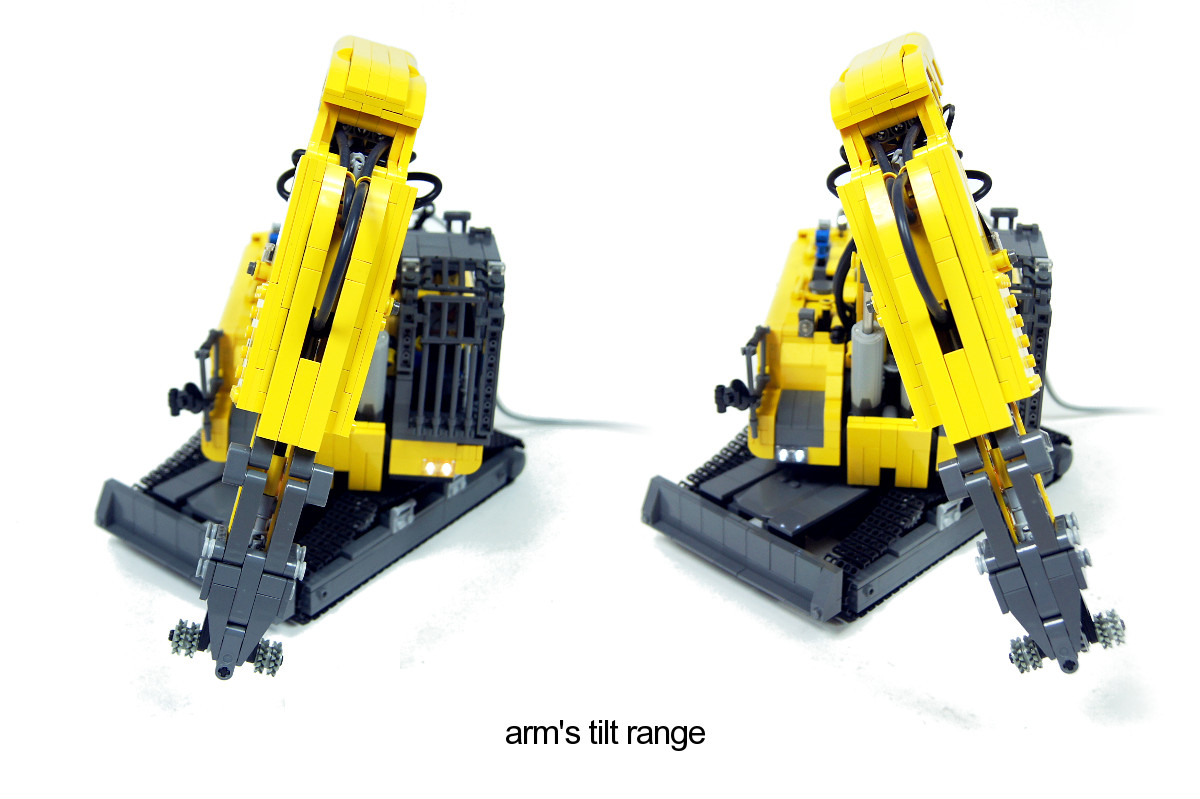
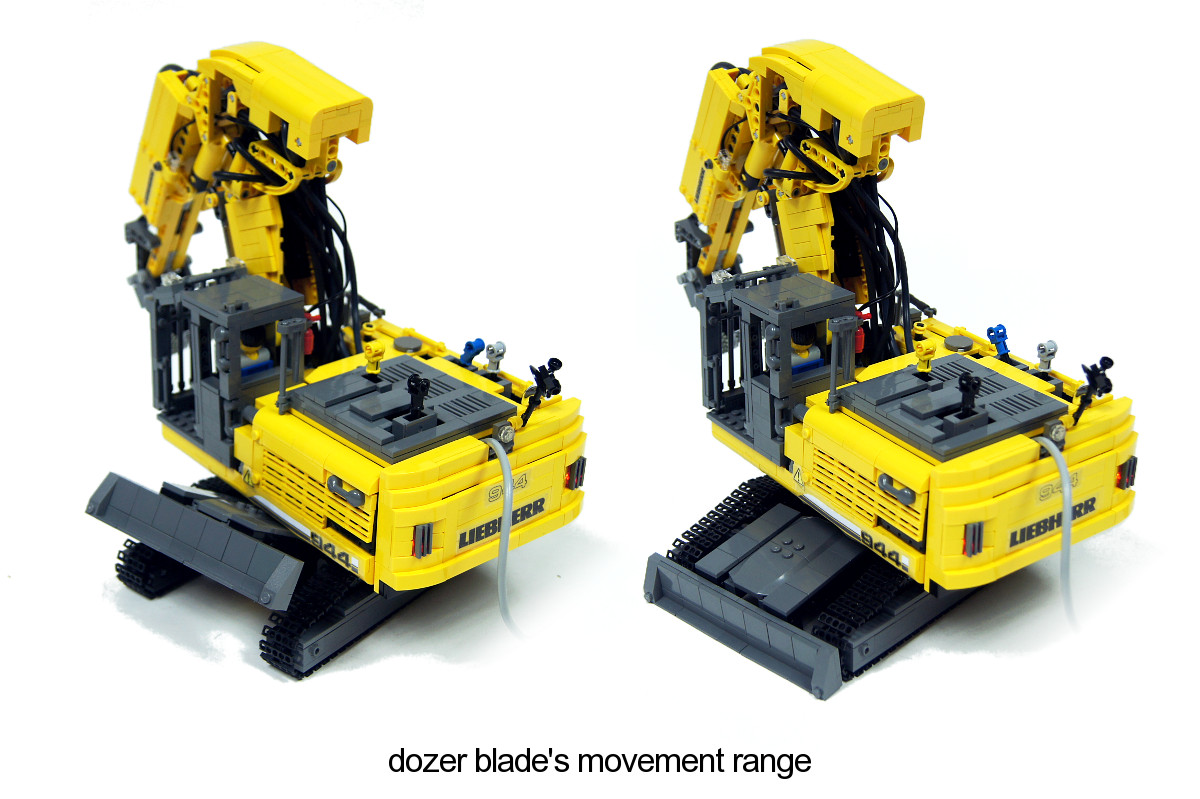
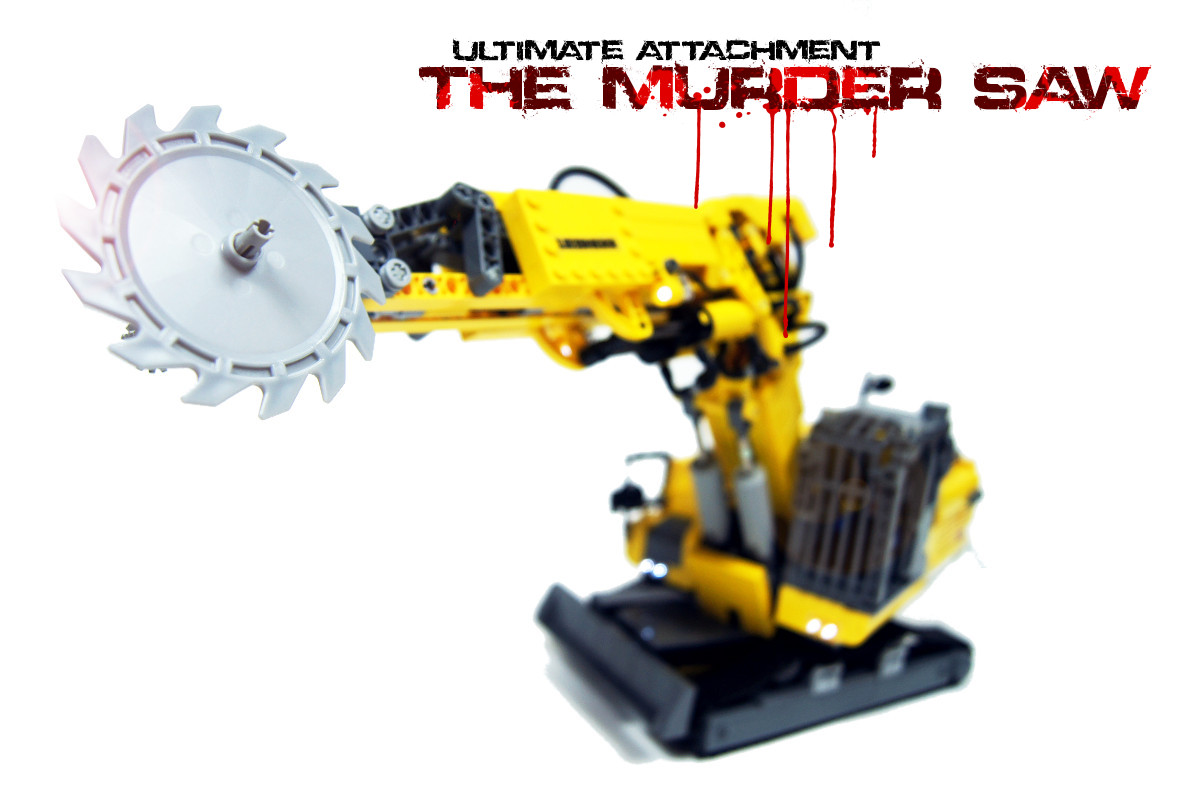
The pneumatic system consisted of a single large cylinder that controlled elevation of the dozer blade in front of the chassis, two small cylinders that tilted the arm’s second section left and right, two large cylinders that controlled elevation of the arm’s third section and a single large cylinder that controlled the angle of the arm’s head. The arm itself was a fully studless structure partially covered by a studfull shell. Its range of movement was reasonably close to that of the original machine, and it was robust enough to support the model on one side. The milling head could be easily removed and replaced by e.g. a bucket or… something else.

It should be noted that the model’s driving speed and superstructure’s rotation speed were both inflated. I have done this on purpose, because I wanted to use the full potential of the model’s motors, knowing that I can reduce the abundant speed at any moment using the speed dial remote.
I was fairly satisfied with this model. It was compact yet full of various functions, it blended motors, linear actuators and pneumatics using the advantages of each, and it looked quite good and accurate. Despite having no gear reduction at all, it was perfectly able to push and tow the 8110 Unimog set which weights over 2 kg. I consider it a noticeable step forward from my previous excavators in terms of blending aesthetics and functionality, and – unlike my previous excavators – it appeared free from severe disadvantages to me.


@Witherley
I think the 8436 set would be good for starters – plenty of pneumatic parts and a good lesson on how to use them.
I want to get into pneumatics too, but I don’t know how I should go about buying the parts. What parts should I get for starters?
I have only recently begun technic building with my son. Your site and MOCs are amazing! I purchased your book; it’s on its way! I have purchased a few random Lego Power Functions (motors, remote, etc). I’d like to purchase the the 42006 Lego excavator and motorize it. I can’t seem to find any instructions to do so. The 8043 kit has been retired. There are few on ebay but very expensive!
http://shop.lego.com/en-US/Excavator-42006
http://www.youtube.com/watch?v=mJv3nrN5ETY
Any help would be appreciated. Can you point me to URL? Thank you in advance,
Jeff
@Muaddib
No, I start from the chassis and build from inside to outside.
@Sariel
It’s me again: o)
Thanks for your prompt answer. But now I have another question:
If you build your models, do you start with the the bodywork, then consider where to get each technical stuff and then add the individual components?
Or even everything is mounted at a time?
Thanks for giving a look in your mind.
@Muaddib
Thank you. As with 99% of my creations – no, there are no instructions.
Hi Sariel,
really great work, this liebherr excavator. Are there instructions available?
I work as a civil engineer at an engineering company for tunneling and rock engineering
(http://www.mueller-hereth.com/index.php/en/)
So it would be very, very cool to have such an excavator.
Good start into the new week.
@Tut31
Actually, I got most of them from eBay.
So you got yours from brick link or from a set?
@Tut31
There’s nothing ironic about it, it’s very logical. Small cylinders were released in few sets and they are much less common than the large ones, hence the price. Nobody estimates prices by what a specific piece can do.
It is really hard to get small pneumatic cylinders without spending a fortune. Even bricklink charges 10$ for one. It is ironic how the big cylinder cost less but can do more.
the bucket seems a bit shaky
@Der Bauer
I could if I had one.
Fucking good work 😉 can you send me the part list of it ??
@Black_Omega63
Well, as a hamster he’s an expert on tunneling 😉
This is one epic creation. 🙂 I love everything about it. Pure genius. Just absolutely epic.
P.S. I never knew Lucius had a driving license! 😀
@shawn
Yes, of course. There was no other Lego Technic shuttle as far as I know.
I saw on on of your projects (can’t remember which), that there was a huge technic shuttle you like, but you couldn’t remember the model number. Would this be it? 8480
@NxT bUiLdEr
That’s called a subtractor and I have designed two better ones several years ago.
I came across this techniques and thought it might be useful to you.
http://www.flickr.com/photos/blake-foster/5512753650/in/pool-788191@N24/
unusual…it goes to fast for a small little excavator but…its a good achievement 😛
@Daniel
I printed them on paper and used transparent tape to keep them in place.
How did you make the stickers or where did you get they?
@Mecho12345
Yes, these are old 14t gears. The saw was put on this: http://www.bricklink.com/catalogItem.asp?P=32054
How did you get “the murder saw” to spin, because it has a pin hole rather than a cross hole, andare the gears on te end of the boom the old 14t
very good work , 😉
@Philipe
Like this one?
http://www.youtube.com/watch?v=7ZcQ3BbUNhs
Really nice MOC. I’d like to see, if it is possible, a video about the 8110 lego set and its components. Thanks