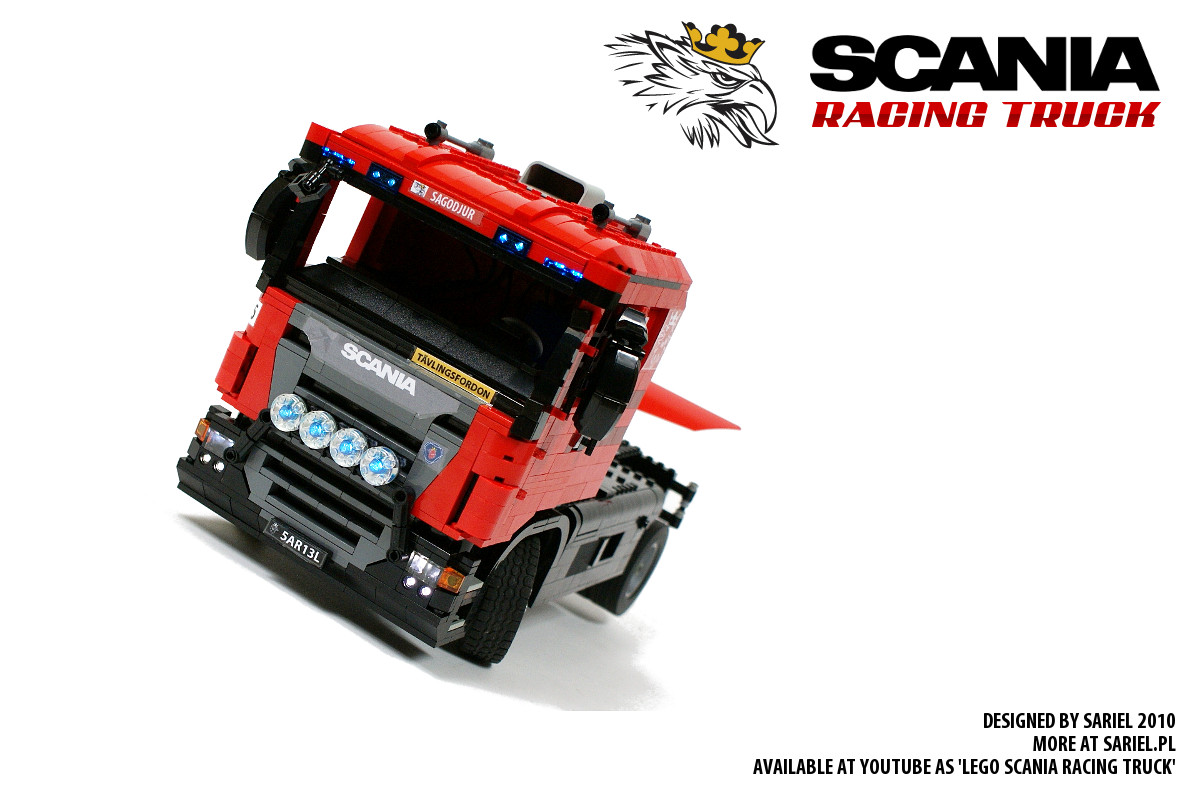
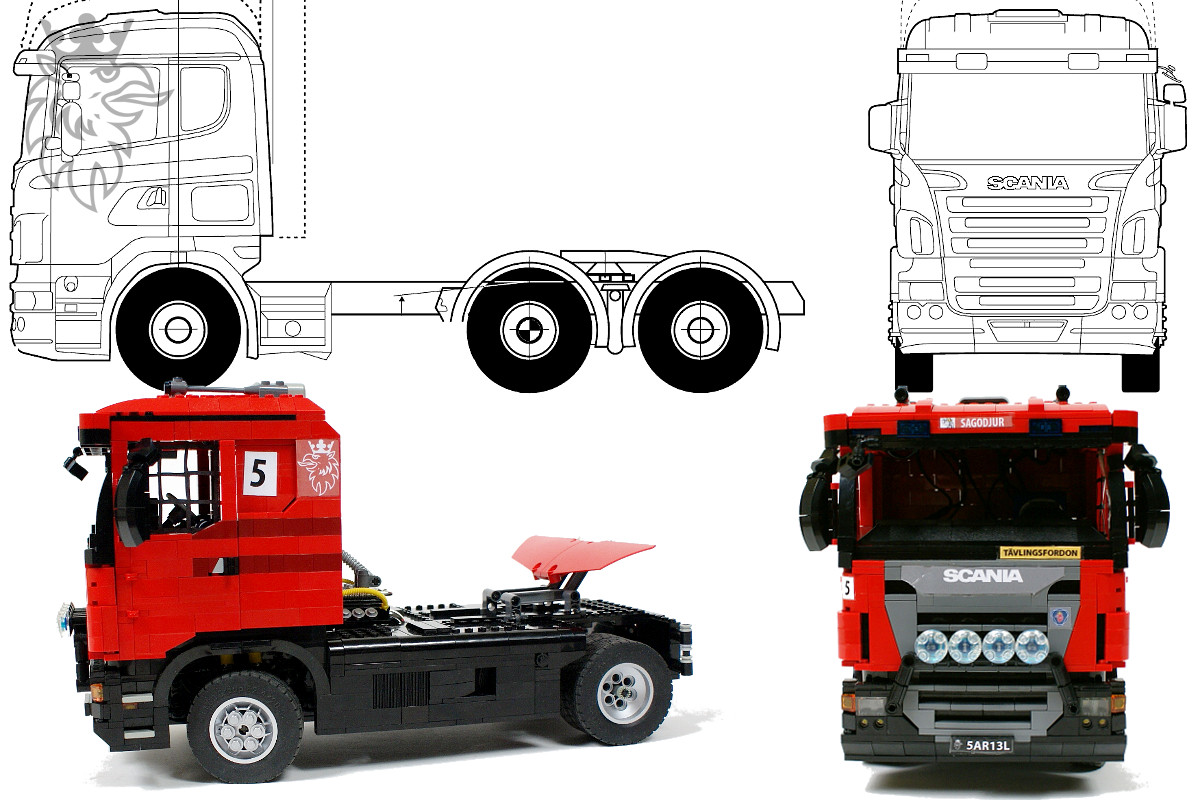
Scania Racing Truck

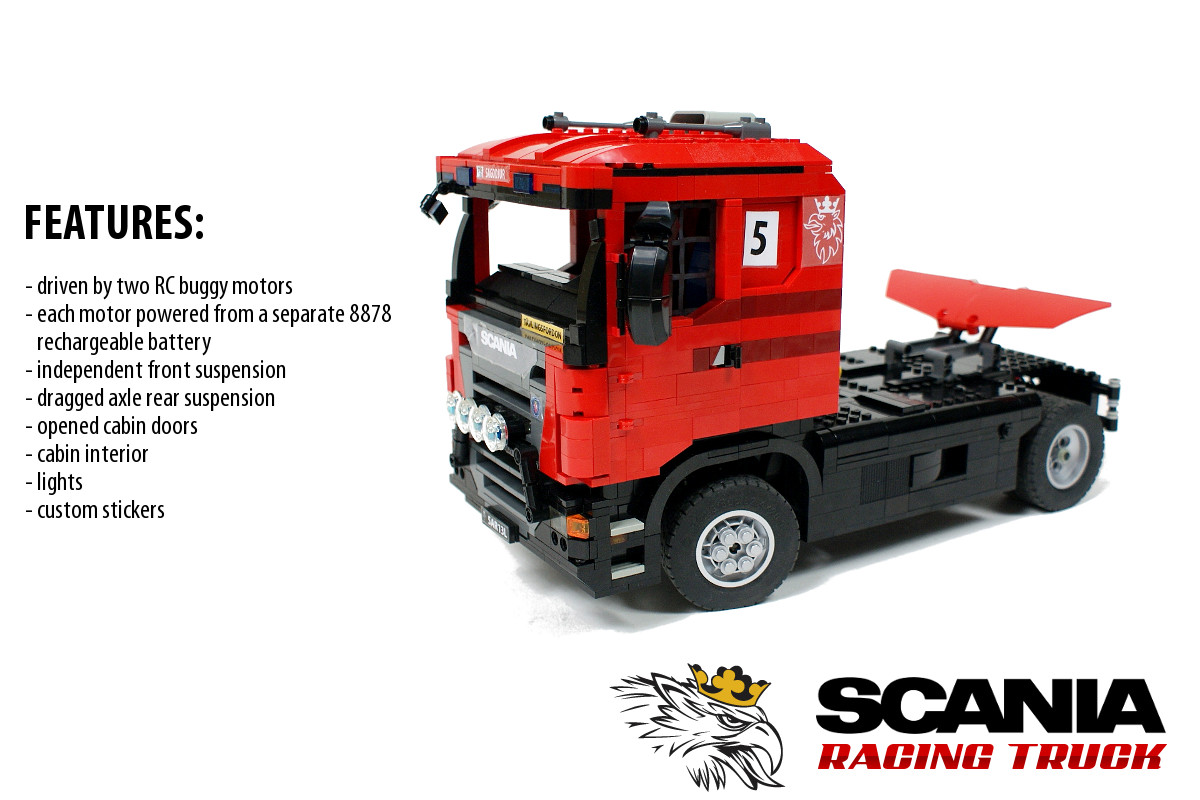
Model of a Scania R500 truck modified as a racing version. Features full suspension, powerful propulsion system with two independently powered RC motors, lights, custom stickers, cabin with full interior and opened doors.
Datasheet:
Completion date: 05/07/2010
Power: electric (Power Functions)
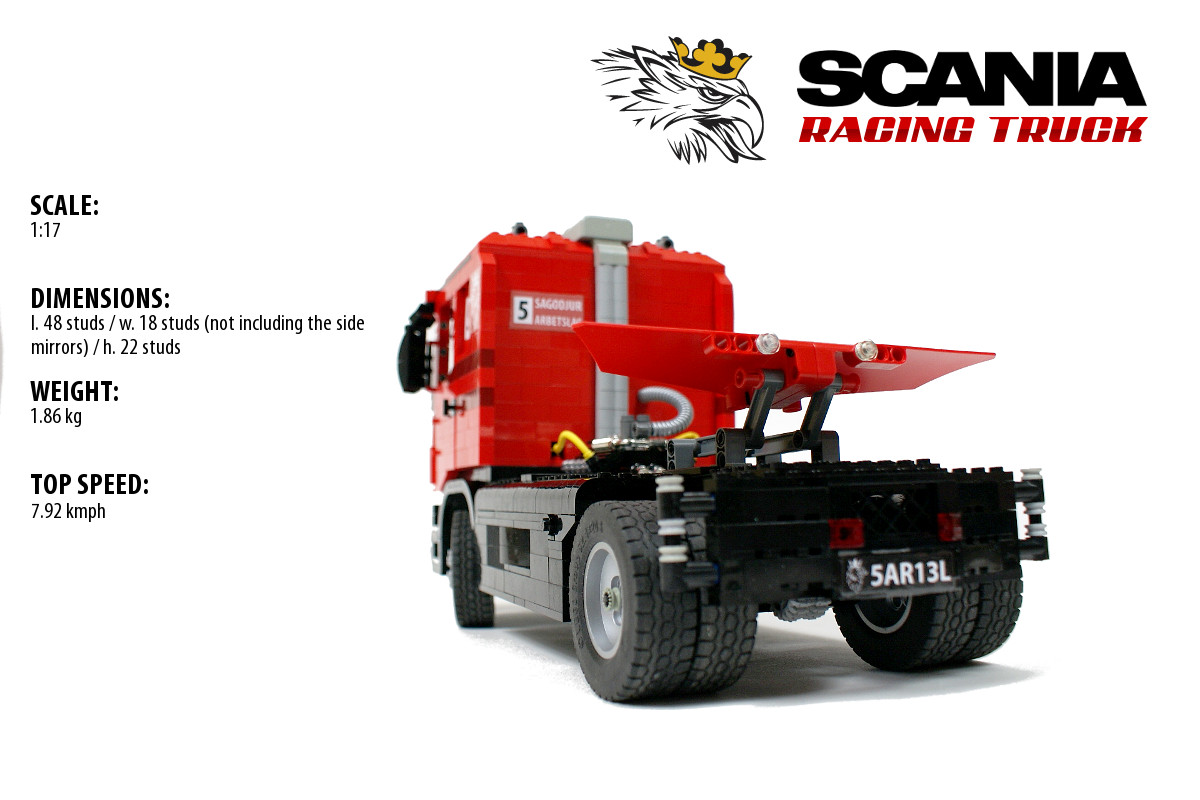
Dimensions: length 48 studs / width 18 studs (not including the side mirrors) / height 27 studs
Weight: 1.86 kg
Suspension: front – independent / rear – dragged axle
Propulsion: 2 x RC buggy motors powered from separate batteries through separate IR receivers, geared down 1.66:1
Top speed: 7.92 kmph
Motors: 2 x RC, 1 x PF Medium
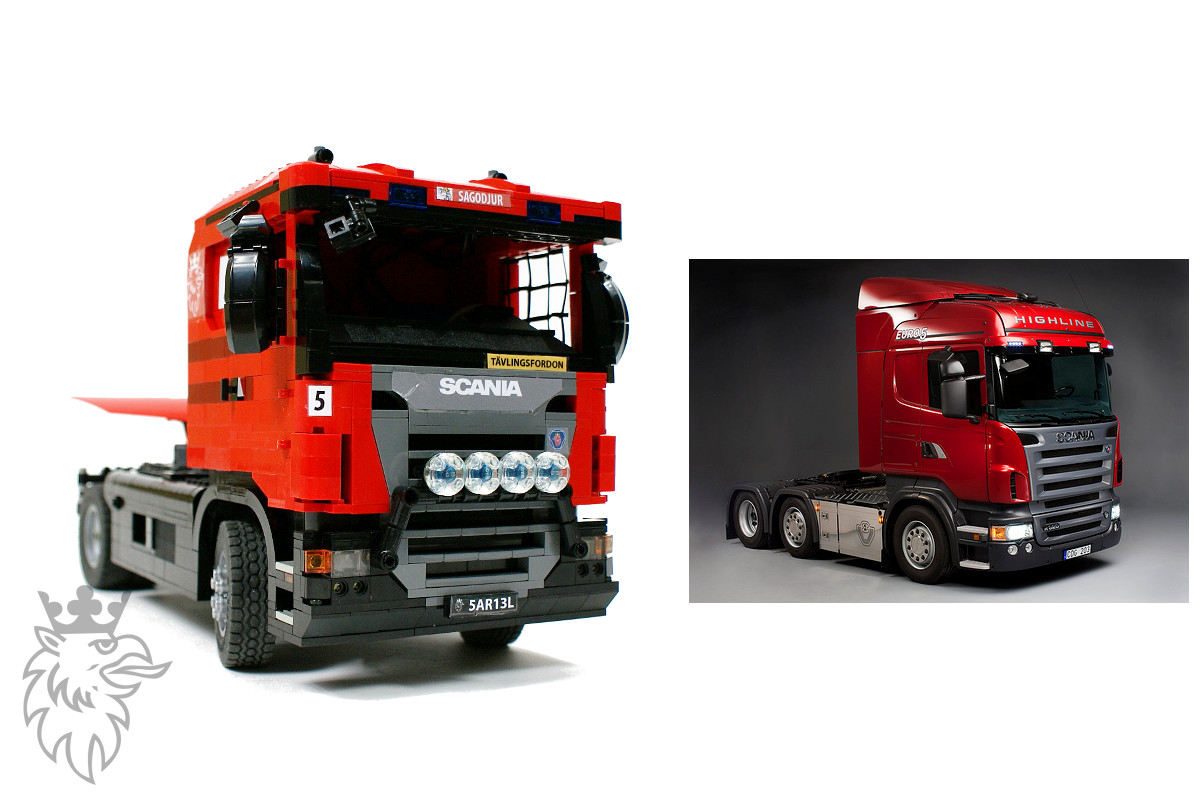
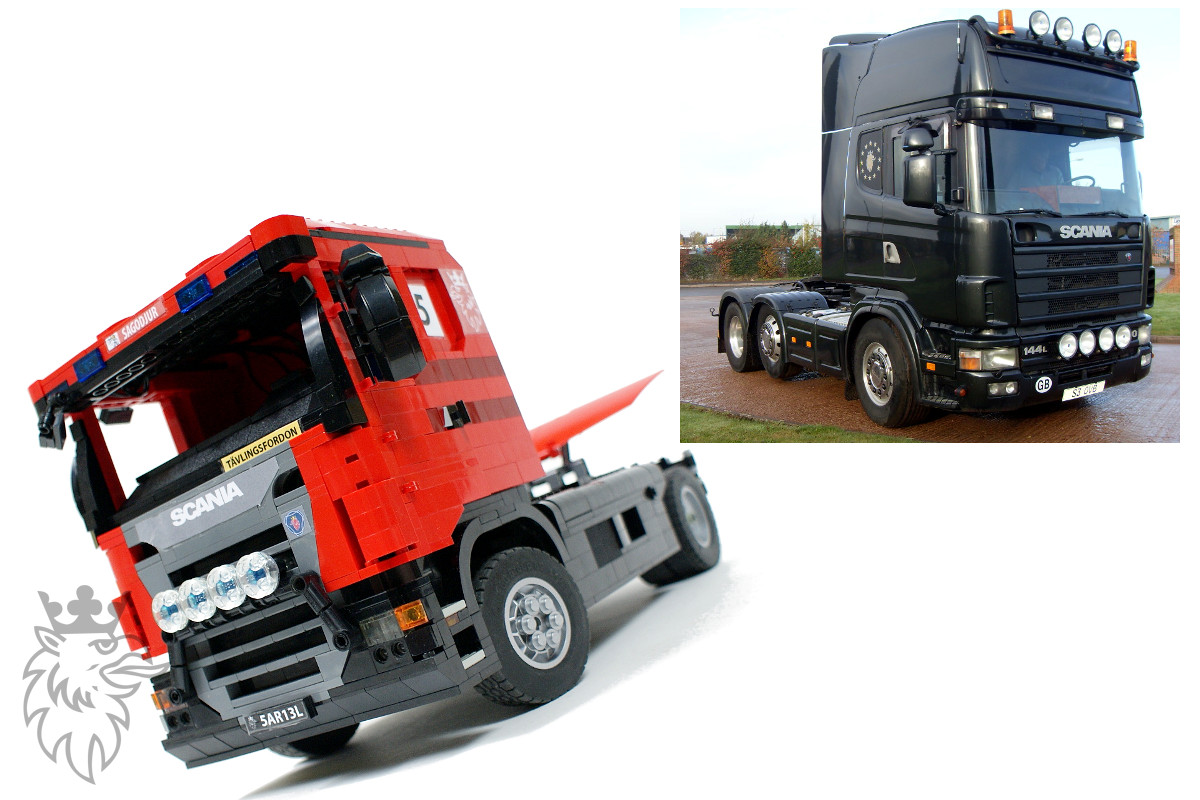
I’m really fond of modern Scania trucks. I have built a model of a Scania dumper truck in 2009, which – while being technically simple – has gathered a significant acclaim because of the quality of its aesthetics and because of the number of details incorporated. I was not fully happy with it, however, because I found the cabin’s look inaccurate and simplified. This was the primary reason why I started to toy with an idea of building a much more accurate Scania model in a racing truck version. Right from the very beginning I wanted it to be red with some chrome and metallic silver elements, which is why I was not convinced of realizing this model, as it had to be expensive to build. Over the time, however, I have gathered a number of chrome and metallic silver elements, and I have determined that it would take less red parts that I initially thought, as Scanias usually have their lower part of the cabin plain black.
Building this model became eventually achievable when I designed the complete exterior of its cabin using the MLCad software and when I bought four metallic silver wheels (to go along with the two I already had). With MLCad model serving as a very accurate shipping list, it became only a matter of time before the red racing Scania would be built.

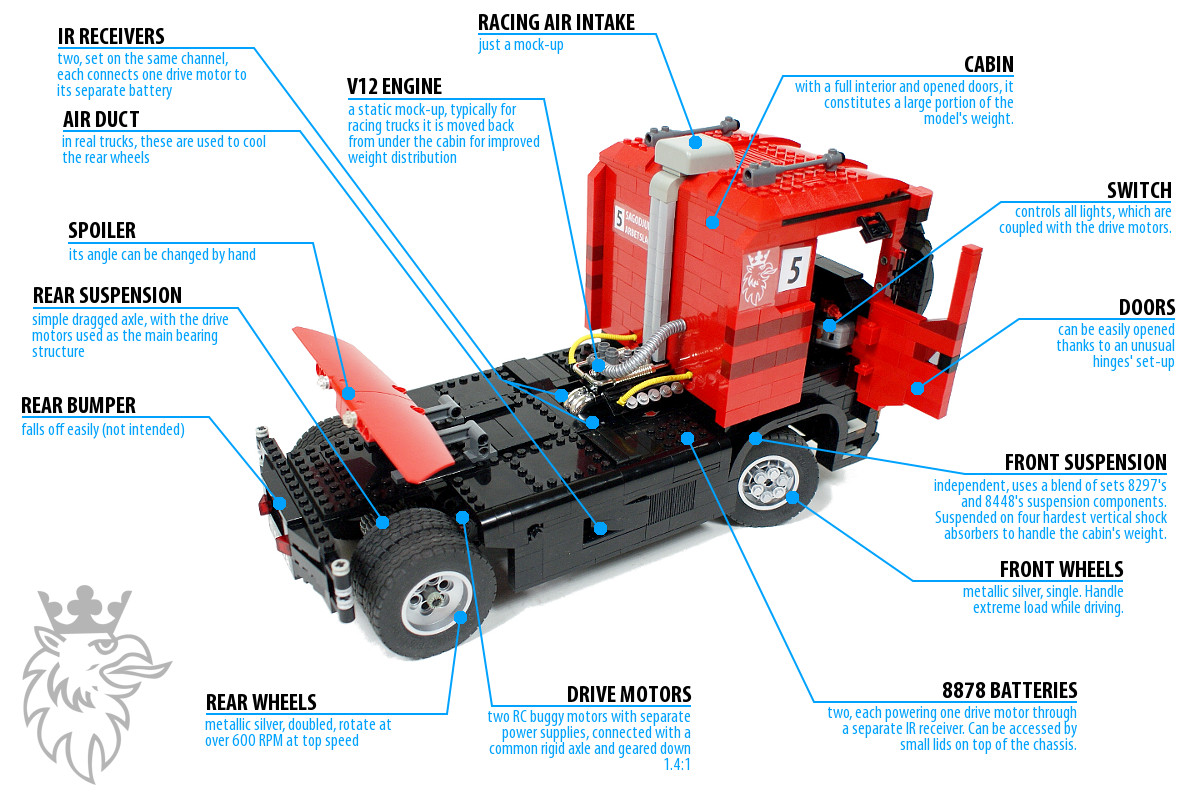
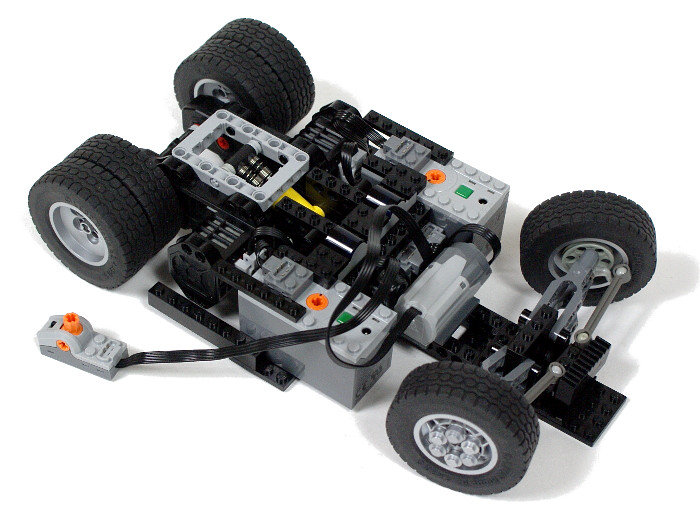
I have built a number of racing trucks before, which provided a significant building experience. Based on it, I didn’t want to focus just on the aesthetic side of the model – I wanted it to perform well too. The key to surpass the performance of any of my earlier racing truck was the use of RC buggy motors for propulsion, as they offer somewhat more mechanical power than PF XL motors do, and they are also more suitable for fast vehicles, with less gearing or no gearing whatsoever needed. To use two RC motors at the same time while keeping the model’s weight reasonable I had to use the 8878 battery as a power supply. Since it was downright impossible to power two RC motors to a single battery because of their extremely high power consumption, I had to no other choice but to get a second 8878 battery. Thus, the model needed some serious investments before I even started to build it.
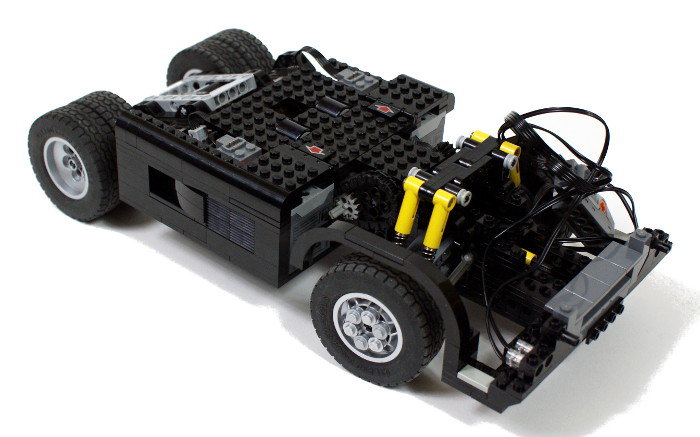
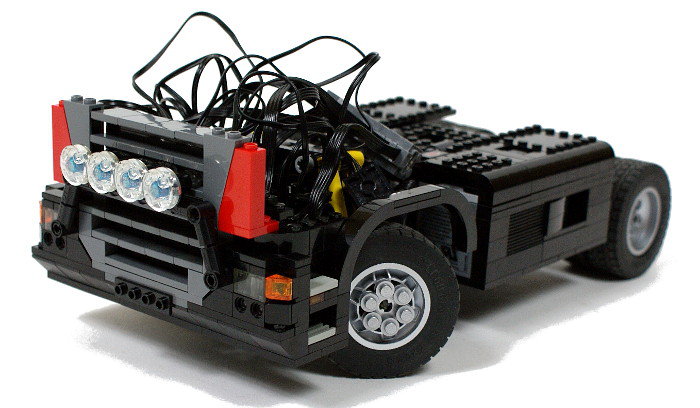
The model’s chassis was initially built with both RC motors using no gearing whatsoever – both motors were simply connected directly to the rear axle. Thanks to their convenient shape, it was possible to use them as the main bearing structure for the whole rear suspension which dramatically increased the internal space available inside the chassis. Thanks to it, chassis housed not only two 8878 batteries and two IR receivers, but also PF Medium motor for the steering, with all these elements located between the front and rear axle. The use of two IR receivers was necessary – since the drive motors were independently powered, they couldn’t be connected electrically and the only connection between them was rigid rear axle. With the initial rear axle set-up it was possible to use a differential between the motors but I dropped this idea for two reasons: firstly, a rigid axle was more efficient (no elements prone to slipping) and much less prone to a mechanical failure, and secondly the rear wheels had only limited traction while turning, since majority of the model’s weight was located above the front axle.
The independent front suspension was based strictly on my previous experiences with the models of racing trucks and used a blend of suspension components from the Lego sets 8448 and 8297. To handle the weight of the cabin, the front suspension was made very stiff, with two hardest shock absorbers set almost vertically above each front wheel. I have also used thin wedge belt wheels between the actual wheels and the chassis to prevent the expensive metallic silver wheels from rubbing away against the chassis – as it already occurred earlier, with slower and lighter racing truck models. The steering system had to be adjusted to the speed and the weight of the model, which is why it used a relatively insignificant gear reduction and no safety clutch whatsoever.
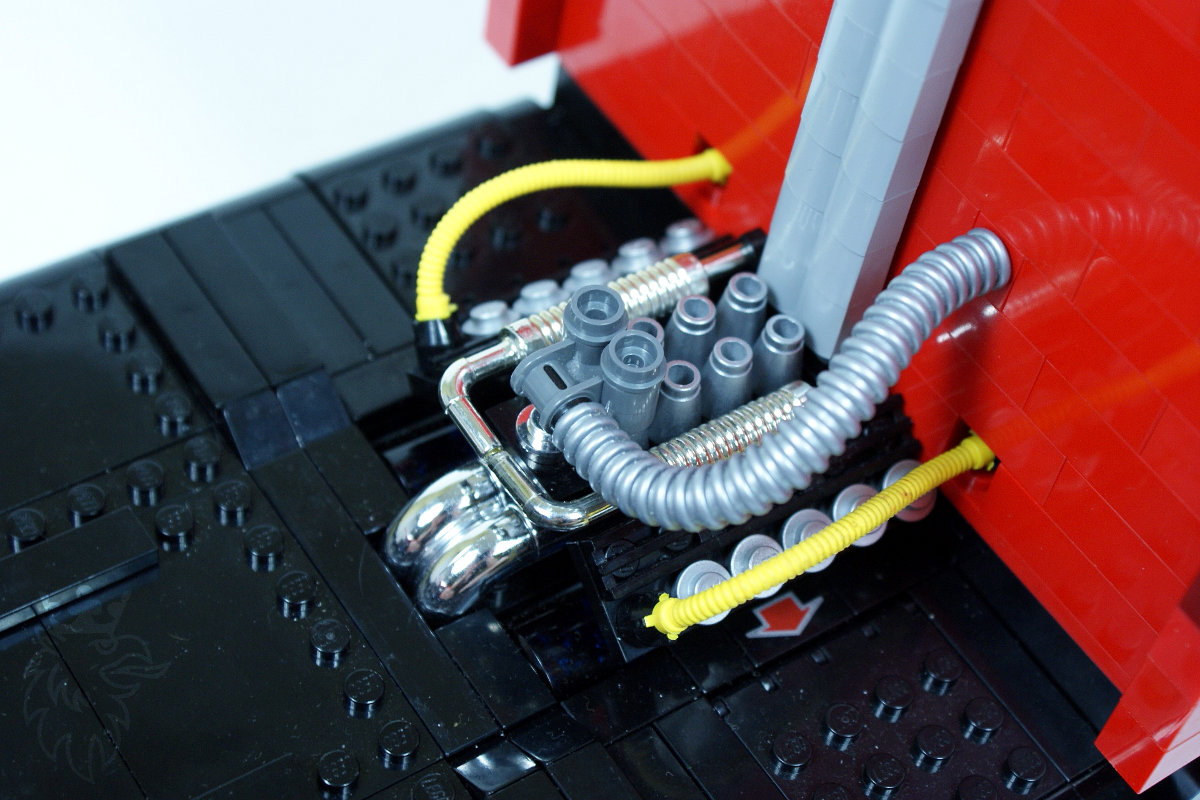
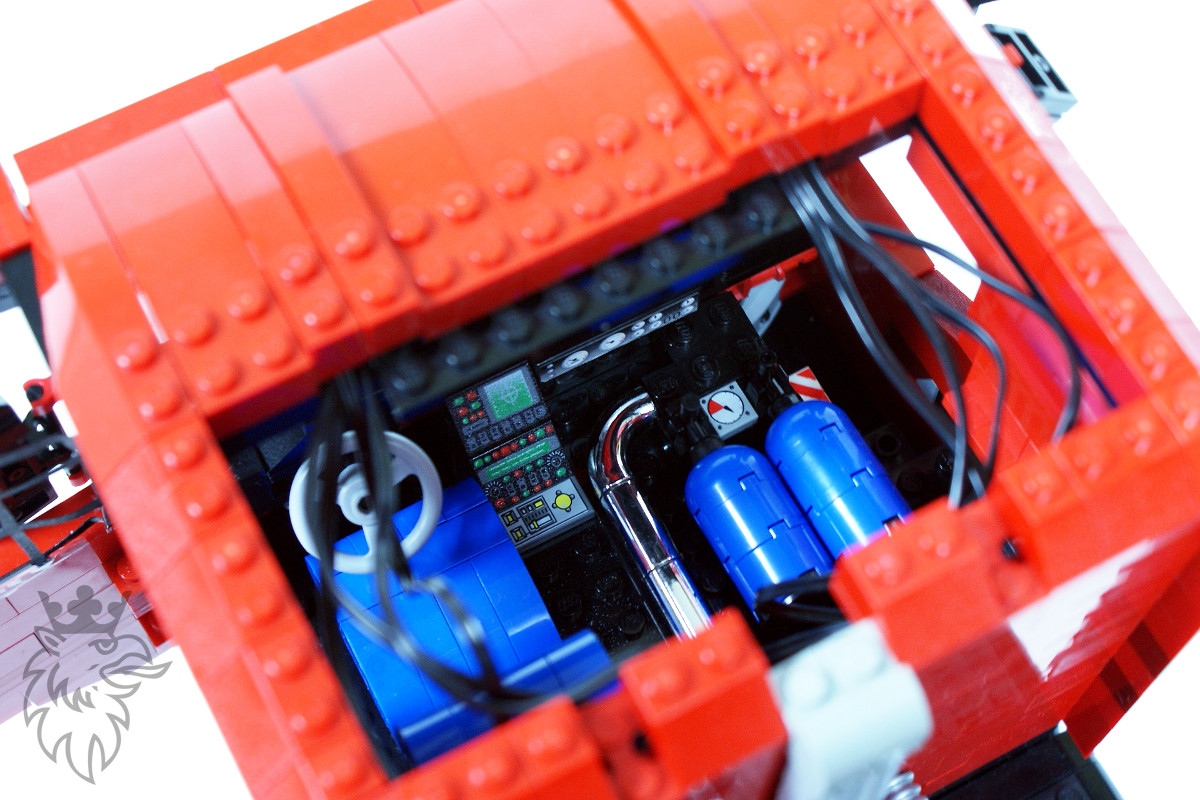
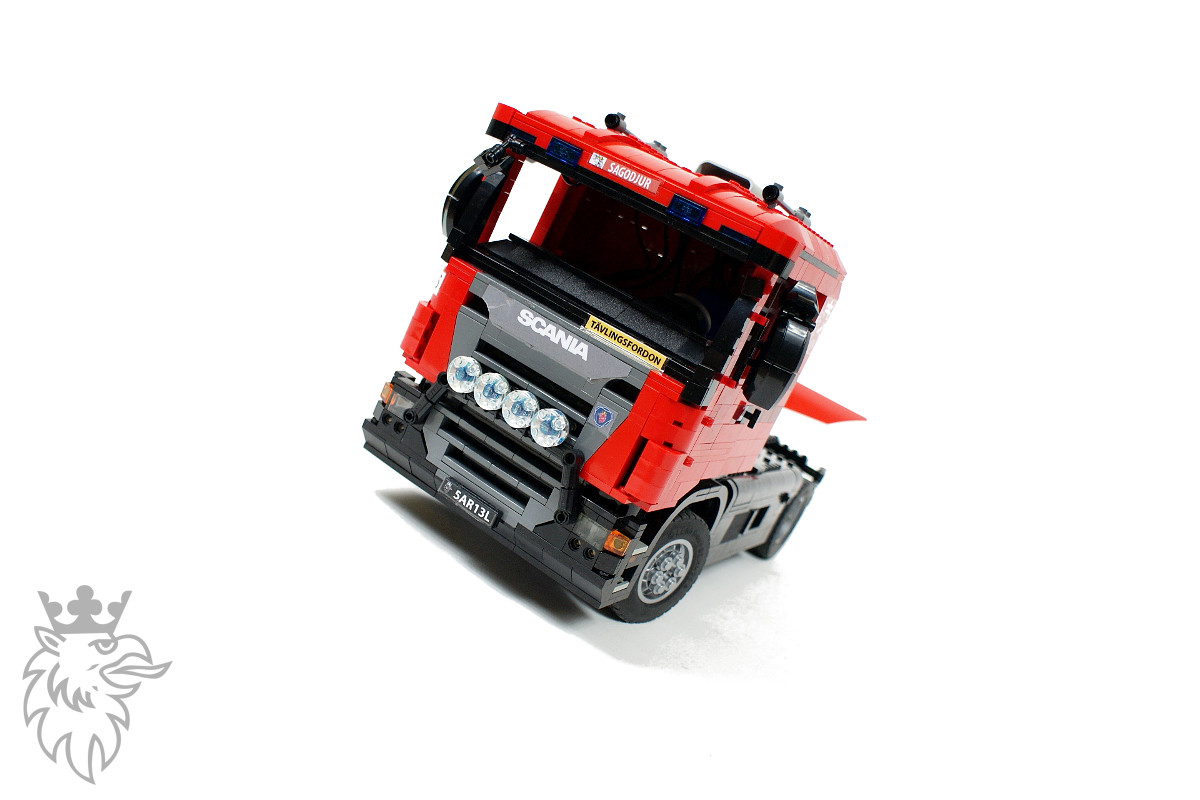
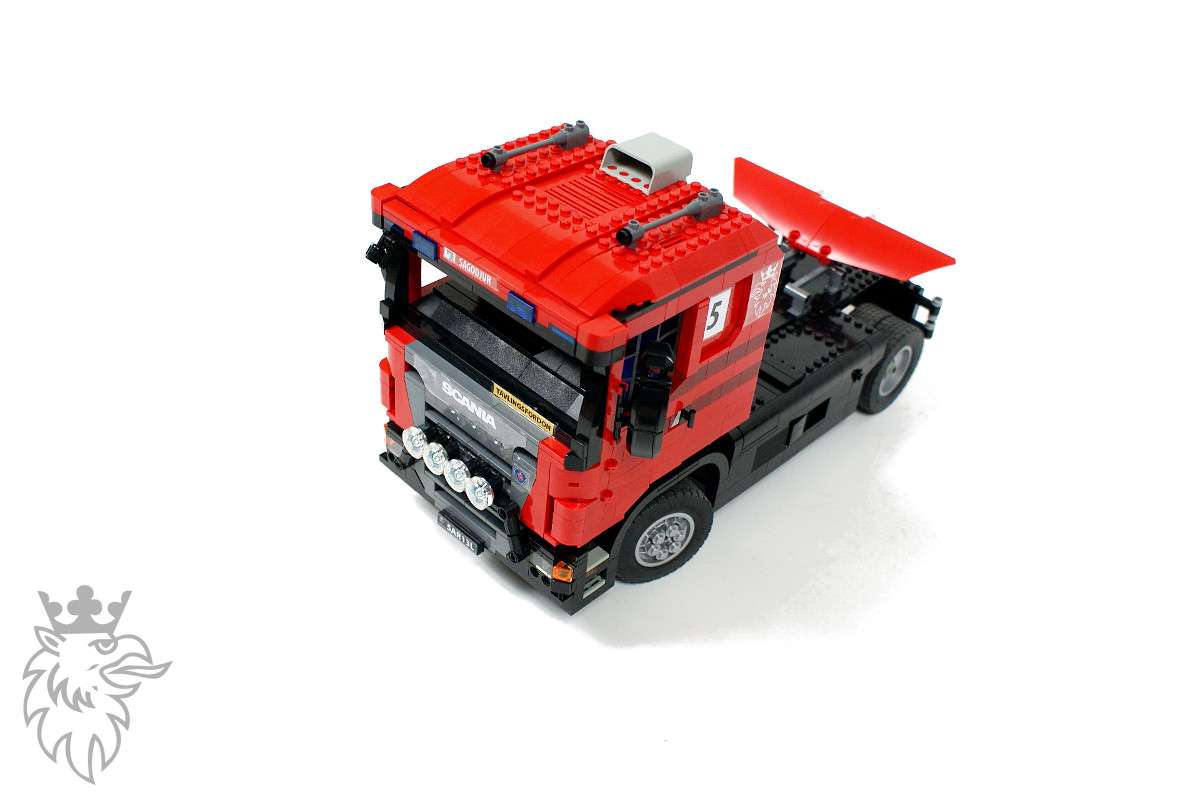
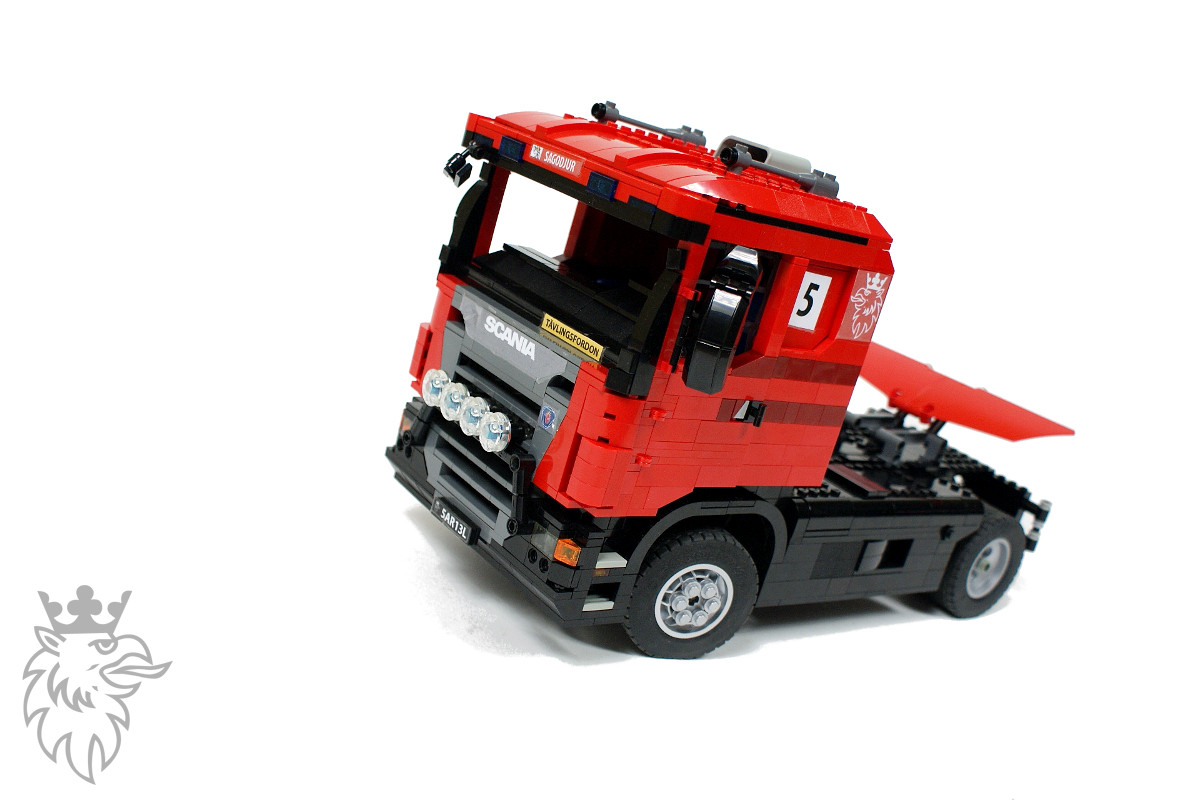
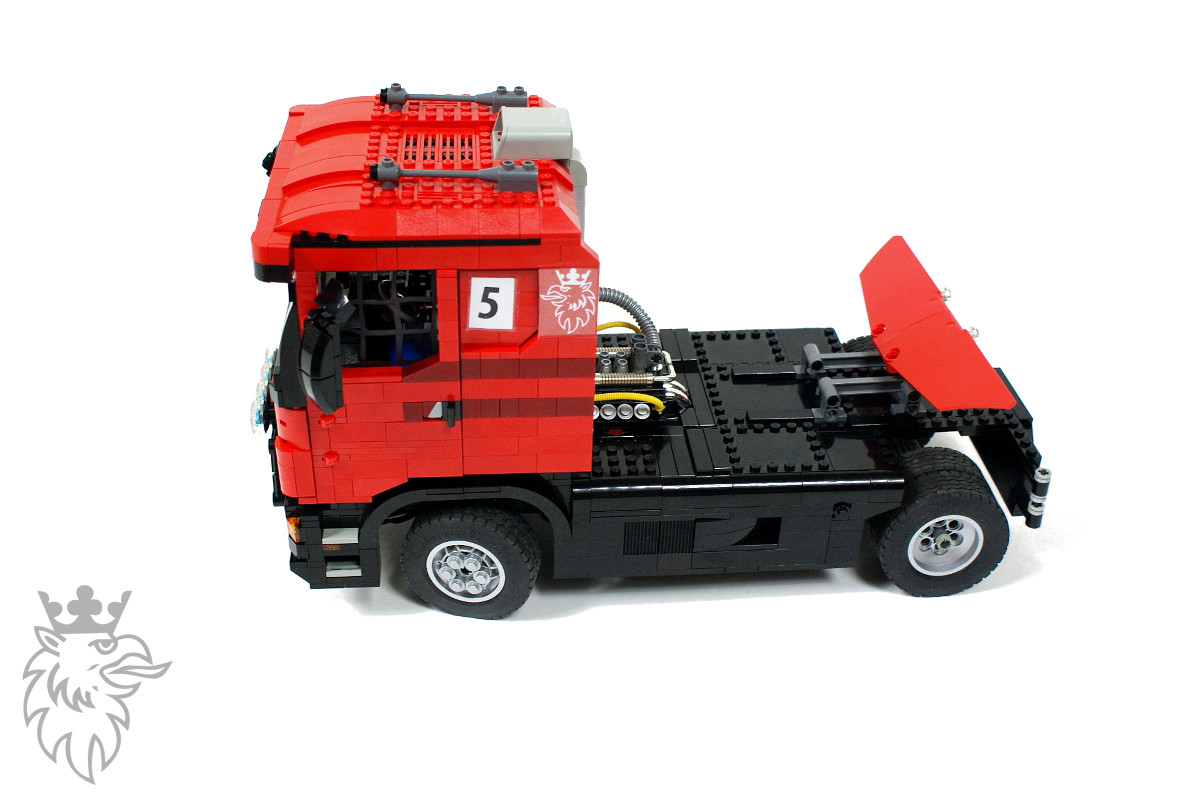
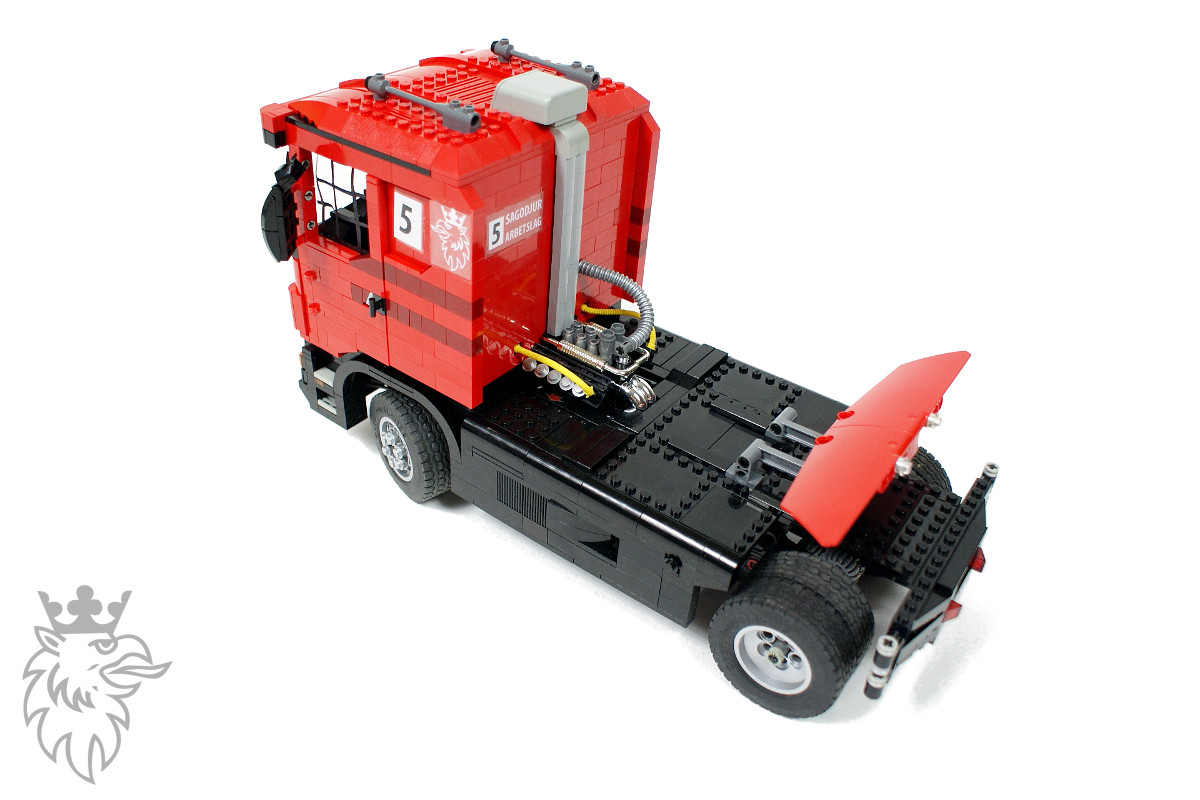
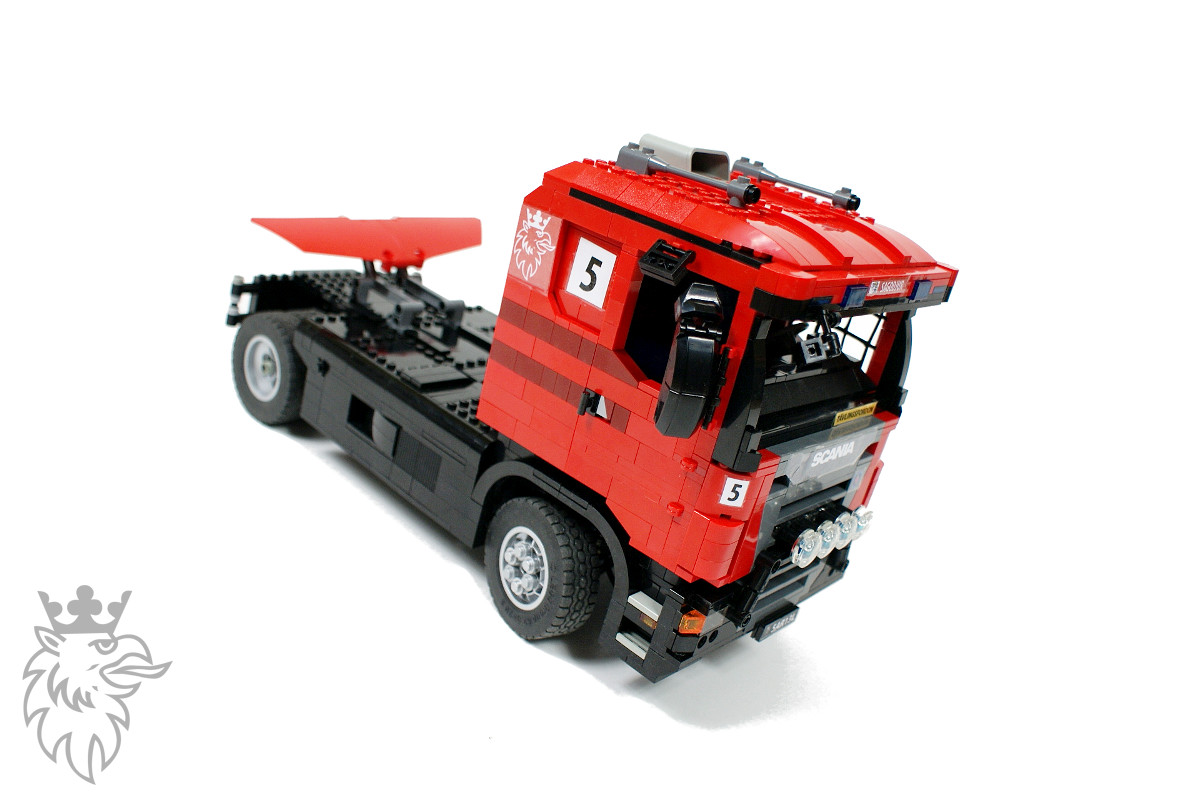
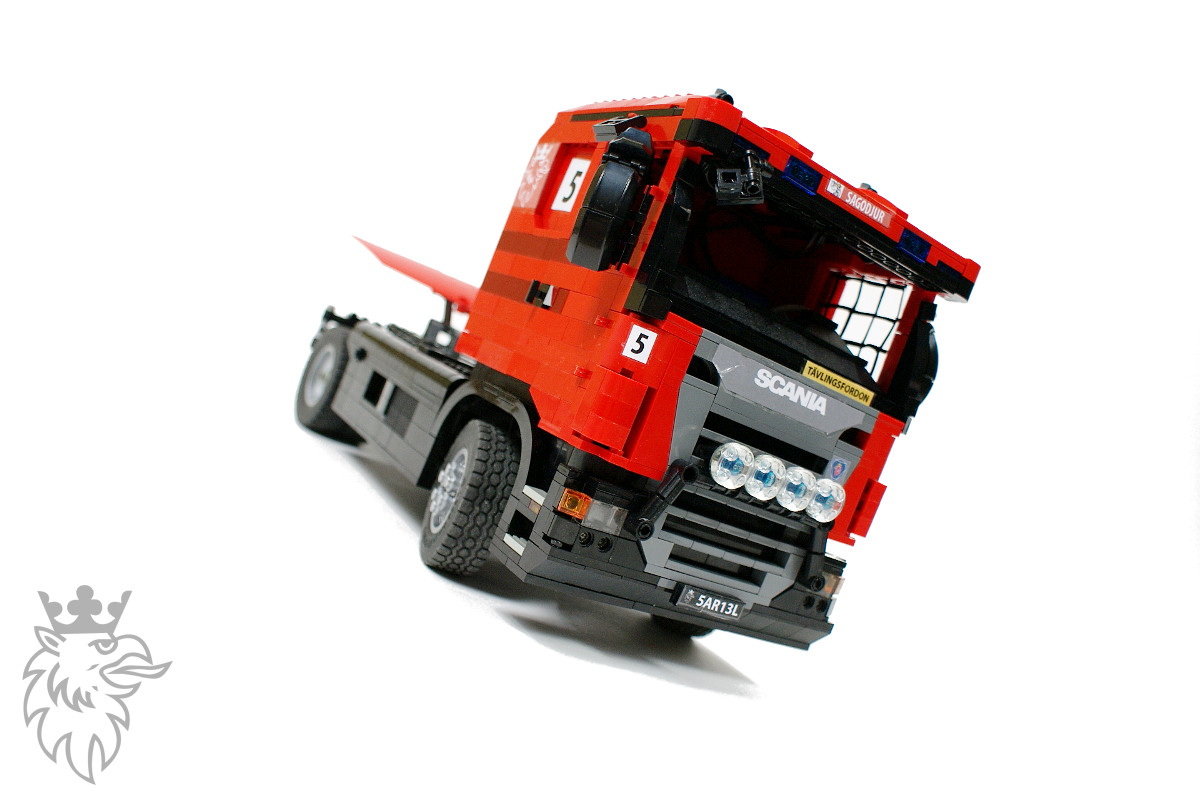
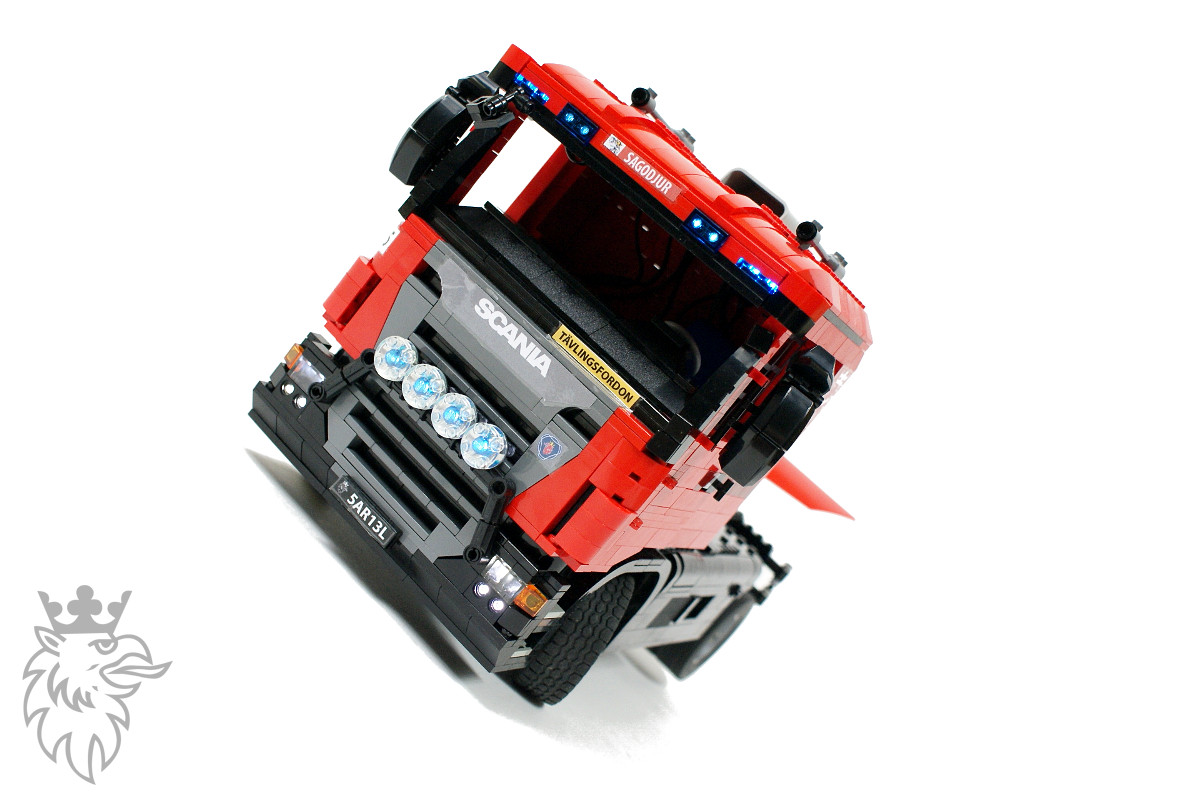
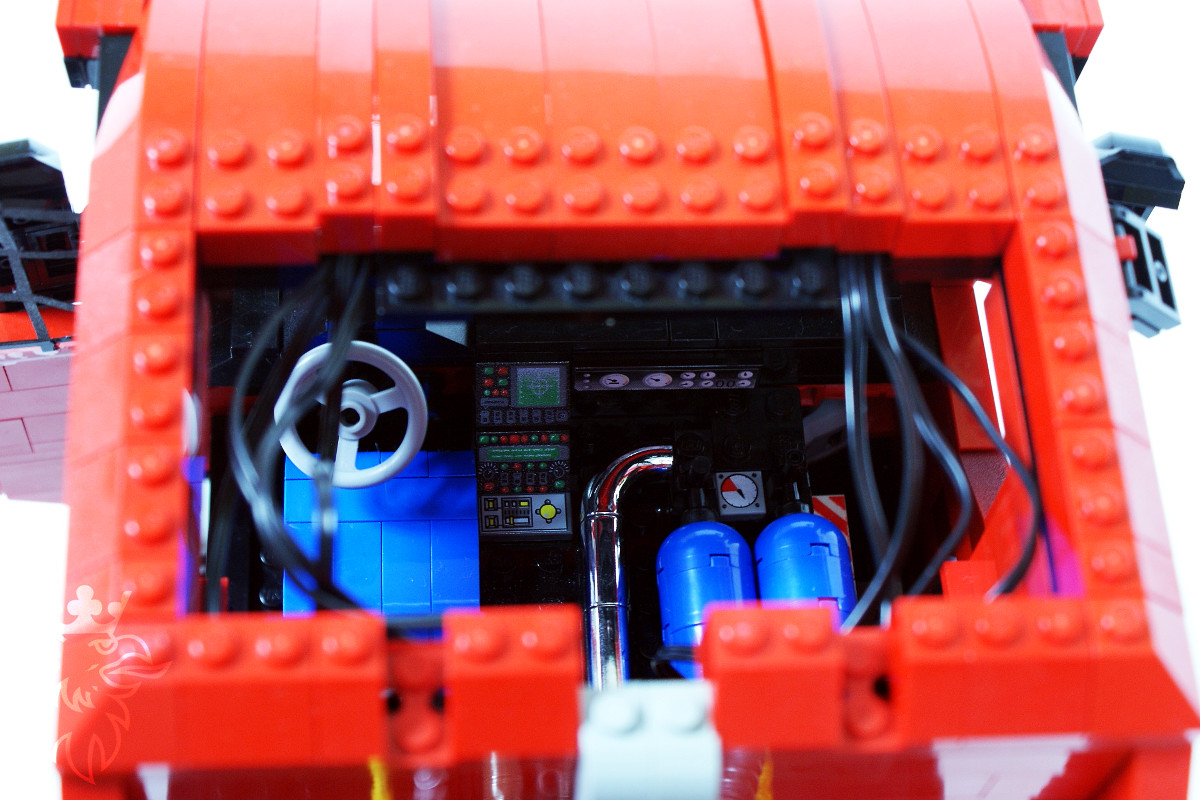
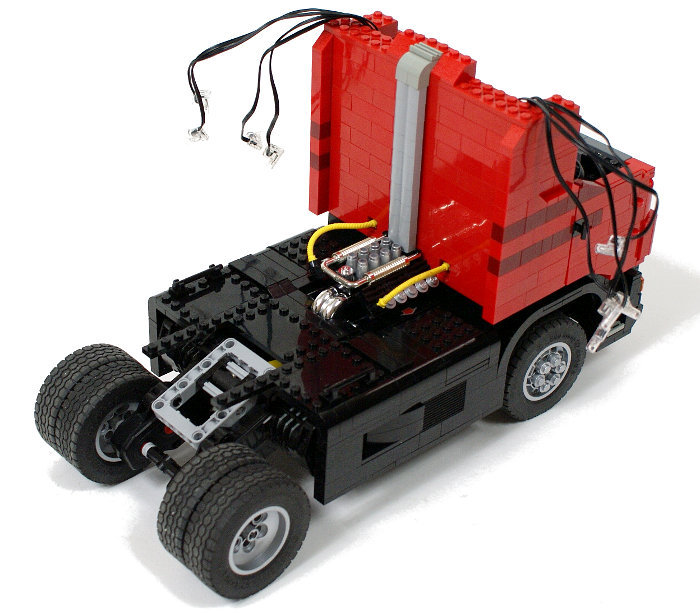
As for the aesthetic side, I came to think that the main disadvantage of my Scania dumper model was the fact that its distinctive front grill was completely flat, with air intakes simply marked with bricks of a different colour. Therefore I have put a lot of effort into inventing a system of recessed air intakes, which was eventually achieved with the use of 2×2 tiles. With plenty of internal space available in the cabin, this system could be used with a relative ease, providing an excellent aesthetic effect, as anticipated. Other than that, the cabin houses not only its own interior, but also a PF switch which controls all the lights (the lights are coupled with the drive motors and go brighter as the truck speeds up, so the switch is used primarily to turn this feature off when not needed, and thus to save energy which is so highly demanded by the RC motors). With 10 PF LEDs installed in the cabin, the switch takes a lot of space to contain 10 PF plugs with their respective wires. I was able to fit it in efficiently by mounting it on its side, so that the plugs are kept horizontally below where passenger’s seat would be located normally.

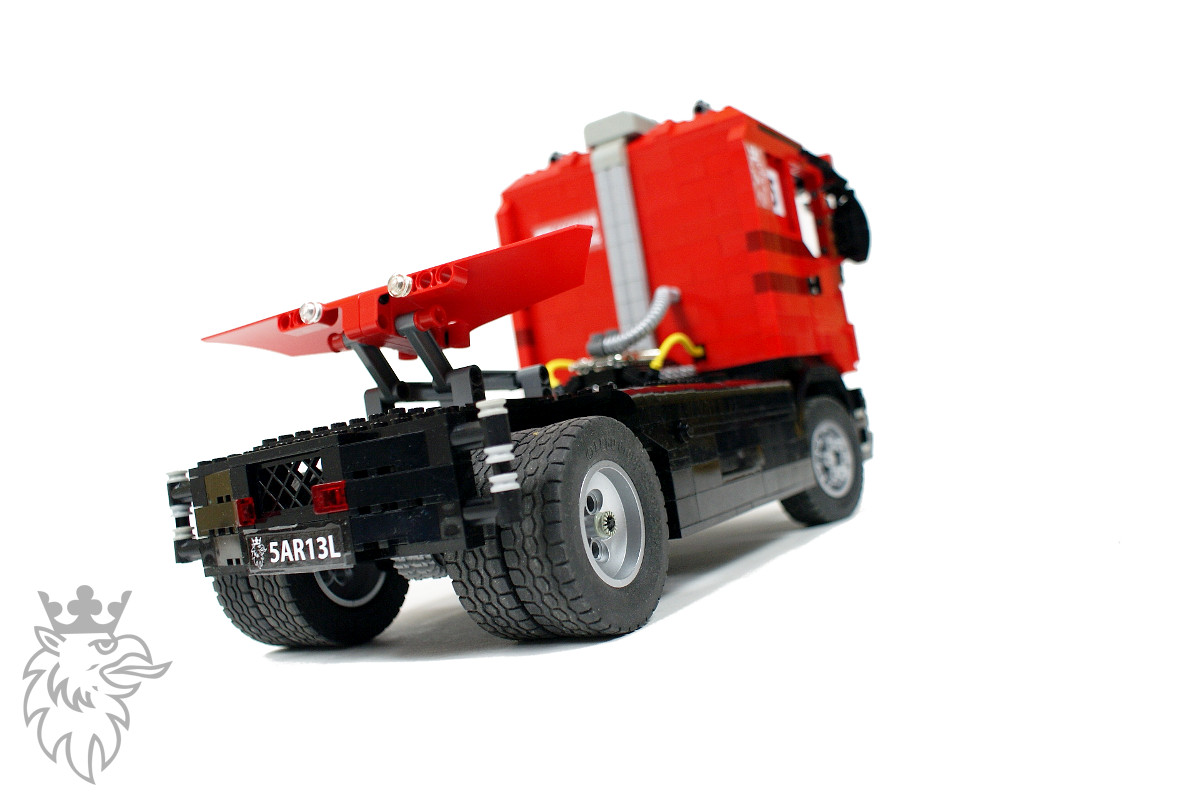
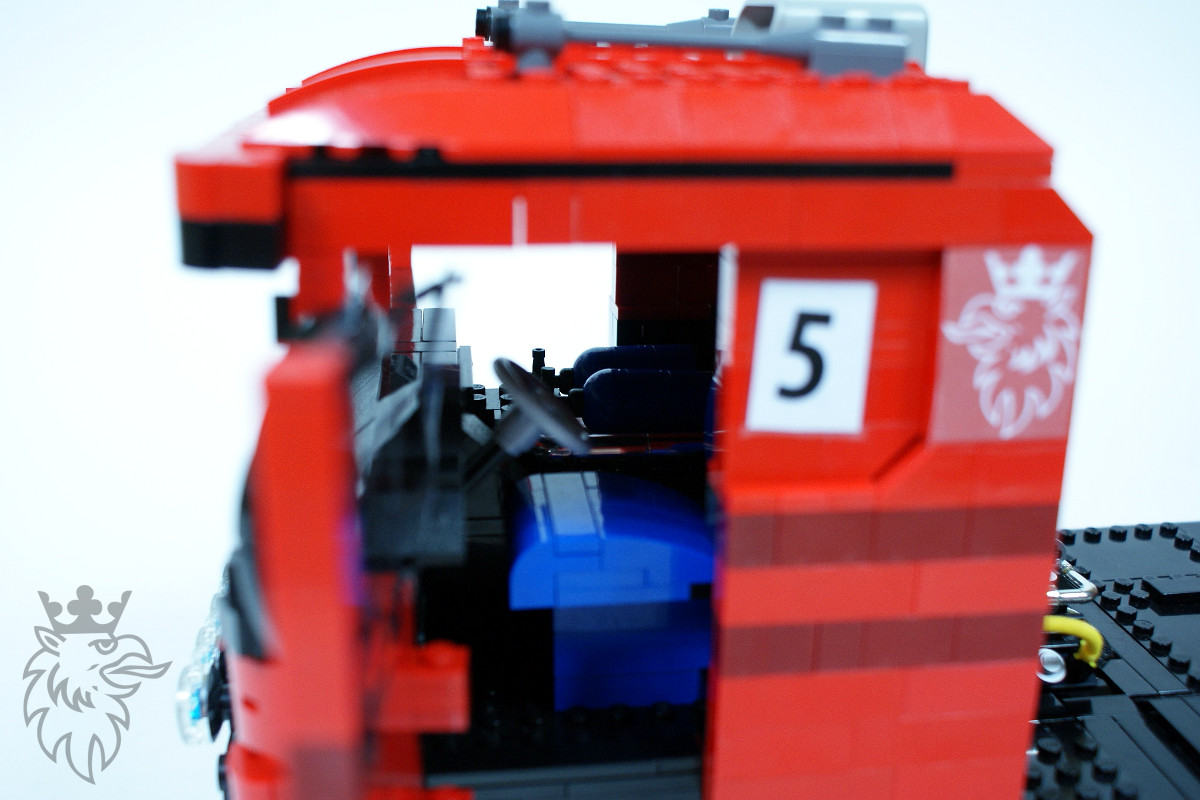
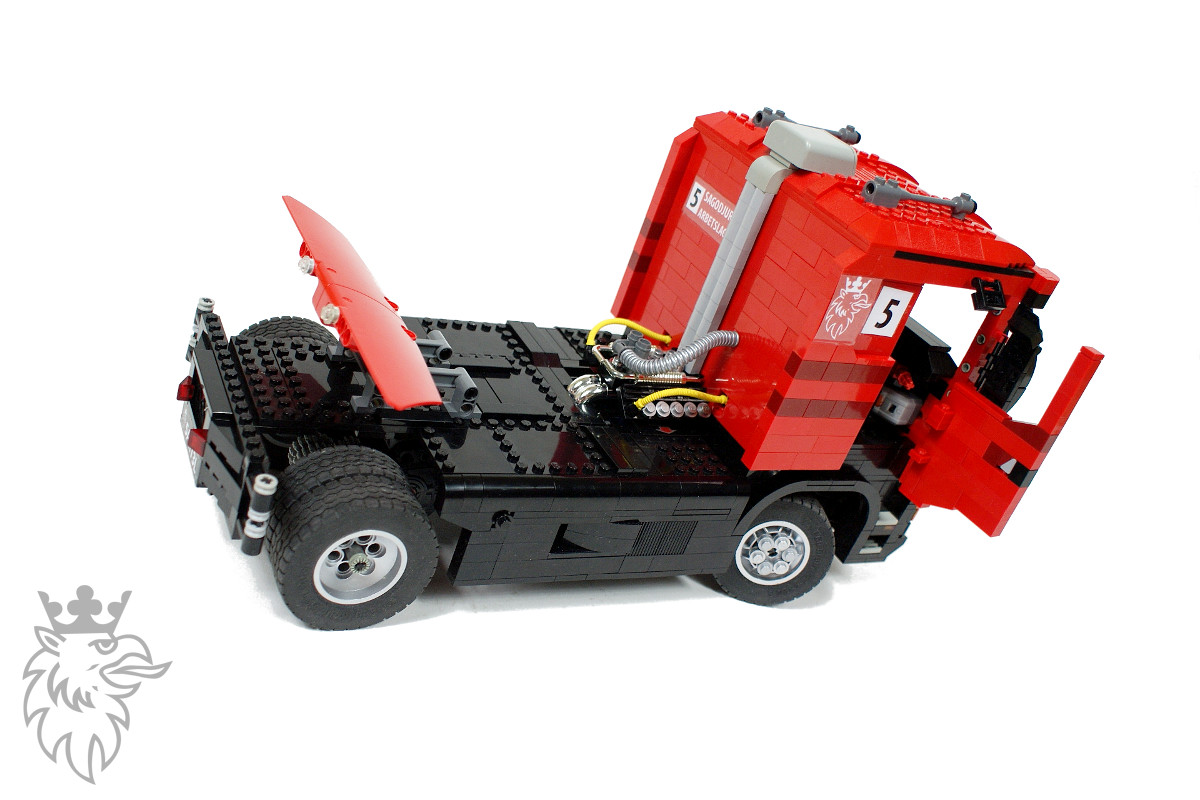
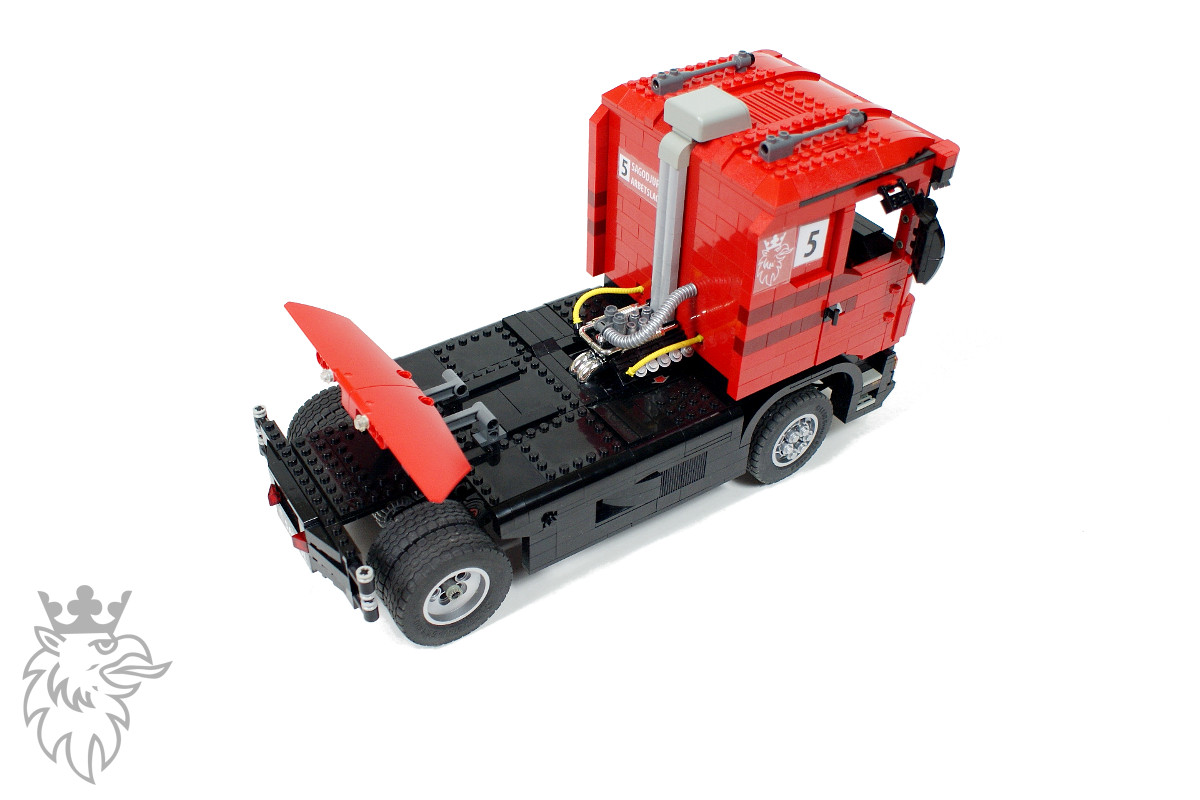
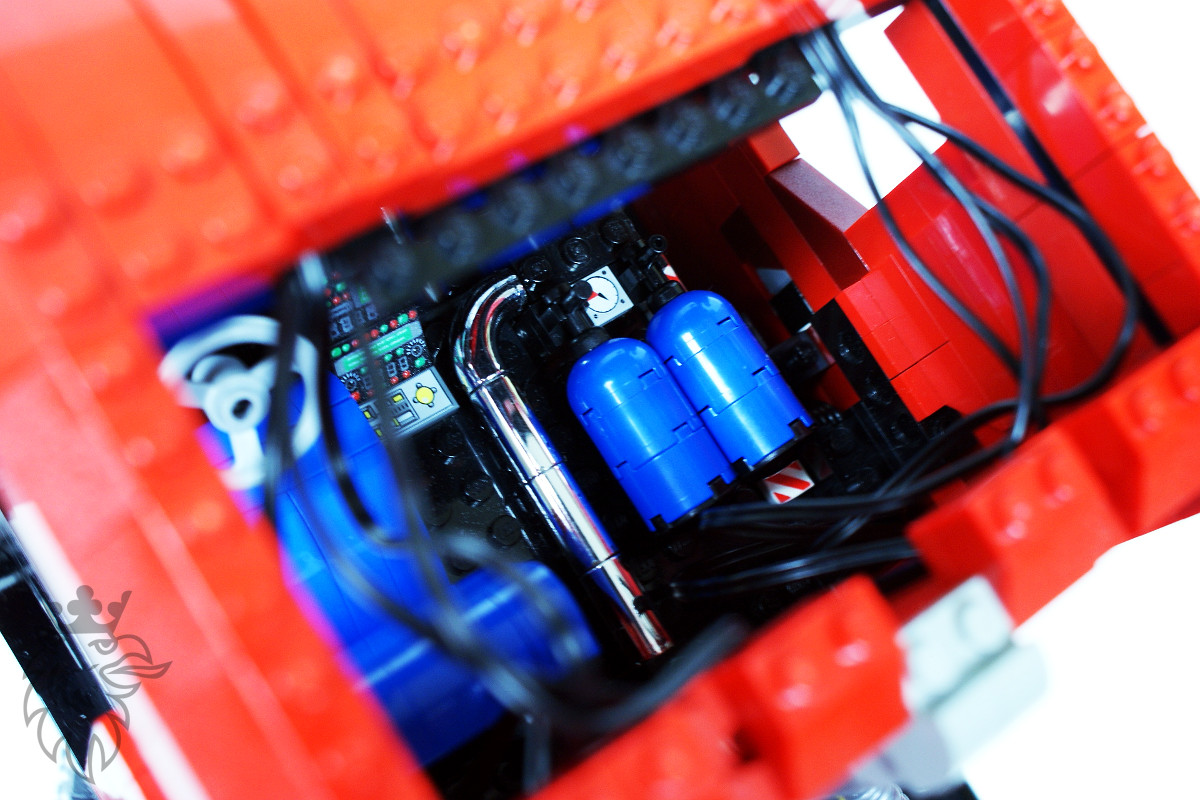
An important thing to know is that the real racing trucks are usually subjected to very radical visual modifications which make them look pretty much unlike any stock vehicle. Being a huge fan of the original Scania design, I wanted to avoid this. Therefore my approach was to use a stock Scania R500 as the model’s point of reference, with a few typically racing elements added so as to minimize their impact on the model’s look. Eventually, it ended up with five such elements: the four extra headlights (which are not really used for racing, but I viewed it as an opportunity to experiment with the PF LEDs a bit), the racing air intake on top of the roof, the engine moved back from under the cabin, the large spoiler instead of a fifth wheel, and a custom rear bumper. Additionally, the cabin’s interior has been arranged in a ‘racing’ fashion, with a mock-up of two blue N2O bottles replacing the passenger’s seat and with a distinctive safety net in the driver’s window. The net itself is not a Lego element – I made it as a sticker, by printing a black square with a dark grey grid on it, carefully cutting it to net-like shape with a modelling scalpel, and then painting its other side black with a felt-tip pen (I could also print the black square on both sides of the same sheet, but since large portion of it was meant to be cut out, it felt like a waste of ink). Eventually, the paper net was fixed to the door with a thin stripes of a Scotch tape on its edges.
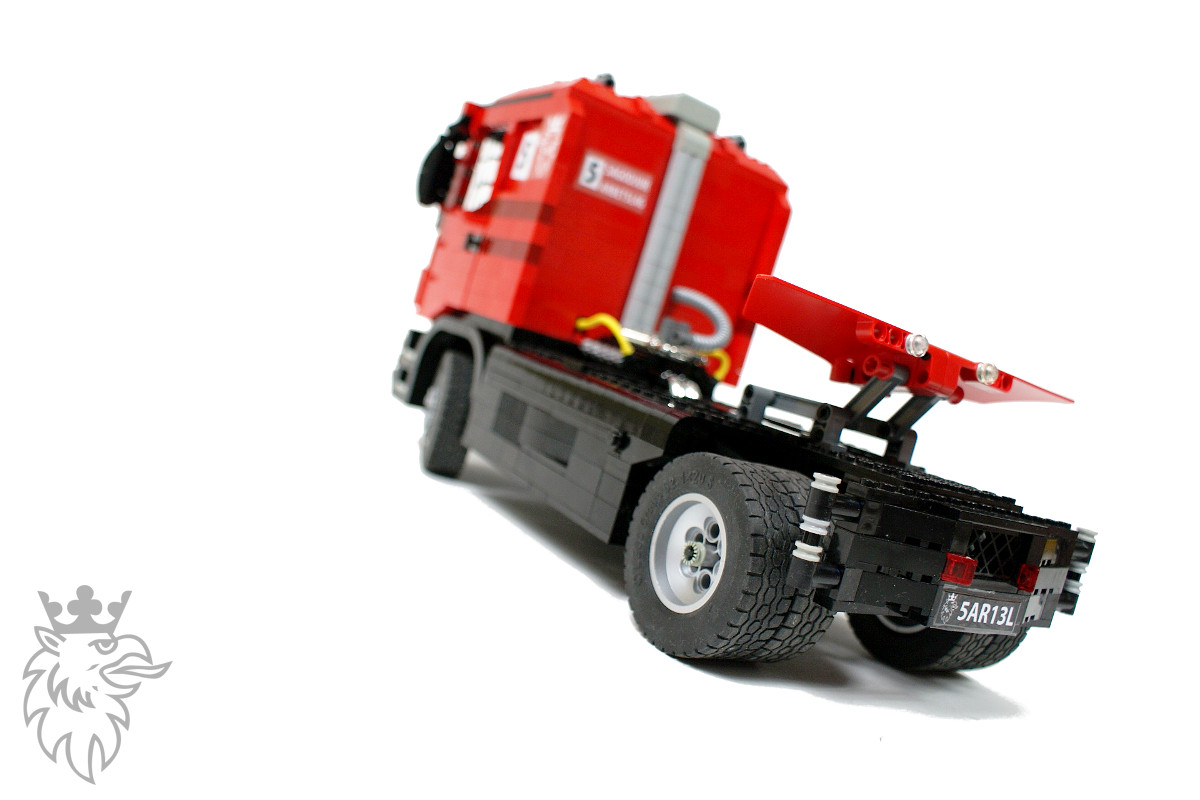
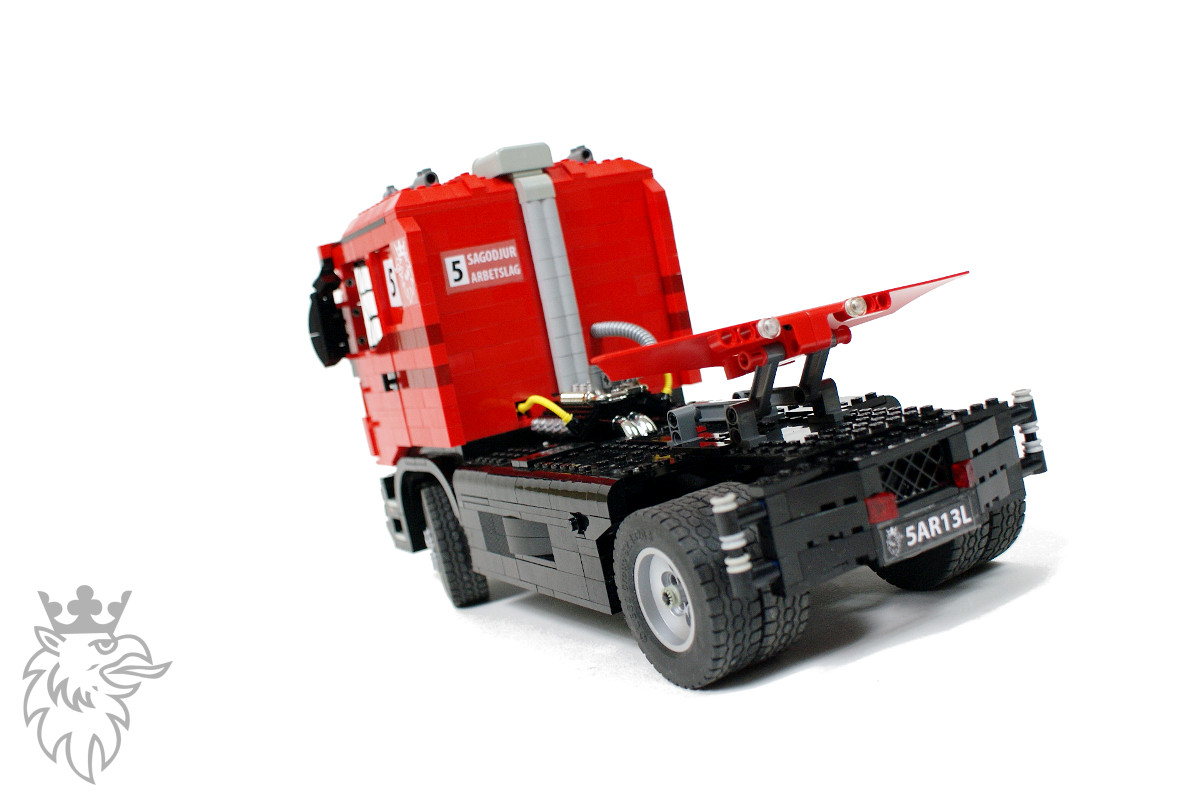
The other, more traditional stickers, have also been intended to reflect the racing ‘nature’ of the model, with the most obvious example being a note in front of the driver’s window that says “Tävlingsfordon”, which is Swedish for “Racing vehicle” (all stickers use Swedish as a nod to Scania’s country of origin). The sticker above the windshield says “Sagodjur”, which can be translated as “Griffon” (the animal used as Scania’s brand mark) and which was intended to look like driver’s nickname, while both front and rear registration plates feature a miniature Scania’s griffon head and a number 5AR13L, which is an obvious reference to my own nickname.
As the model was getting close to its final weight, the propulsion system started to show signs of weakness. To solve this, I have moved the rear axle back a little while keeping the motors intact, and added a 1.66:1 gear reduction between the motors and the axle, with gear wheels doubled to handle the significant torque. It has greatly improved the overall performance of the model by making it faster and decreasing its accelerating and braking times, but it also made the chassis seem a bit longish and it made the rear suspension very soft. The manoeuvrability of the model, on the other hand, was not noticeably affected by this change. I have ran a number of tests with Lego speedometer mounted on the truck and the top speed it recorded was 7.92 kmph. This is more than any of my earlier racing trucks could achieve, but I feel like it could be surpassed by this very model. The model clearly has plenty of power in the drivetrain and appears to best build up its speed in long runs. It led me to believe that it could break 8 kmph given a long section of a perfectly smooth floor (unlike the floor I had to run tests on). Anyway, 7.92 kmph is a fairly good result, as it requires model’s wheels to rotate at over 600 RPM (that is 10 rotations per second) and – given the model’s 1:17 scale – corresponds with the speed of 135 mph in the real life.
The truck was highly acclaimed for its aesthetics and performance, both emphasized by the video which took me 4 hours straight to produce. It was my second construction to use a slow motion footage (shot with Casio Exilim FS-10), and my first construction to be accompanied by 1200×800 px photos rather than usual 800×600 px, as I really liked the look of the model and the results of its photo-session.
The model will be kept intact at least until a public event that takes place on July 10th, giving my fellow LUGPol members the chance to see, and perhaps even to drive it.
Photos:


Work in progress photos:

Video:
Media reference:
Legocn.net (Chinese only), Mancave (Dutch only), Town Truck Brick! (Spanish only)

@Laine Gadd
Sorry, I don’t have it anymore.
Hello
Great model, any chance you could send me the LDD file for this truck cause id really like to modify it (if thats ok) and turn it into a 4 door mid-mounted heavy pumper fire appliance 🙂
Cheers
Laine G
@Ivo
There’s like 1,500 parts, you want me to list all of them?
witch parts (matching nummber) thit you use
@Legoman
I don’t make instructions.
How do you instructions ???
@Wanye Clements
Impossible to say without testing.
Would using a 20 tooth driving a 12 tooth gear make it go faster? (overdrive)
Zarabista robota!!! Podziwiam!!!
@TwinTurbo
Look at the photos, read the description. It’s all there.
Please tell me how did you make the rear suspnsion!!!!
LoL i read all the description and i understand why
Thanks@TwinTurbo
Hi
Why in the work in progress pictures number 5 i can see that there is no gear reduction
And in the description you say that i has gear reduction?
Your truck looks amazing is amazing drive amazing steers amazing and you are a genius!!!!!!!!!
@Mecho123451
These wheels have diameter of 8 studs, Unimog wheels have diameter of 12 studs if this is what you ask.
Can you give me a picture of these wheels next to the new ‘mog tires
@Touhou
Look for a Power Functions extension wire.
How did you connect the battery to the RC motors?
@Mahonii
Nie jestem w stanie doradzić Ci przełożenia, bo to zależy od wagi Twojego modelu. Co do pomysłów na wykorzystanie reszty silników – jesteś na stronie gdzie znajduje się ok 90 MOCy, myślę że znajdziesz wśród nich jakąś inspirację.
Witam
Bardzo spodobało mi się twoje dzieło (choć osobiście uważam że ciężarówki są zbyt… Ociężałe).
Jak widzę, użyłeś dwóch silników typu buggy, stąd moje pytanie: jakie przełożenie powinienem zrobić aby, używając dwóch identycznych silników buggy i kół z zestawu off roader, mój pojazd był szybki ale nie zacinał się przy przeszkodzie, np. dywanie?
I jeszcze jedno, czy mógłbyś doradzić mi jak wykorzystać pozostałe 8 silników (2x XL, 6x M)?
Mam dużo elementów, z zestawów 8275, 8043, 8297, 8285 i wiele innych pojedynczych elementów.
Z góry dziękuję za odpowiedź
Mahonii
@Ruben
You can buy everything at Bricklink, and links to the wires that connect RC motors to IR receivers are directly below your comment.
how do you put the rc buggy motors on the receiver? where you can buy it? where i can buy the rc buggy motors? and do the motor whit 7.2 volt.
@Zozol
Przejściówkami dostępnymi na rynku od jakichś dwóch, jeśli nie trzech lat:
http://www.bricklink.com/catalogItem.asp?S=8886-1
http://www.bricklink.com/catalogItem.asp?S=8871-1
Super projekt. Jak połączyłeś silnik ze starym łączem do nowego pojemnika na baterie?
@Dirk Klijn
Search YouTube for “Sony eye candy”.
@Sariel
Can you give me a link? I’d like to use the music for a movie for school.
@Dirk Klijn
It’s not mine.
What music did you use for the video, and if its yours may I use it?
@Noud Goertz (from Holland)
1.66:1. It’s written in the description above, actually.
what is the gear- combination?
@kyle
Yes, they are there for extra torque.
hey in the WIPs on facebook and some of the ones of above, the rear axel is straight but on the finished model there four (ass far as i can see) bevel gears, are there just for extra torqe?
@Espen Danielsen
13 studs.
@Sariel
Thanks!! That helps a lot! (And they are quite cheep)
Du you know the size of this set as weel, http://www.bricklink.com/catalogItem.asp?P=22969c02? They seem to be close to 12 or 13 studs, and quite wide. But I can’t find any comparison between them…
-ED-
@Espen Danielsen
Yes: http://www.bricklink.com/catalogItem.asp?P=44772c02
These have 12 studs in diameter.
Hello
I was wondering if you might help me a little. I’m designing a viechle, and to be able to integrate all 12 functions I want, I have to make it to a scale I don’t have large enough wheels/tires for… Do you know of any wheels/tires larger than 41896/45982? Preferably a rough tire.
Hope you can help me out.
-ED-
@Ulisses Hornung
There has been adapter for it available for years now.
http://www.bricklink.com/catalogList.asp?pg=1&q=extension+wire&catLike=W&v=2
Well, I was just wondering, made some research, but didn’t found, and I also tried to figure it out from the pictures but couldn’t. How did you connected the Ir Receiver to the Buggy motor since the connectors are totally different. Did you modified them, or there is an adapter for that reason? please let me know. Thank you so much
@gimba96
Yes, but it made it much heavier.
Nice build!
Only one suggestion:
I made my own racing truck with the same propulsion system
but instead of two rechargeable battery boxes i used one normal battery box wich worked fine too.
@Lego mom
Hope it serves him well 🙂
Thanks for the info. As far as too much for my 8 year old … well he is an 8 year old with a lot of determination. @Sariel
@Lego mom
It’s this with some rubber band added: http://sariel.pl/2009/01/mini-steered-suspension/
No disrespect, but firstly your son should be able to steer perfectly well without it, it actually makes steering feel weird, and secondly mechanisms like this may be a bit too much for an 8-years old promising young man.
My 8 year old found your youtube video for the Lego Return-to-center Steering System. We are trying to find the instructions to build it. Can you steer us in the right direction. Preferably the exact site. Thanks.
@coau
http://www.bricklink.com/catalogItem.asp?P=5292
I am wondering about these RC buggy motors. I have never heard of them or seen them before… Where did they come? Are they just really old? What set r they from?
@Neil
I thought, but I didn’t have the time to build one yet.
Great model!!! Must be tiresome to keep on telling people that you don’t make instructions though. Have you ever thought of make a model that walks? It would be cool, especially from someone with your experience. And peices. Unless you already have one and I missed it.
@sephirot8082
No.
Hi
is magnificent!
There are instructions to build it?
maybe because i don’t got plate hinges to test it
That shouldn’t make a difference.
yeah i tried that.but it stiil doesn’t work.or is it just because im using the brick hinges?
Look closely at this picture: http://www.brickshelf.com/gallery/Sariel/ScaniaRacingTruck/dsc05518.jpg
There’s nothing tricky, it’s just the matter of placing the hinges.
hey im trying to make a truck but the only problem i’m having is the doors on opening.the brick at the back that doesn’t moves keeps on bloking the opening so i have to force it open.how did you do you doors?
My simple car had one RC motor, receiver, battery and medium motor.
I have used separate IR receiver with a separate battery for each single motor, and I didn’t encounter any such problem.
Great truck, but how did you overcome the problem about PF IR receiver not able to handle those amps needed for RC motor? They use almost twice current versus XL motor (according info in link below). I tried that and after a while my receiver smelled burned and did not work properly anymore …
Or maybe you just have not driven that truck too much – yet 😉
http://www.philohome.com/motors/motorcomp.htm
Thanks!
Yes, they are F1 wheels. 10 studs in diameter.
Man dude!thats awsome!iv’e actually never seen somethig go that fast before.Nice work.By the way since i don’t got a face book account i wan’t to ask you one thing.are those tires that you used on the dodge charger the F1 tires?if so please tell me what size they are because im going to buy 2 on bricklink for my lego williams racer F1 set because it’s missing the front 2 wheels.Thanks!
yay swedish great work btw
It’s in the description, Tony. Right after the “top speed”.
how fast does the truck go
JO, Ben: Maybe: http://www.bricklink.com/catalogItem.asp?S=8886-1 ?
you need to put some camber on the front wheels, it would be more realistic
Yes, of course.
if the two engines are connected directly to the rear axle, are the two engines forced to work at the same speed?
Yeah, I guess I do.
This is amazing. Congratulations once again. Oh and by “opened”, don’t You mean “openable”?
Thanks Badachelli, I’ll have a look.
Axel – how many times do I have to say BRICKLINK? This name is already in the comments below and in the video itself.
where did you obtained those two engines?
Hey, sariel, I read this pdf recently and I think you may get some ideas from it!
http://www.isogawastudio.co.jp/legostudio/toranomaki/en/download.html
Its like 300 pages long, FULL of technic stuff. I know i got some ideas!
I’m perfectly aware of this.
When I open the top image in a new tab, it is no longer squashed; this may be something to do with the column on the left which shows the date.
The photos on this page look squashed horizontally.
Ben: http://www.bricklink.com/catalogList.asp?q=extension help yourself from there.
I don’t think real racing trucks use nitro, there is a top speed limit anyway.
where on bricklink did you get the cable/ converter
This truck rules! Is nitro charge leal in truck races? It’d be interesting to see a model built scaled to the 8448 wheels, then it would be possible to have the front wheels turn (steering I mean) around an imaginary line inside the wheels, so that the wheels would stay tight in parallel while driving. Question is, what motor could power such a big model… 😛
Haha, I like the license plate!
Sherwin, it was part of one of the four extra headlights that flew off. It was hit hard by one of the wheels being rammed.
Lex, the whole rear suspension is rotating around lower mounting points of the RC motors. So the RC motors not only drive it, but also connect it to the frame.
Lovely model again (sounds a bit girly, but not meant that way). Got a question with regards to the back of the truck. I can see the rear suspension, but how does it actually rotate? Is that 5×7 the point of rotation, since I can see the springs being mount inside there. Or is it tilting on the mountingpoints of the RC-motors?
What flew off the truck when you hit the tires at 2:09?
Just where I got all the other parts from, BRICKLINK.
from where did u get the adapter-cabel from PF to 9V??
This is all so cool, all of your pieces are sooooo cool I just wish you had instructions so we all could build them and have a out of this world good time building and showing off the prizes. KEEP IT UP.
Another masterpiece! Your fellow LUGPol members will be fortunate to be able to drive this race truck! I like the nitrous oxide bottles in the cab. I’ve seen some real Race Trucks on the local drag strip 5 miles, and you have captured the essence of the beast!