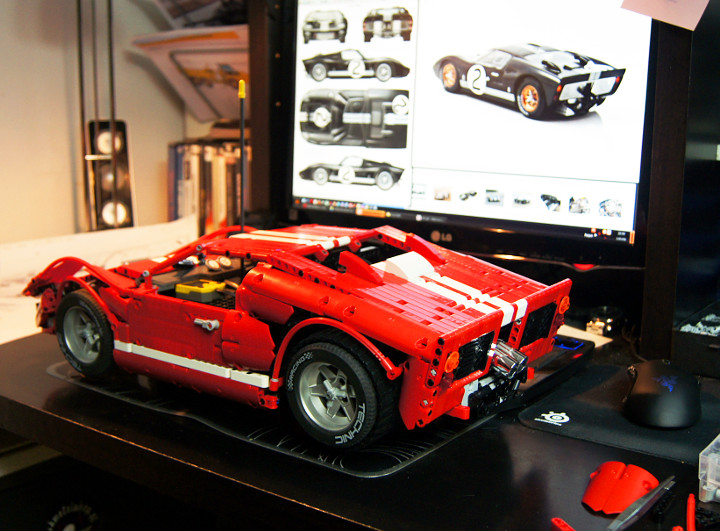
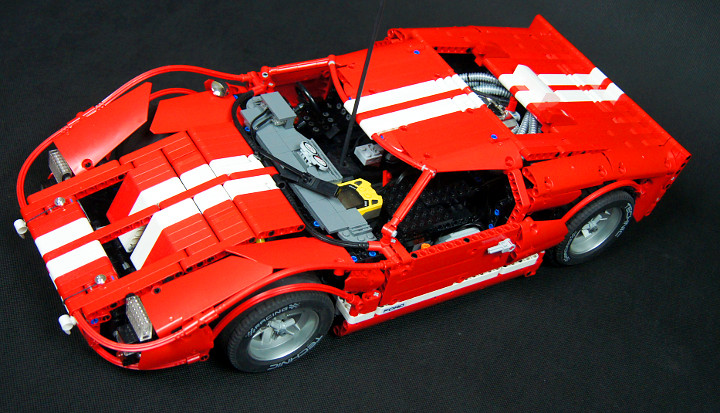
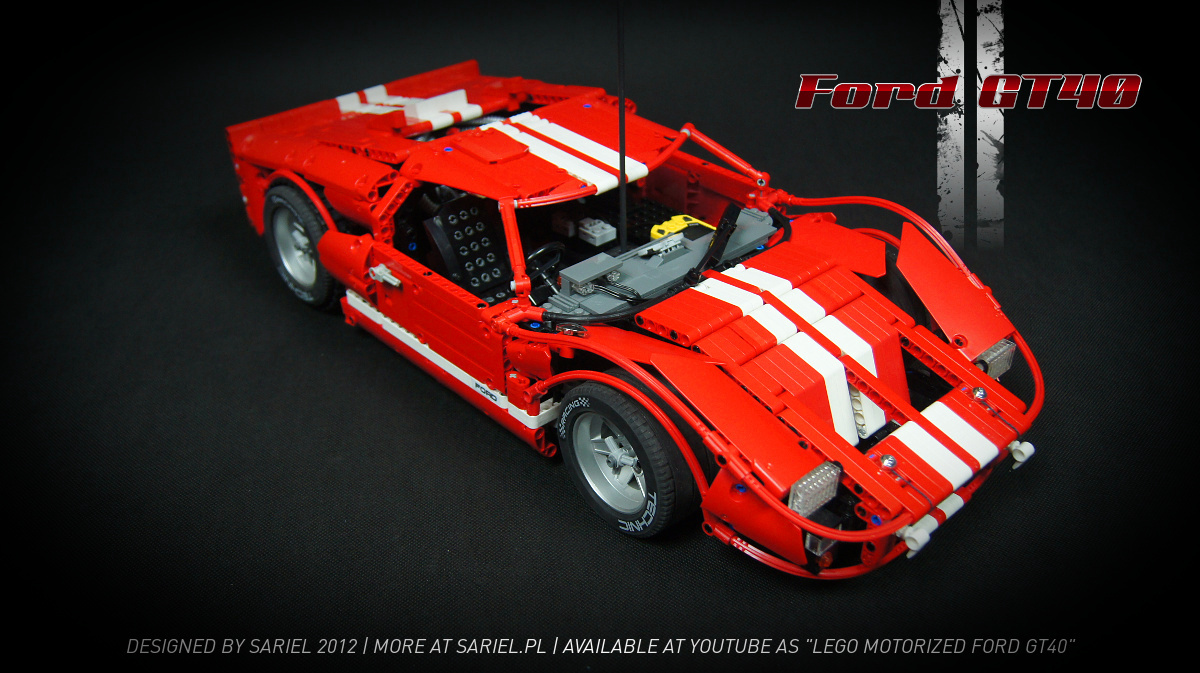
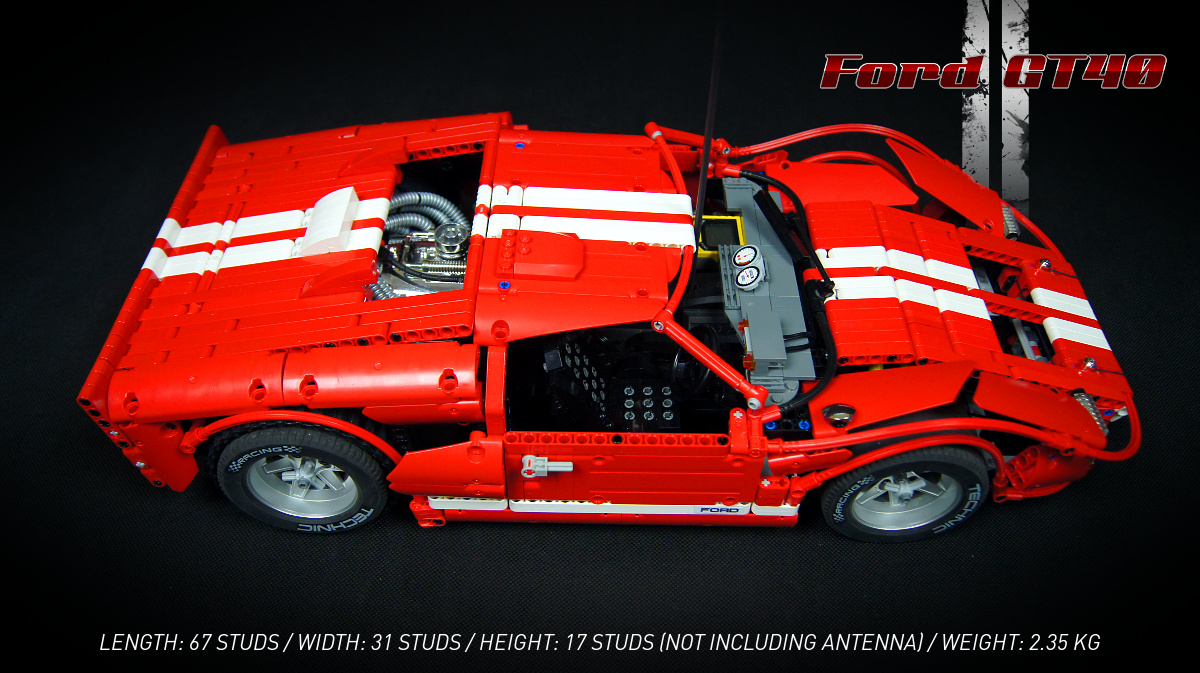
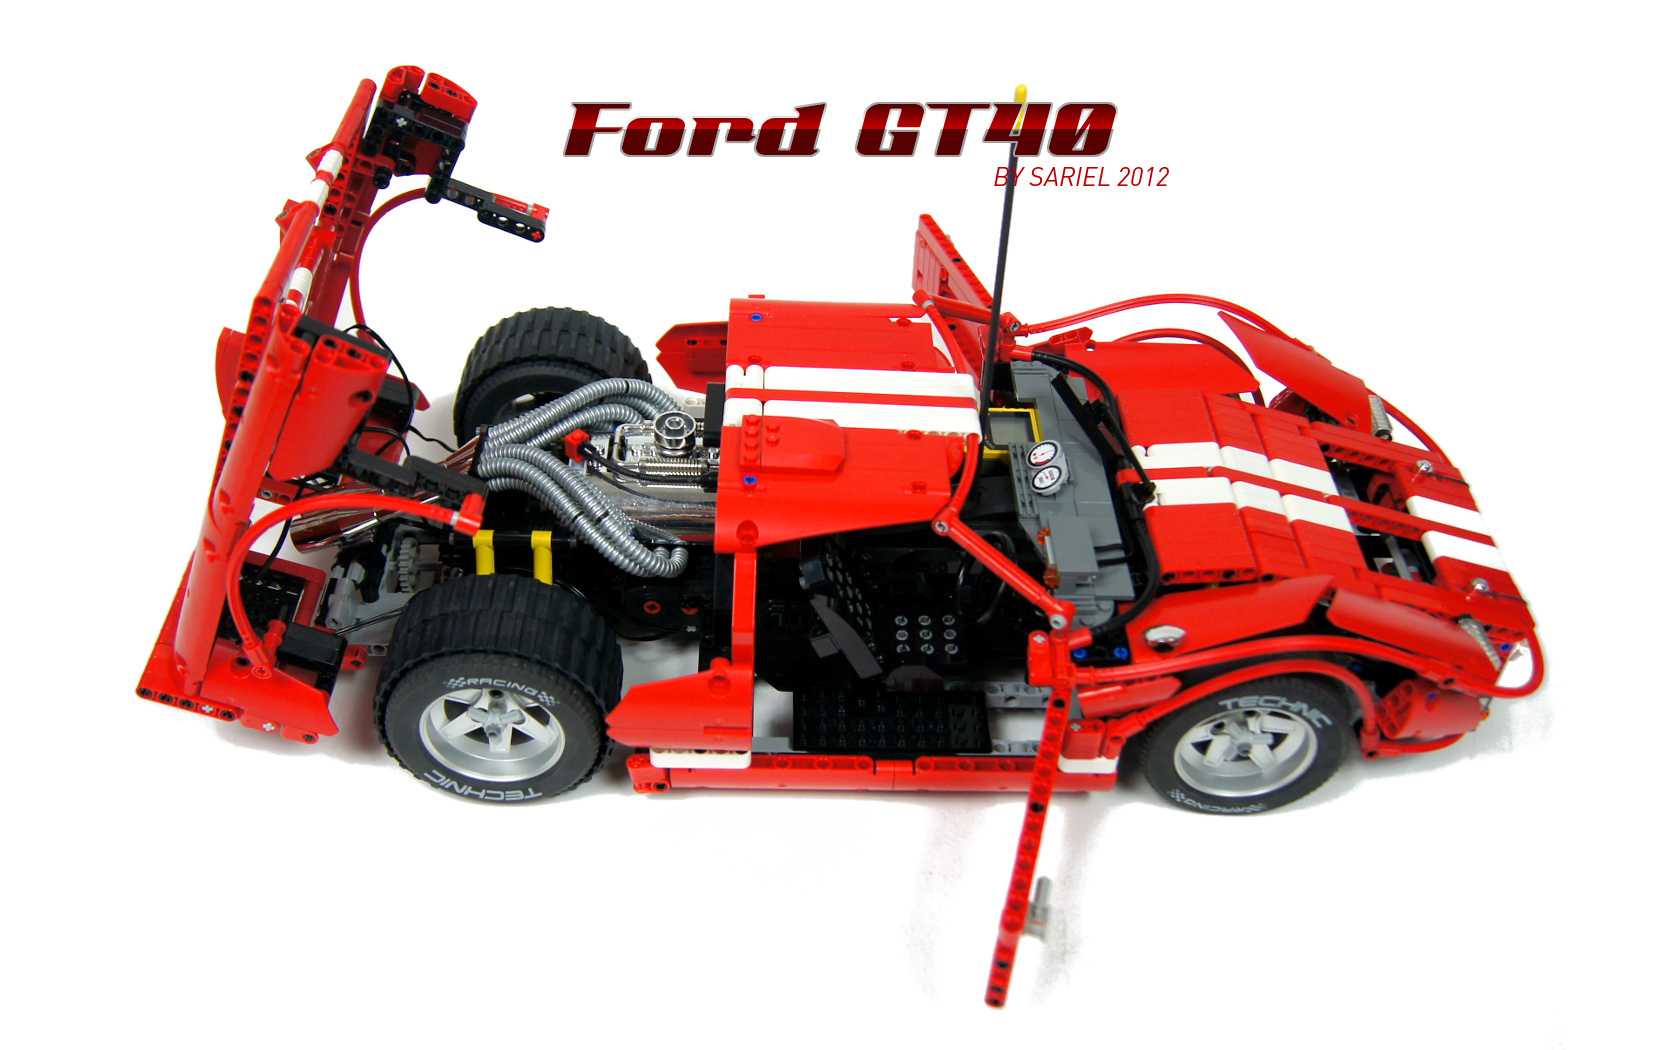
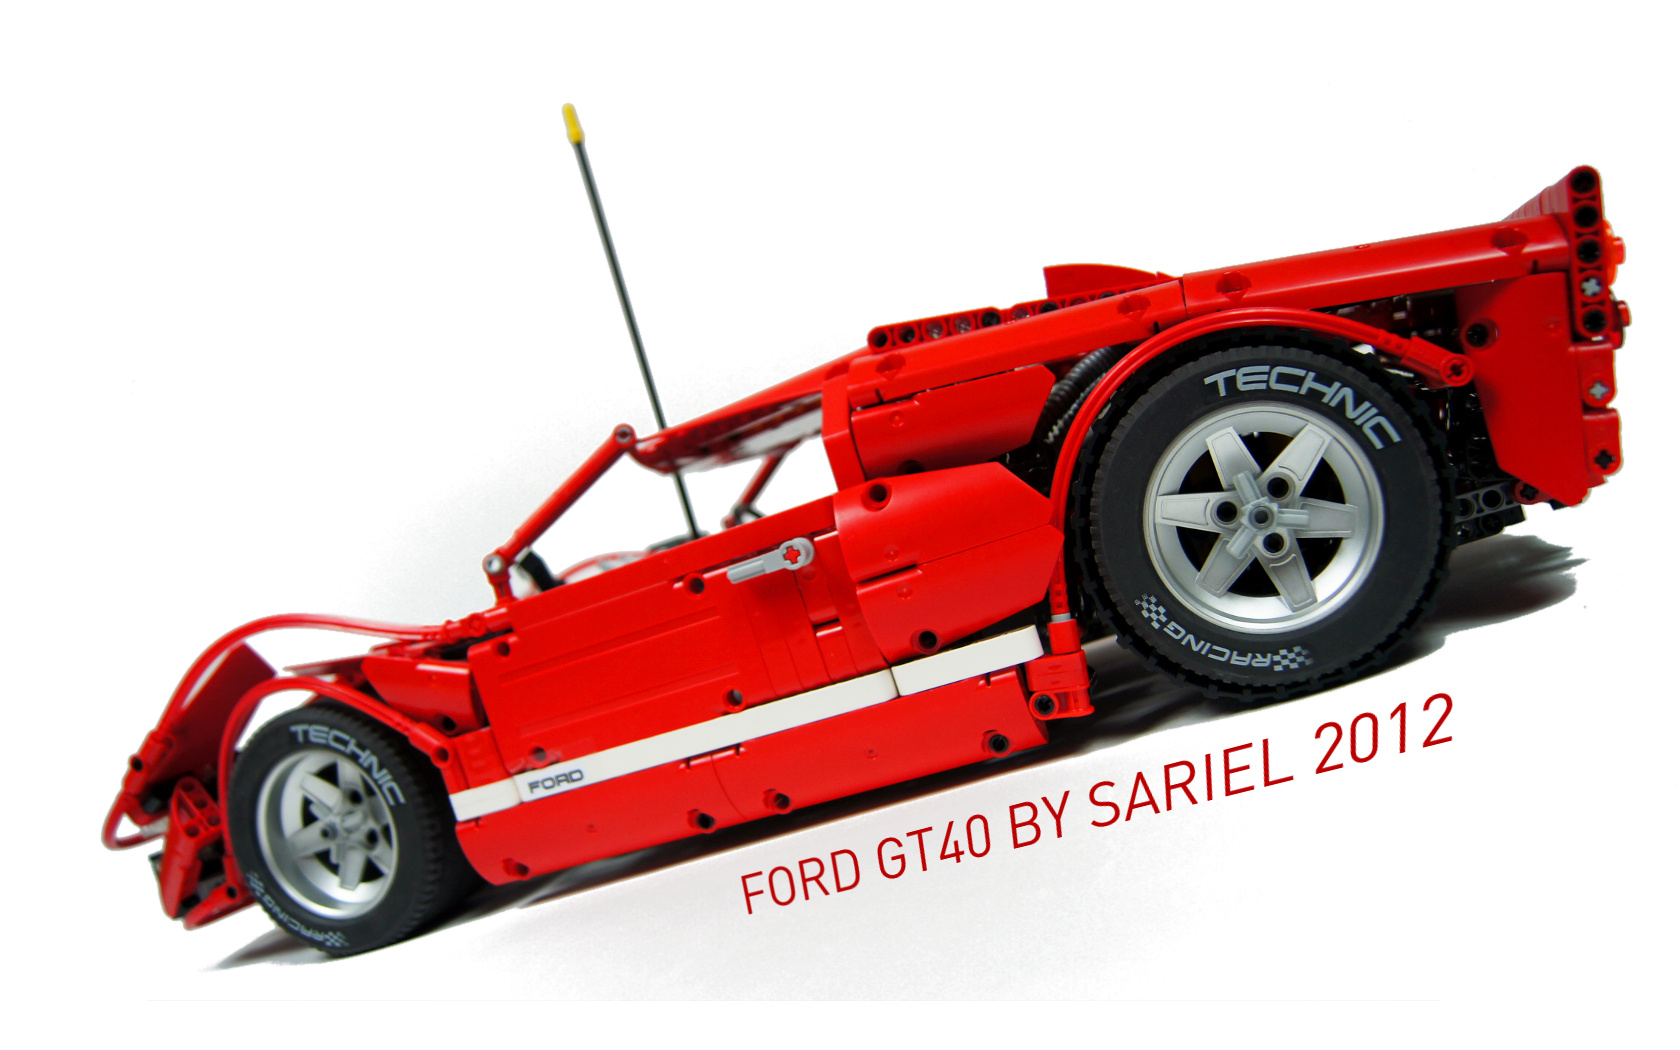
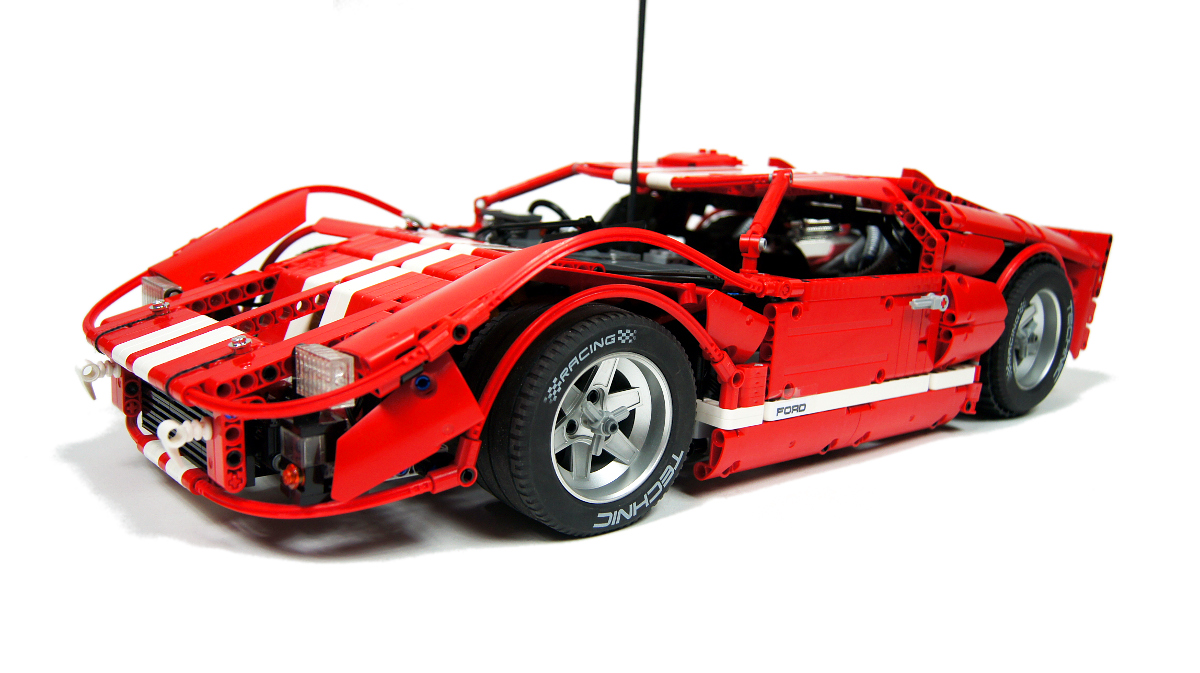
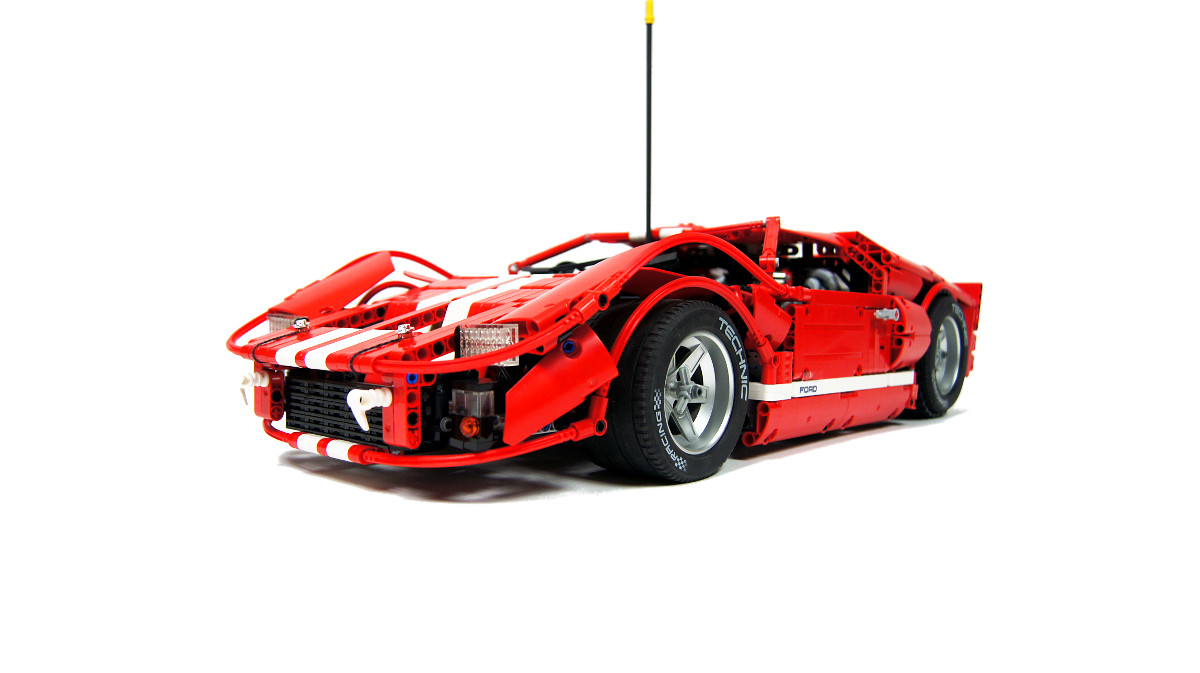
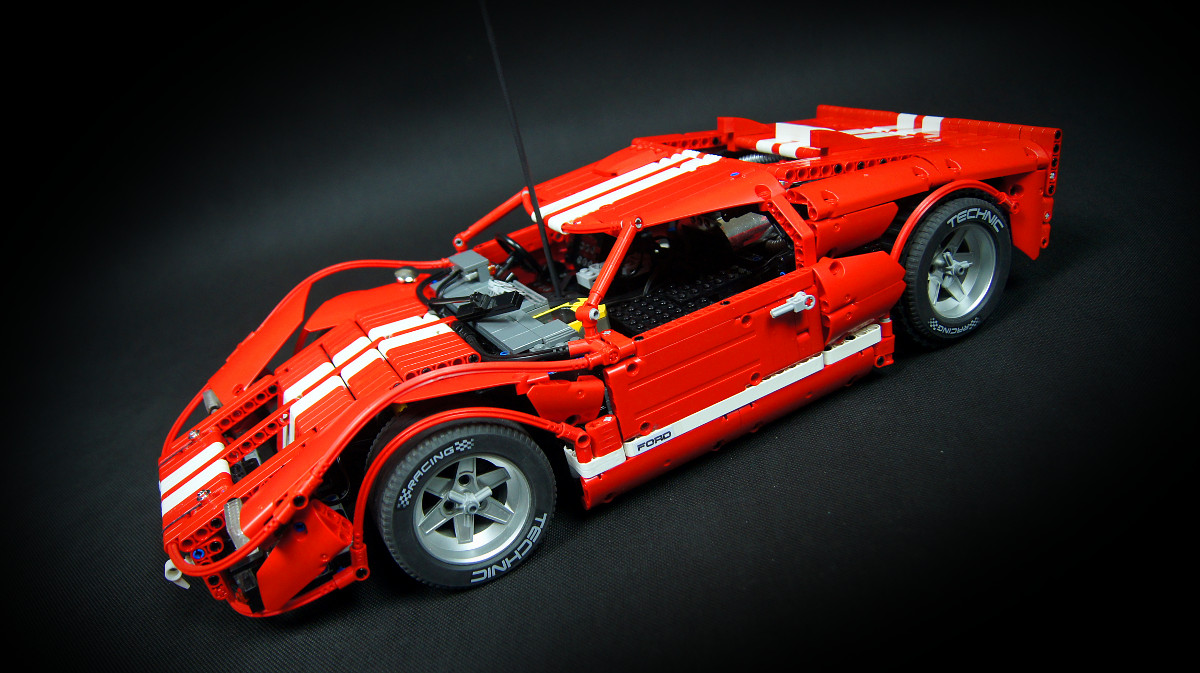
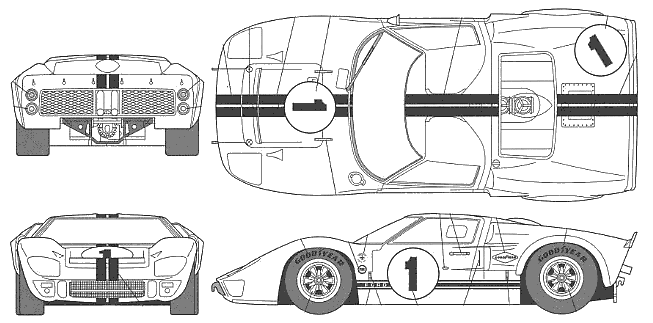
Ford GT40

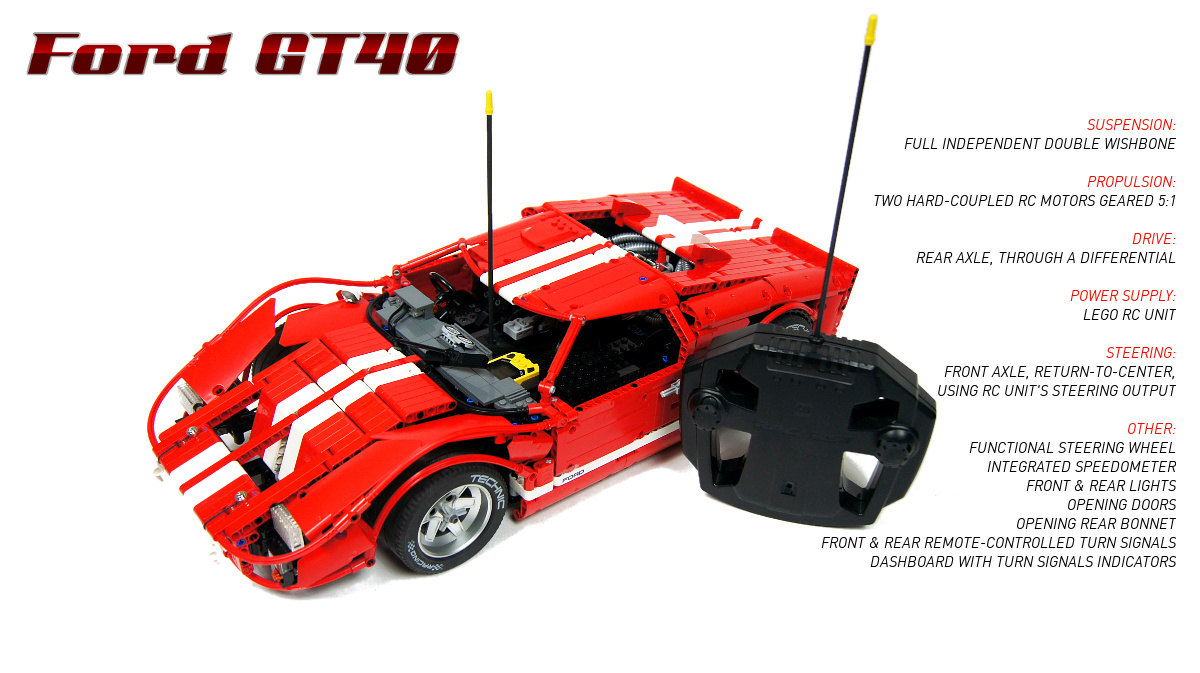
Model of the legendary 60’s racing car. Features full suspension, remote-controlled drive, steering and turn signals, lights and custom stickers.
Datasheet:
Completion date: 17/01/2012
Power: electric (RC unit)
Dimensions: length 67 studs / width 31 studs / height 17 studs (not including antenna)
Weight: 2.35 kg
Suspension: full independent
Propulsion: 2 x RC motor geared 5:1
Motors: 2 x RC motor, 1 x PF Medium, 1 x micromotor
Top speed: 2.2 kmph
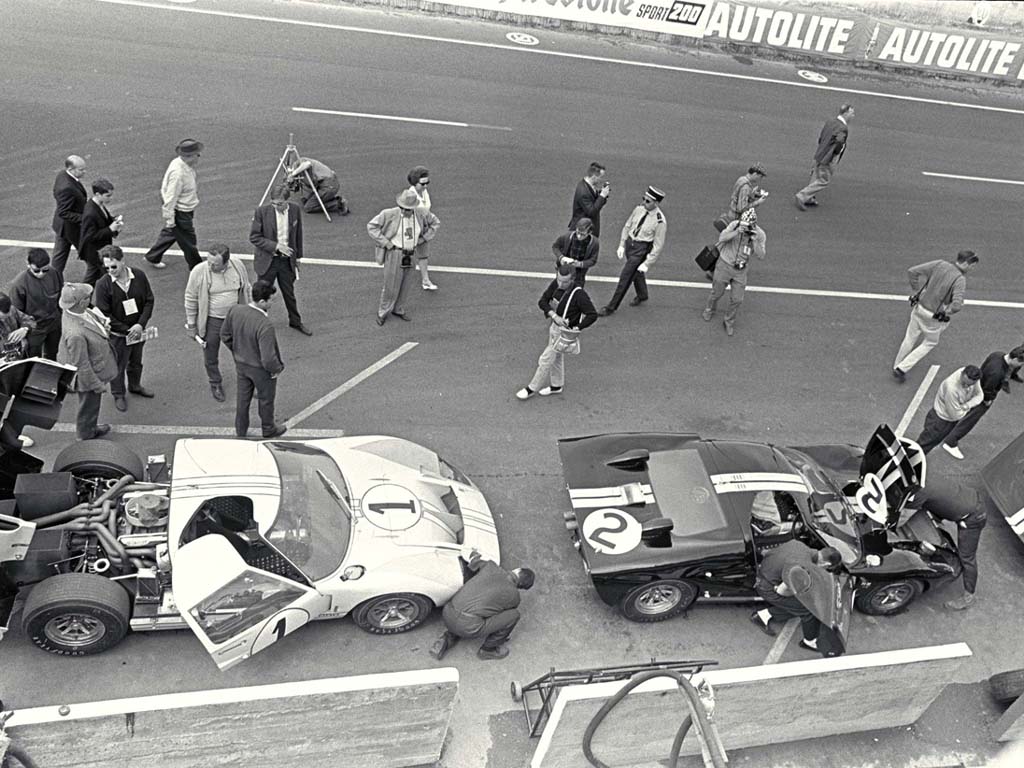
Ford GT40 is a classic racing car with a beautiful history. It was built for one purpose only: to defeat the Ferrari team in the Le Mans race – a goal set by Ford after failure to buy out the entire Ferrari company (Enzo Ferrari changed his mind in the last second). To understand the gravity of this challenge you should know that the Ferrari team won Le Mans six times in row starting from 1960.
The basic design of the car was purchased by the Ford from Lola Cars company owned by Erica Broadley and located in Huntingdon, UK. It can be therefore considered originally a British car. However, Ford spent several months working on car’s aerodynamic properties, under supervision of former CEO of the Aston Martin company, before it was considered race-ready. The finished car was the fastest car of its time, and it won Le Mans race four times in a row between 1966 and 1969 year. When it debuted in 1966, three GT40s have won three first places in the race. Keep in mind that we are talking about race that involved brands such as Ferrari or Porsche – it’s difficult to think of any modern Ford car completing such a task.
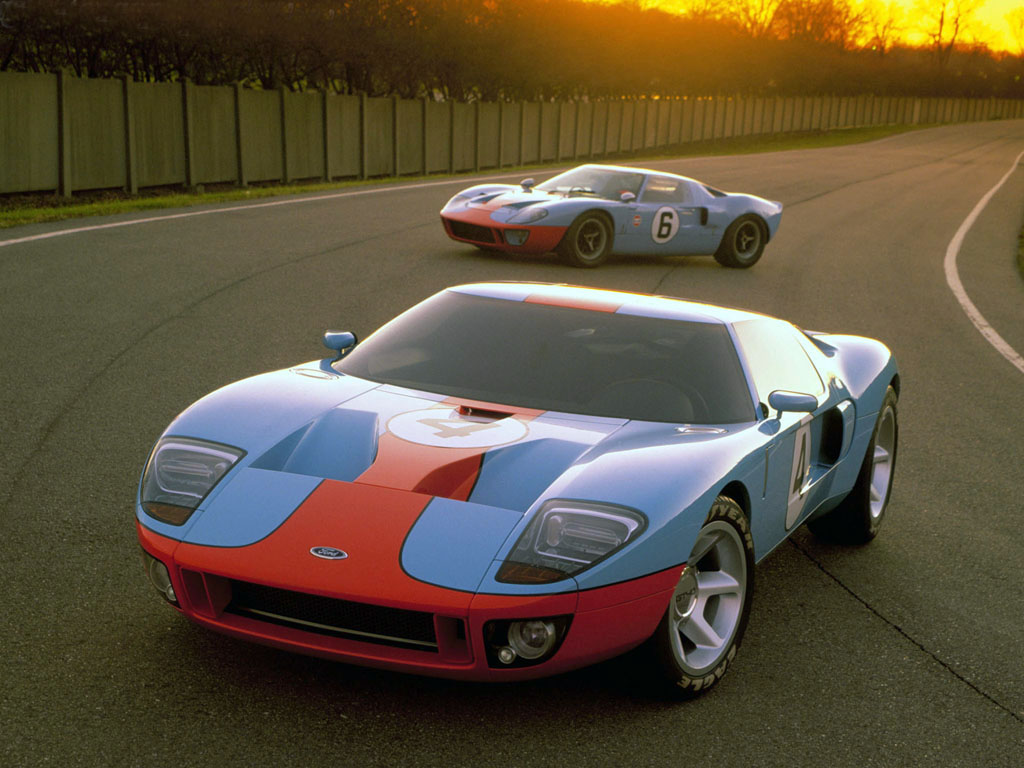
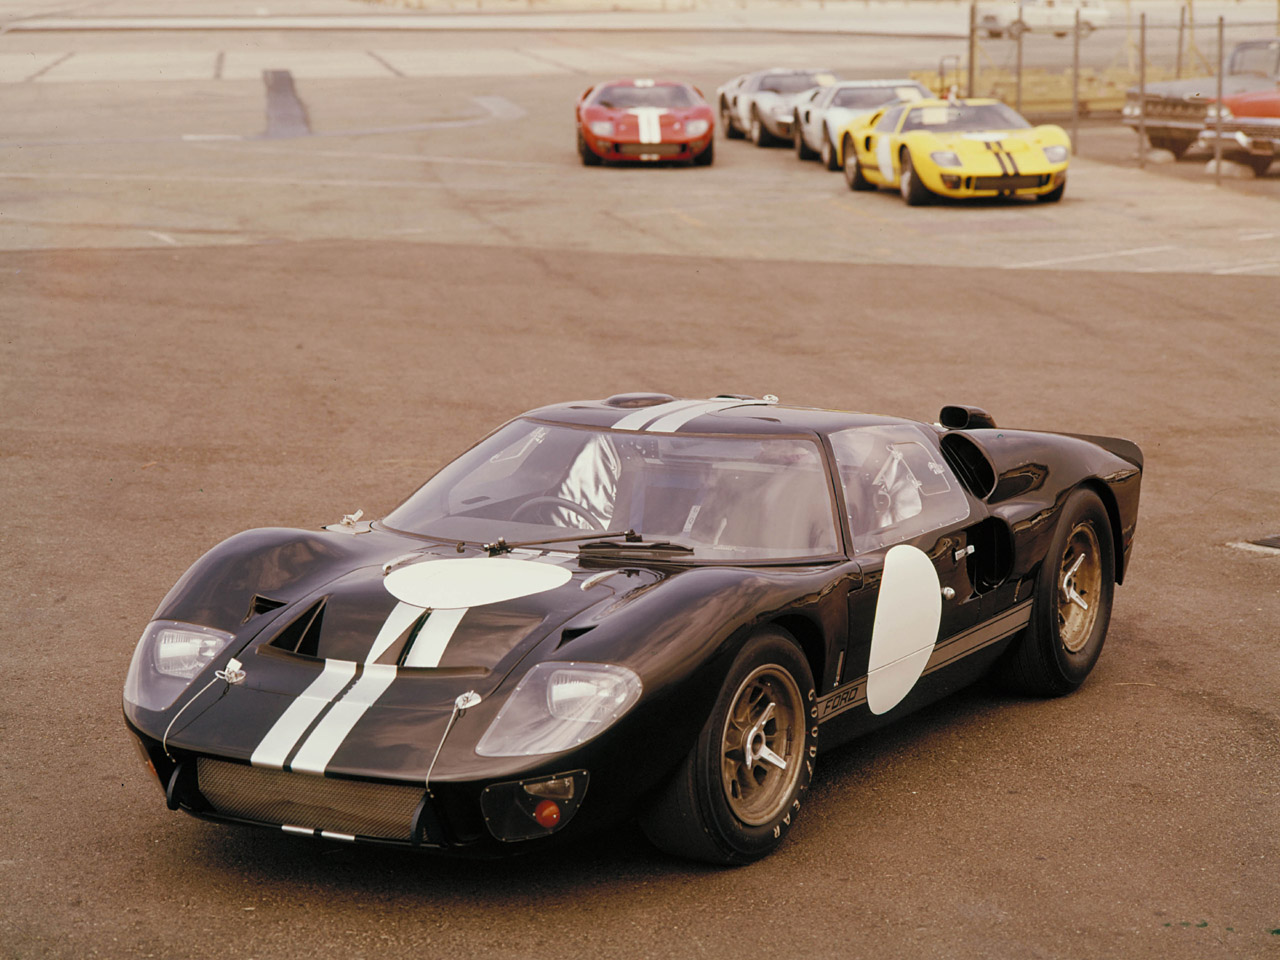
The original GT40s were built in a limited number, and the number of “civil” versions was even smaller, making it one of the world’s most often copied cars in the years to follow. It can be roughly estimated that the number of replicas today is several times greater than that of the original cars. Around 2002 the Ford company decided finally to create a new edition of the car, which was supposed to be as close to the first GT40 as possible. In reality, it was largely different, including being taller than 40 inches – a number the GT40’s name originated from – and it was therefore named Ford GT. Due to many differences some Gt40 enthusiast consider the new edition “softened” or completely ignore its existence. You can see the differences between new version (in front) and the old one (in back) below:
If you are looking to learn more about this legendary car, you can see a dedicated Top Gear episode here, and you can listen to how it sounds here.
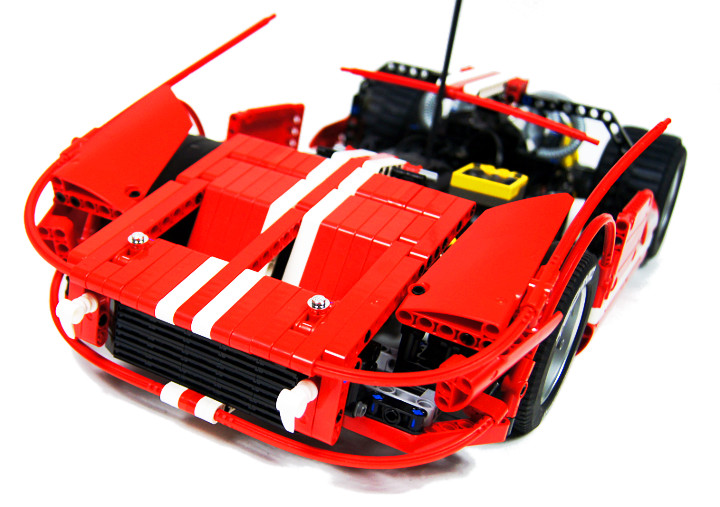
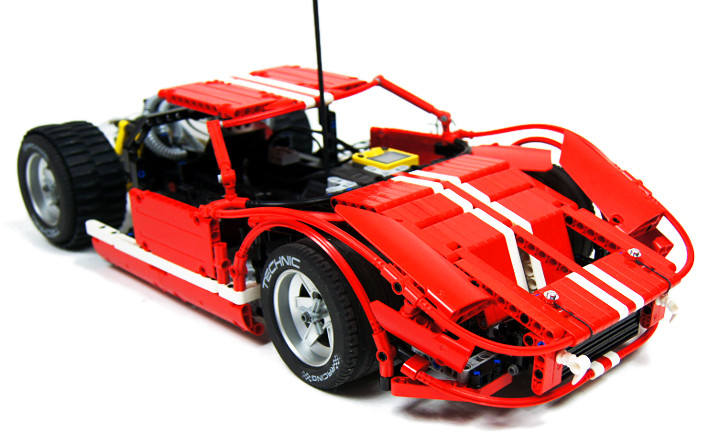
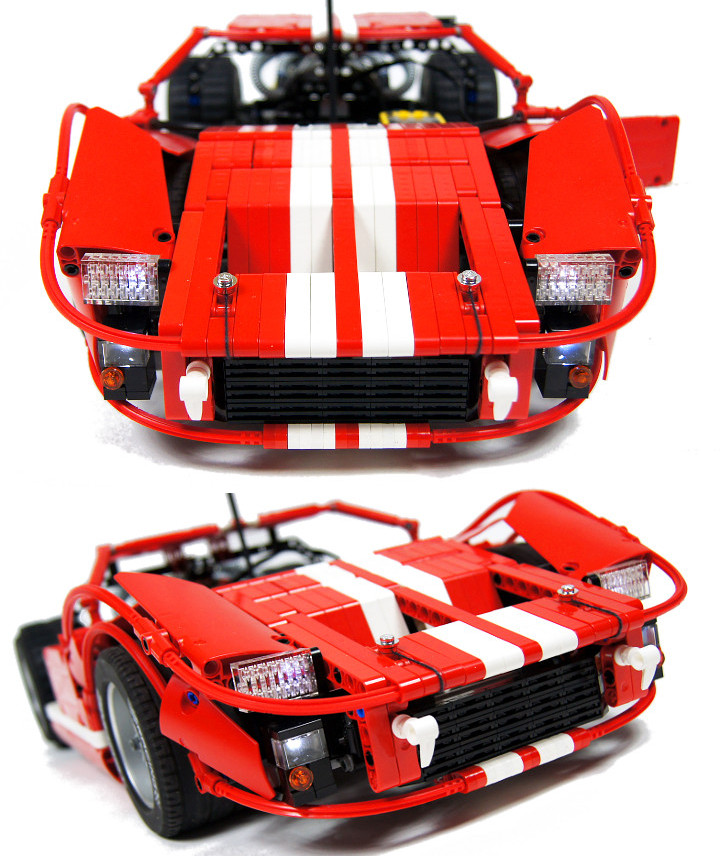
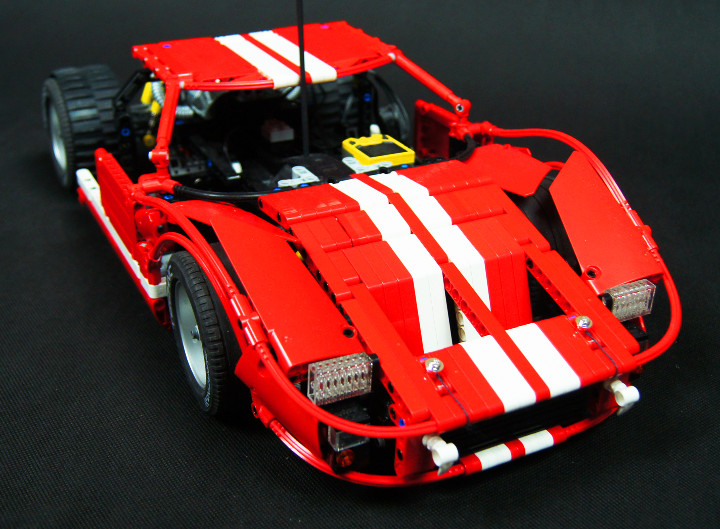
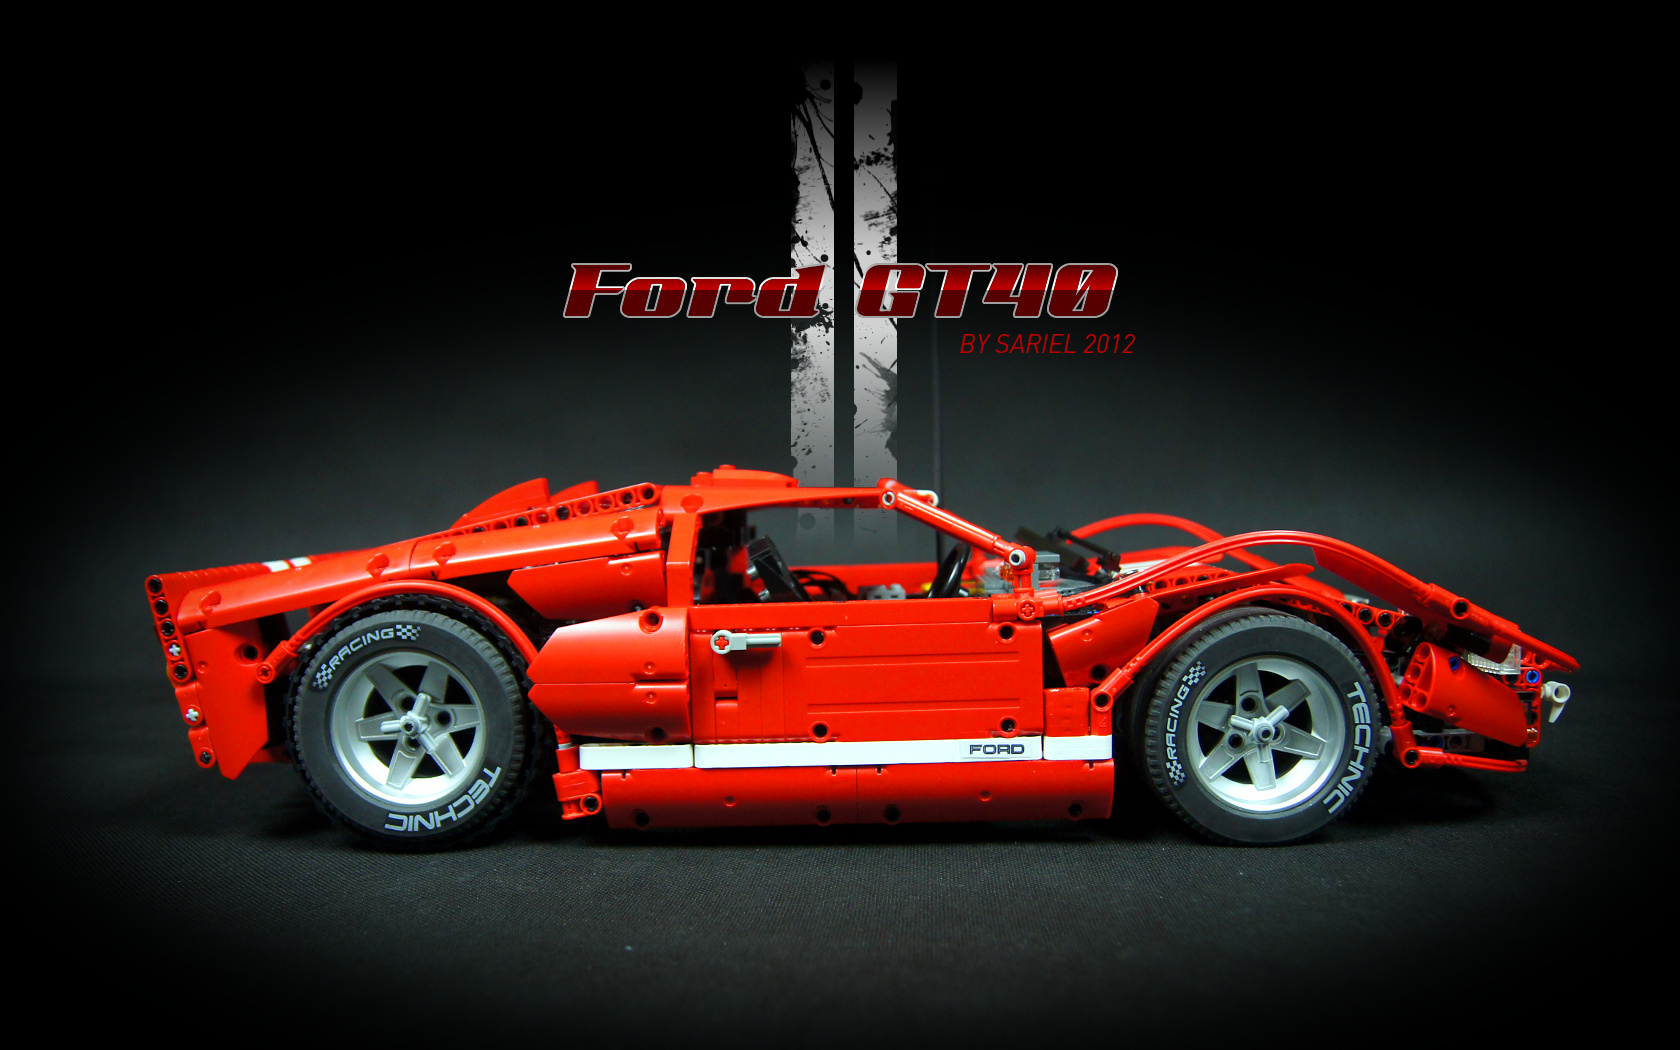
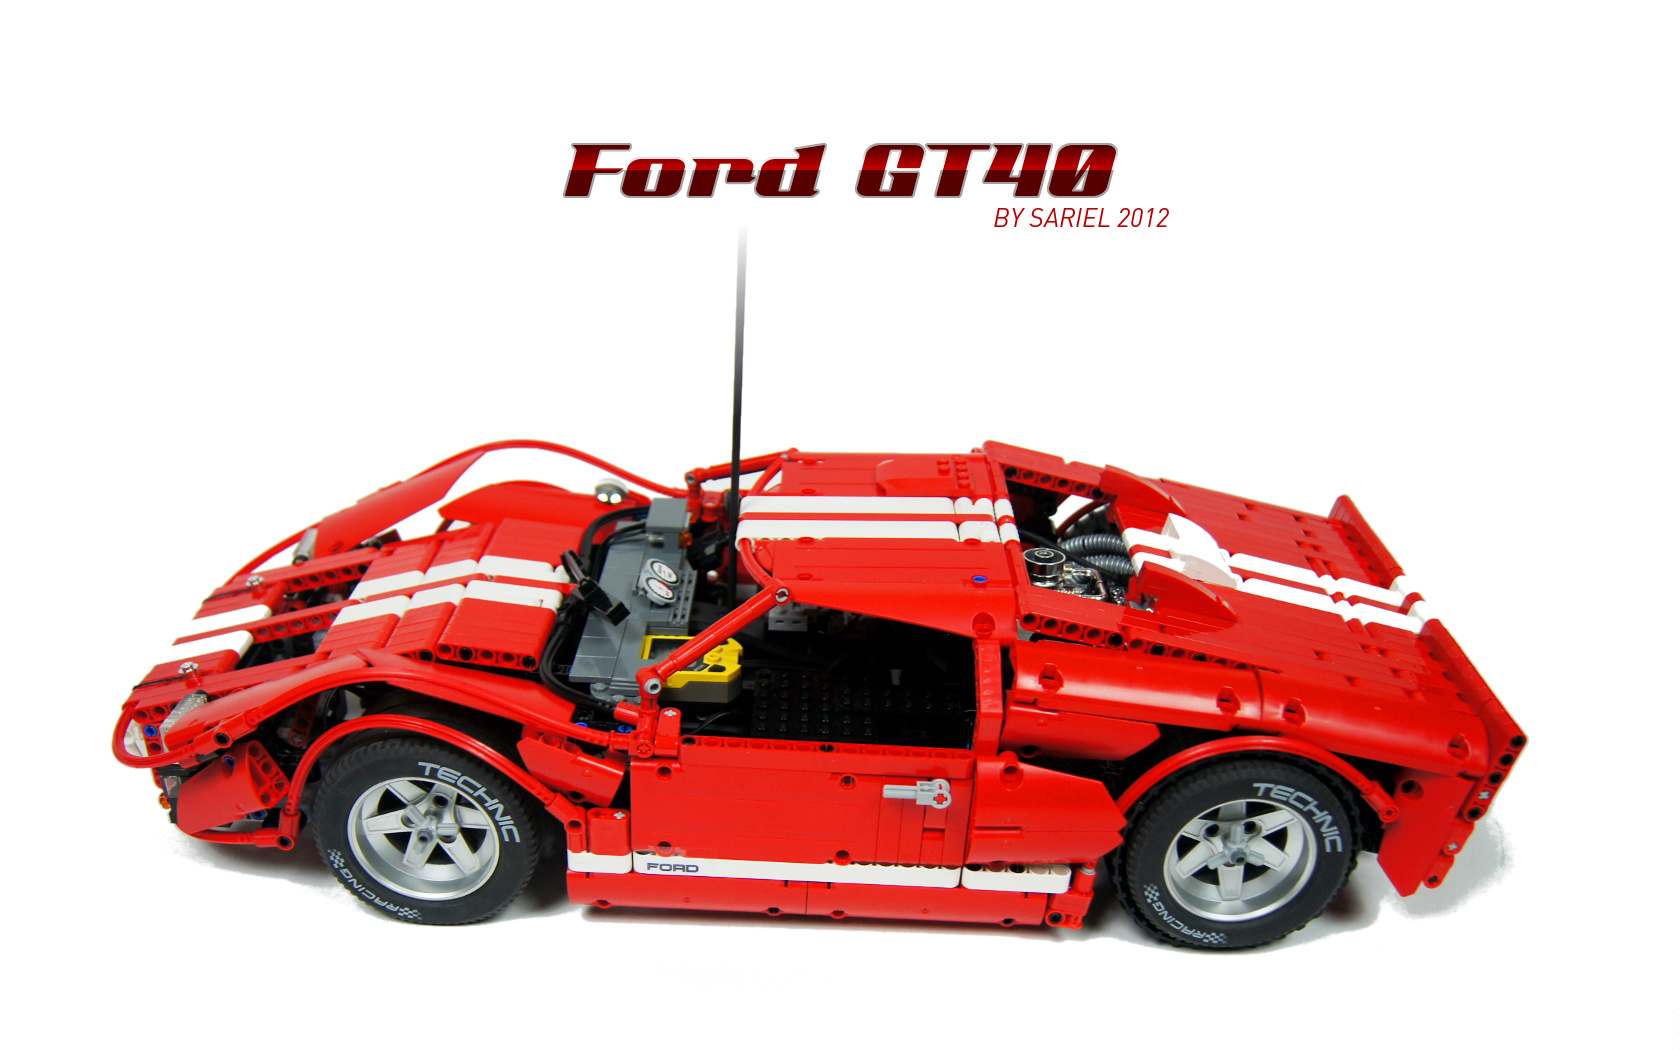
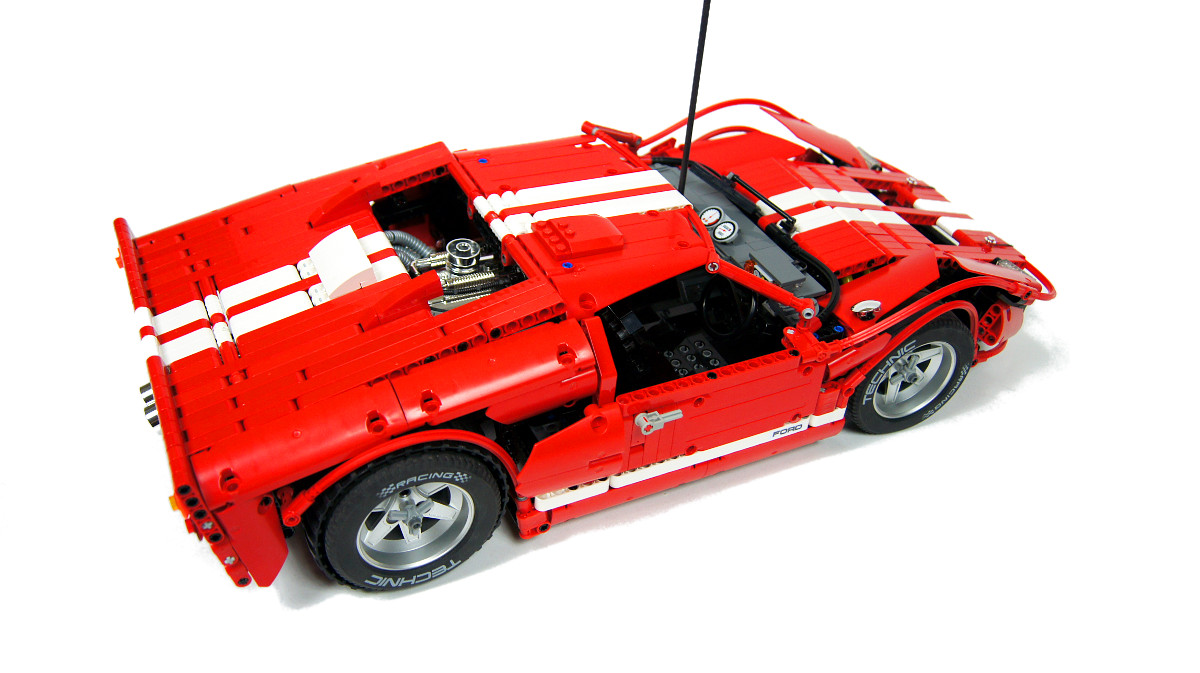
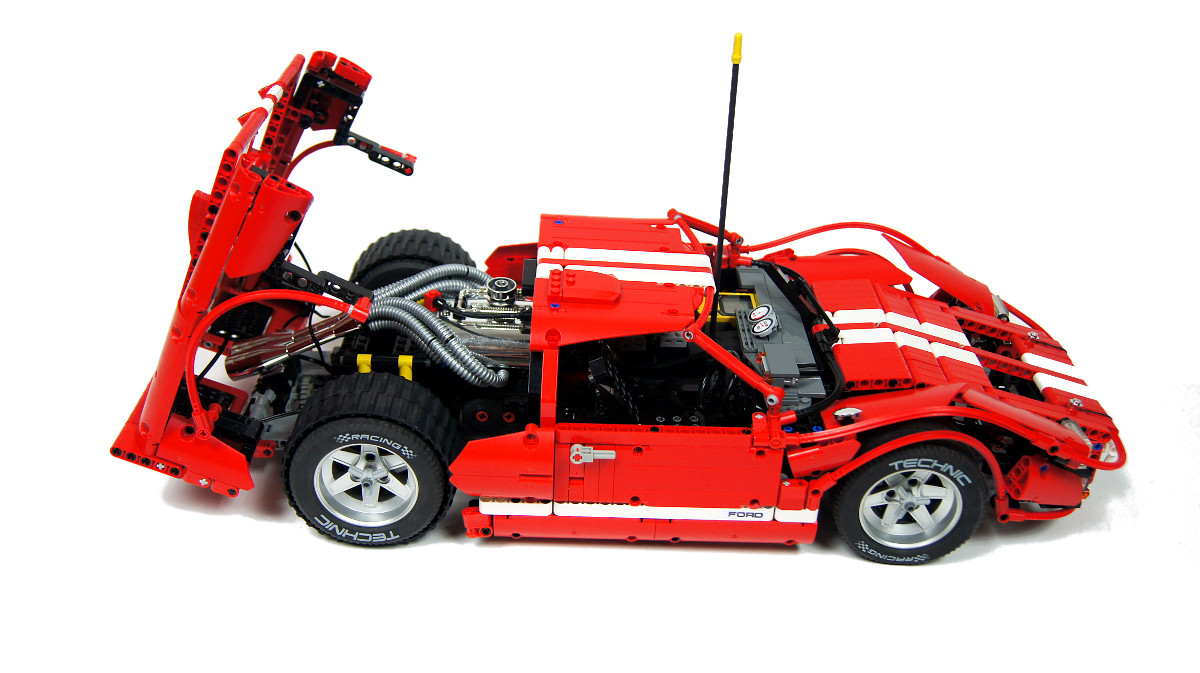
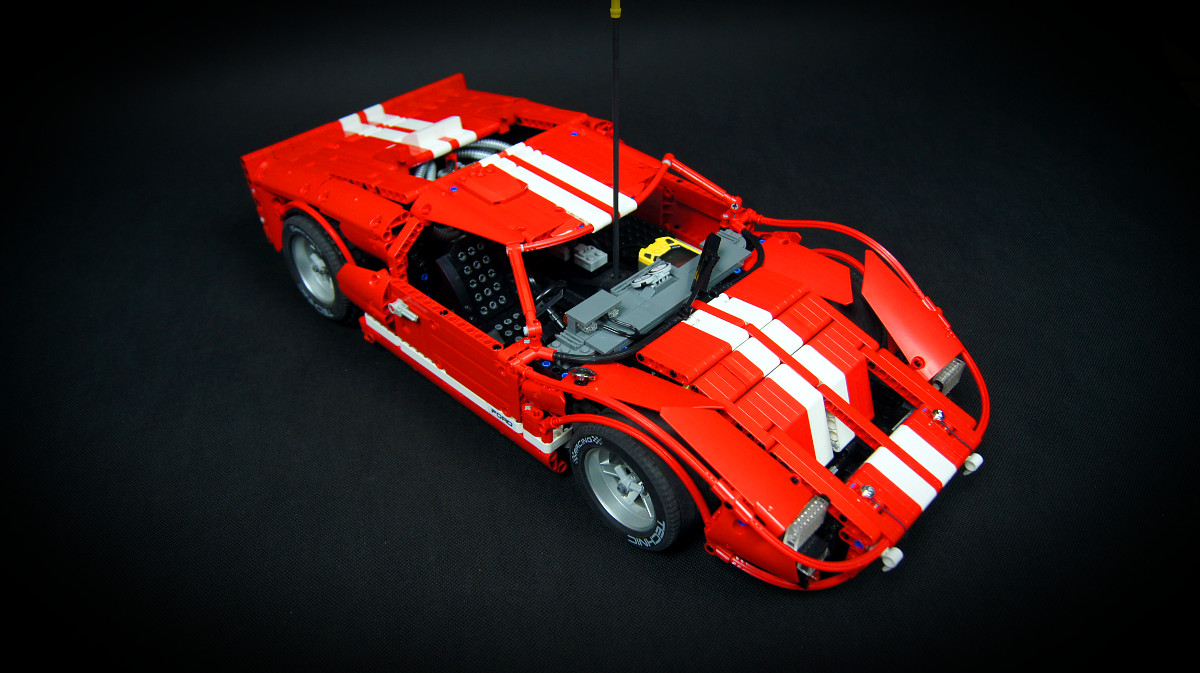
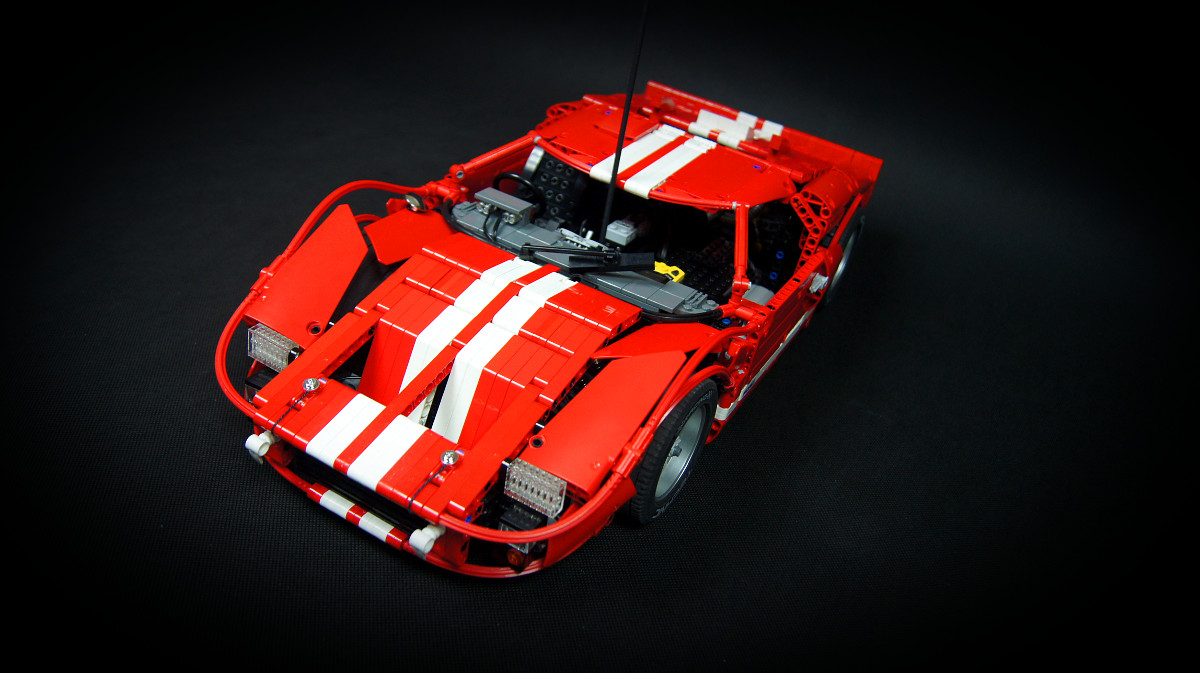
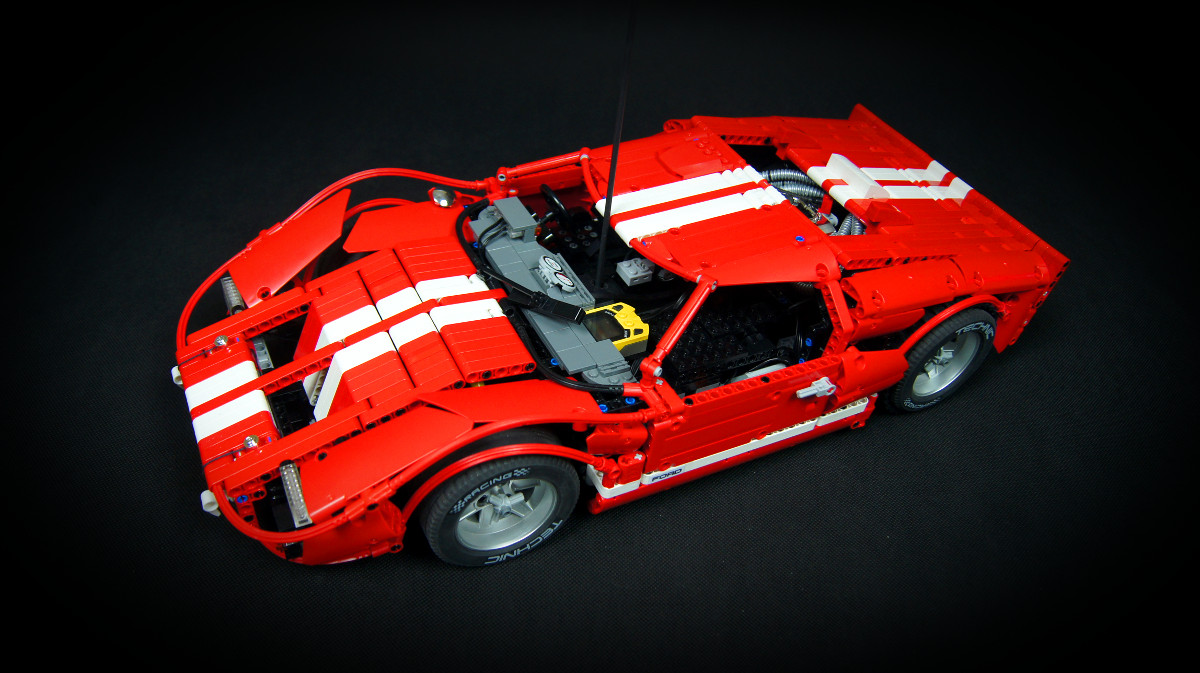
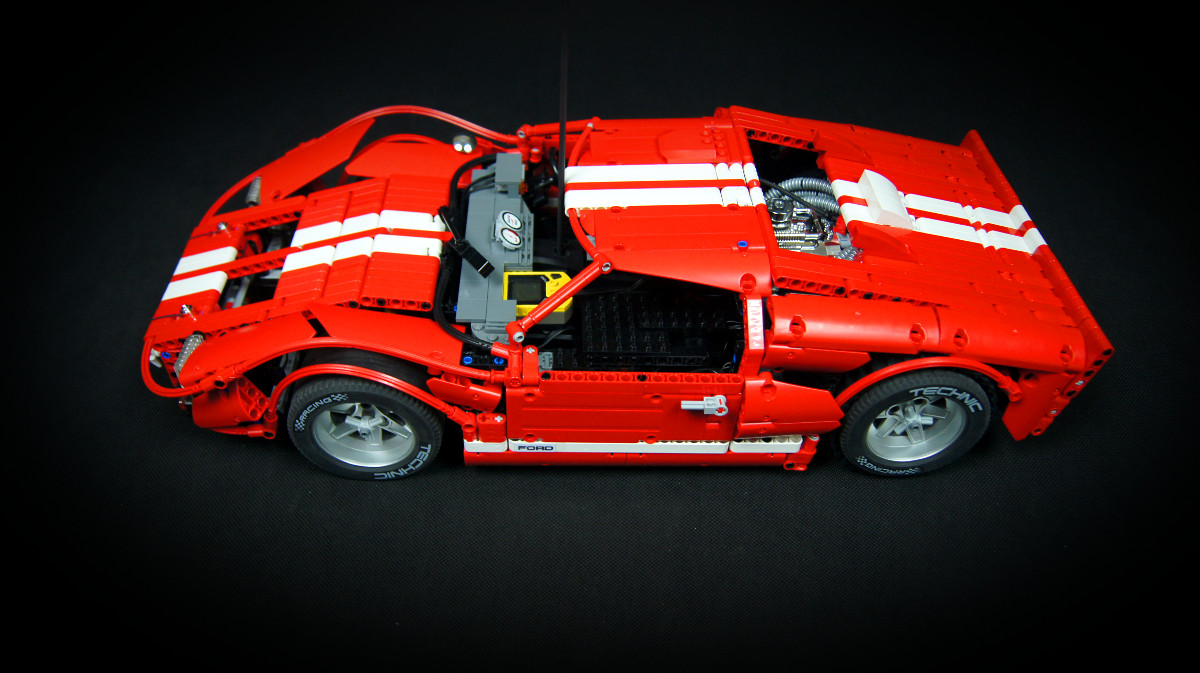
Ford Gt40 is called the most beautiful car ever made by some – which is arguable, given the fact that its look does not stand out so much from the look of other cars of its era. In fact, it’s strikingly similar to some cars built around the same time (e.g. Lamborghini Miura P400 version S) or even slightly earlier (e.g. Porsche 904 GTS). As large models of supercars give little room for functions (no space) or for performance (weight), my goal was to make the model look real and authentic. Out of many versions of the GT40, with many details looking much differently, I have chosen the Mark II version – one that had a history of engine failures, but that also included many interesting and unique details, including air intakes on top of the rear bonnet. Some other details, such as the absence of side mirrors, show that it’s a racing version of the car. My decision to build the body of the model fully studless was strengthened by seeing a Ford GT40 model by Arvo brothers. I consider them to be among the world’s top studfull builders but their studfull model does not appeal to me – and I don’t think I could possibly top it.
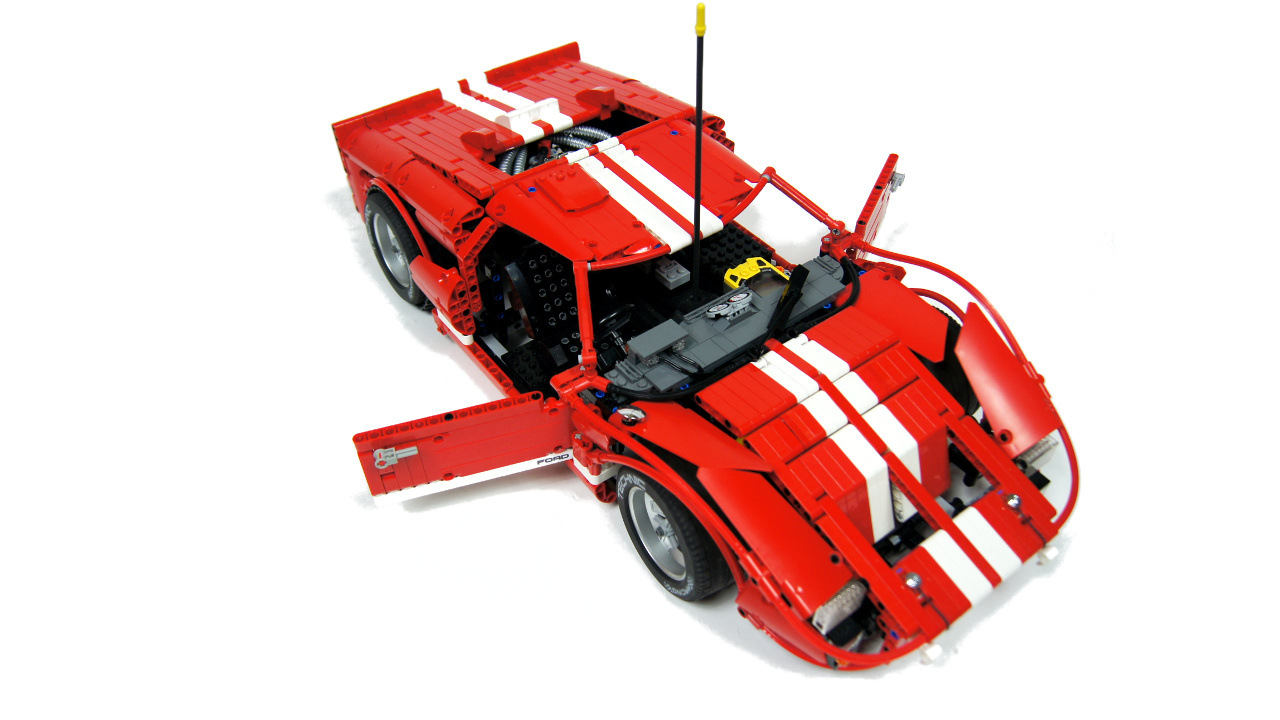
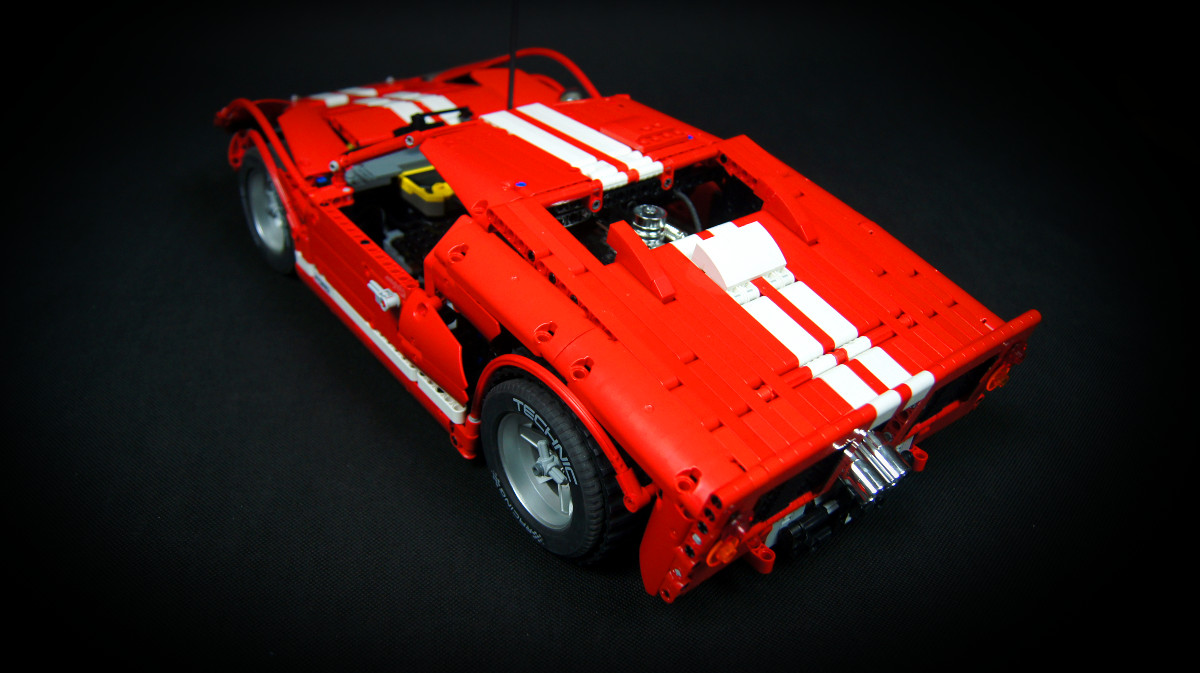
 Most of all I wanted to model the shapes of the car properly, looking for a balance between using beams, panels and flexible axles. I was looking for something between the approach of the LEGO 8448 set (body made of just general contours with gaping holes) and that of some older cars by Crowkillers (fully enclosed bodies made primarily of beams). Some compromises proved necessary – the roof was a single part, without parts of it being attached to doors, because I was unable to find a good-looking solution to that. The front bonnet did not open and the rear bonnet was inaccurate – it should open with all side air intakes attached to it, but it only opened with the top two.
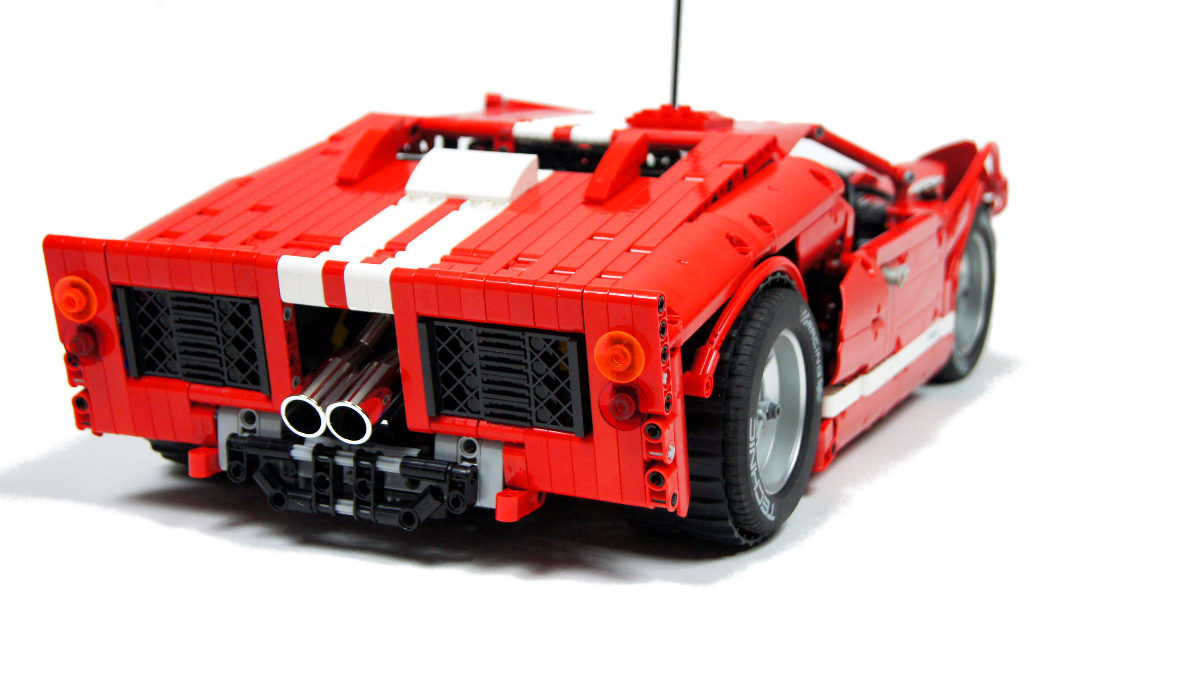
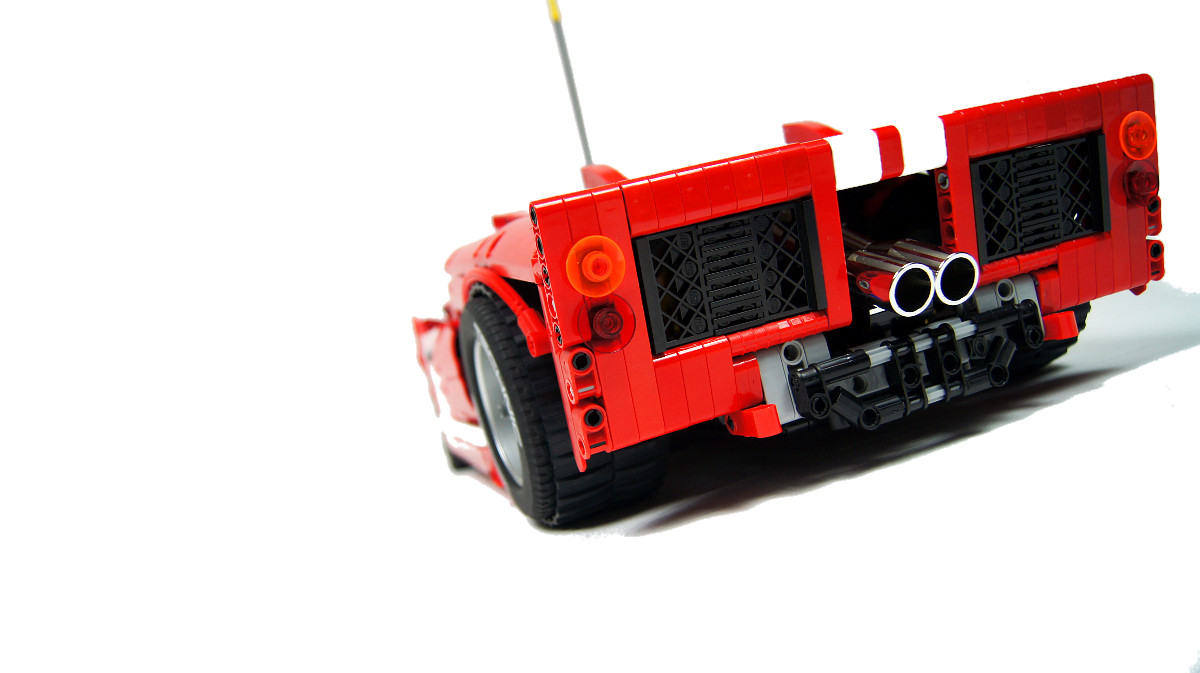
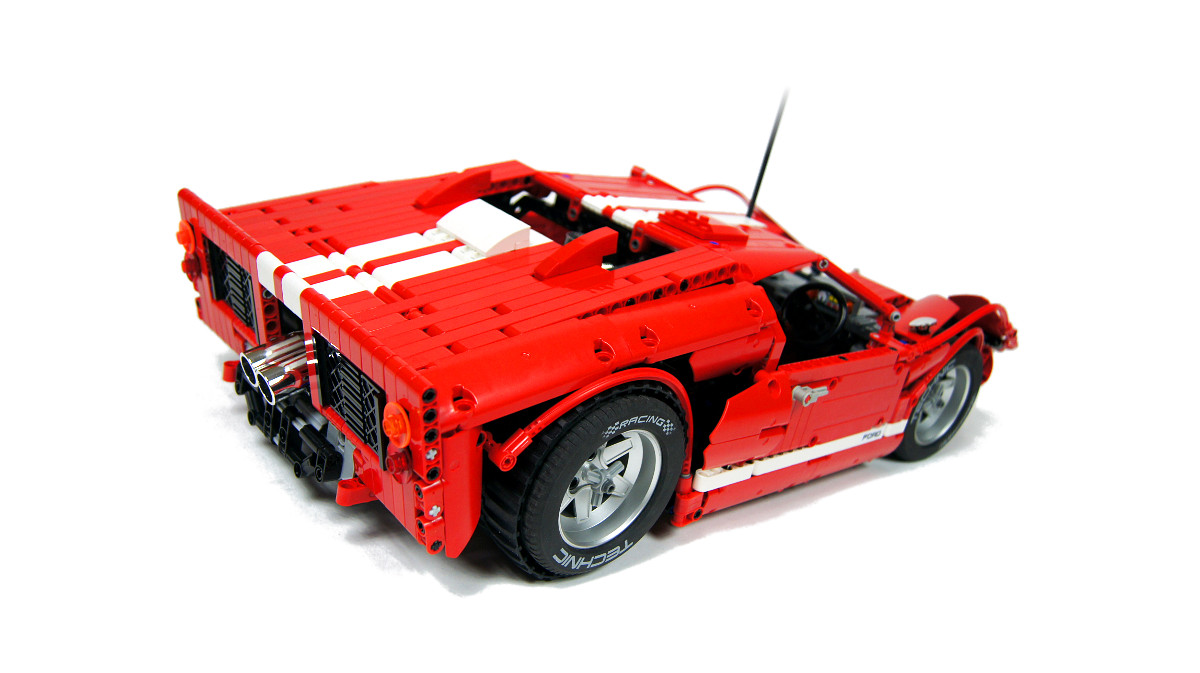
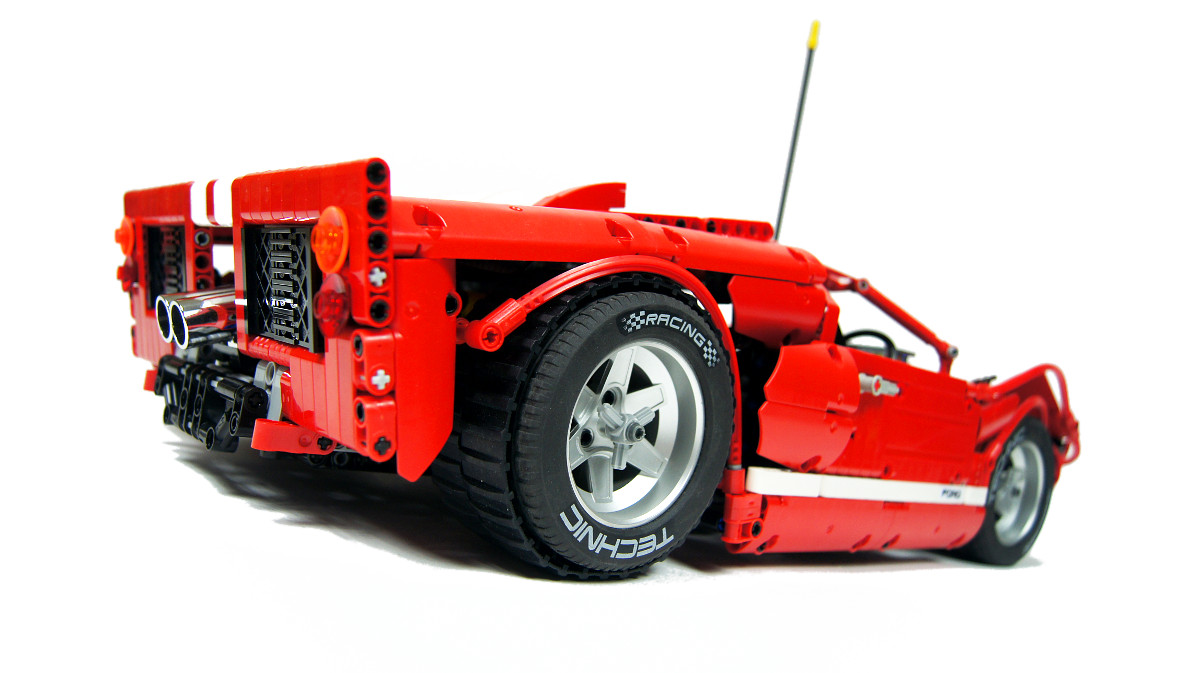
Most difficult part of modelling the body was the front of it, particularly the front mudguards and headlights. If you look at front of the Gt40, its mudguards follow a complex curve which slightly rises towards the sides of the car. I wanted to model this feature, which I consider crucial in making the model look accurate, and I think I achieved that using large panels set at complex angles, with flexible axles drawing the outer body contours. The headlights, on another hand, are nearly rectangle-shaped and come with vertical ribbing, typical for headlights of all cars of that time. I eventually used blocks of 1×2 trans-clear plates, which I think look accurate, but they absorb much of the light of the Lego LEDs behind them.

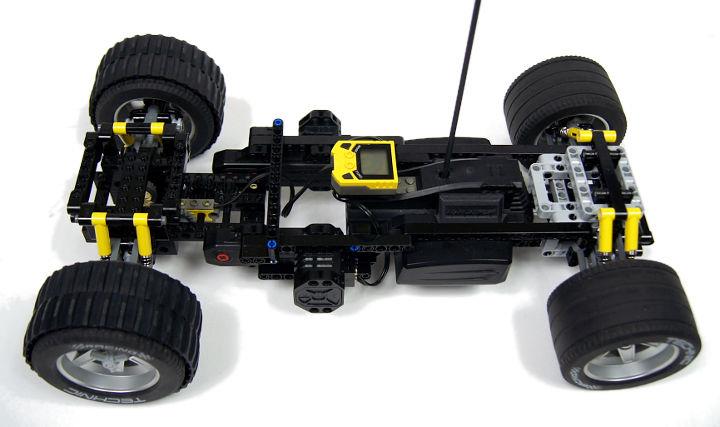
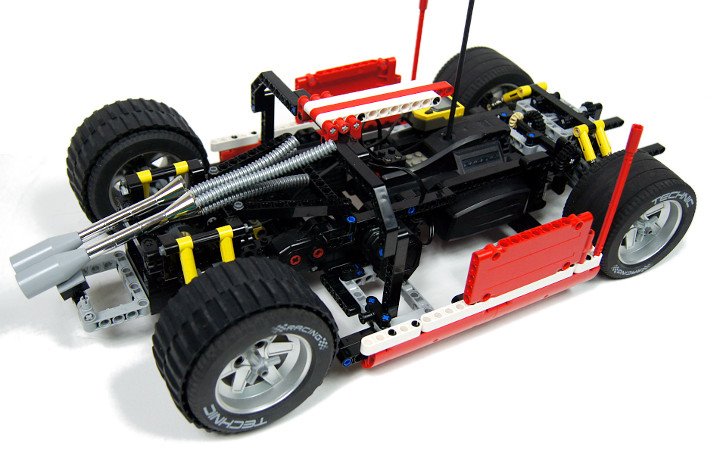
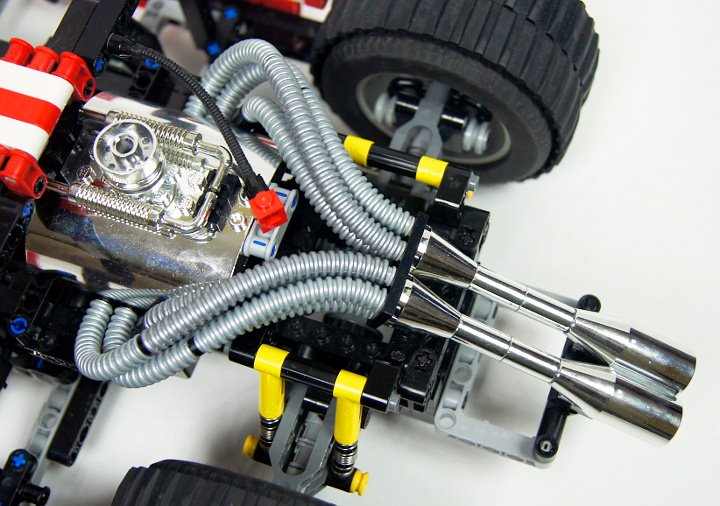
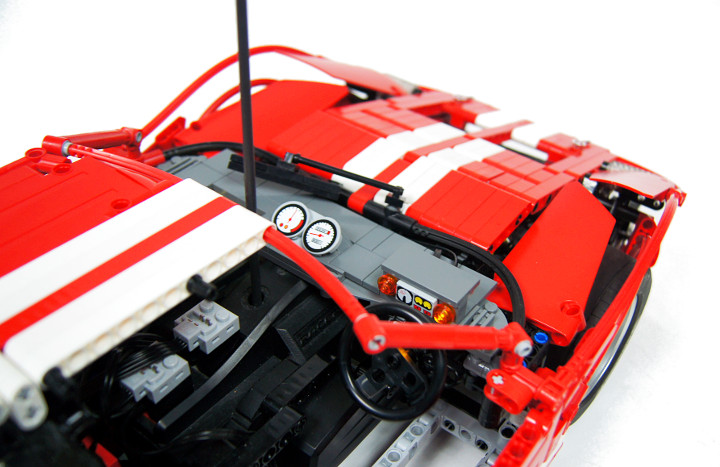
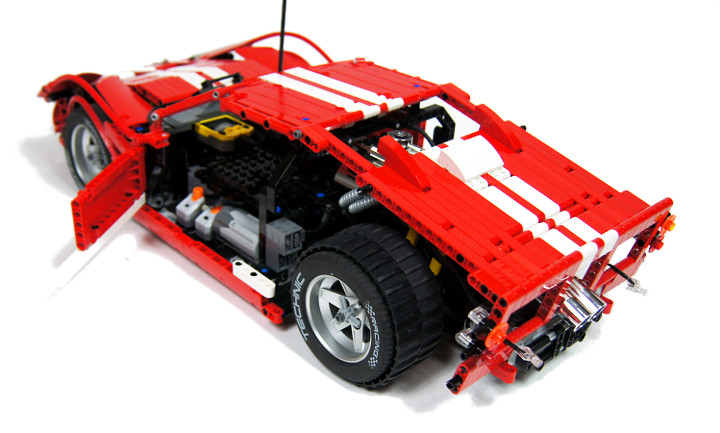
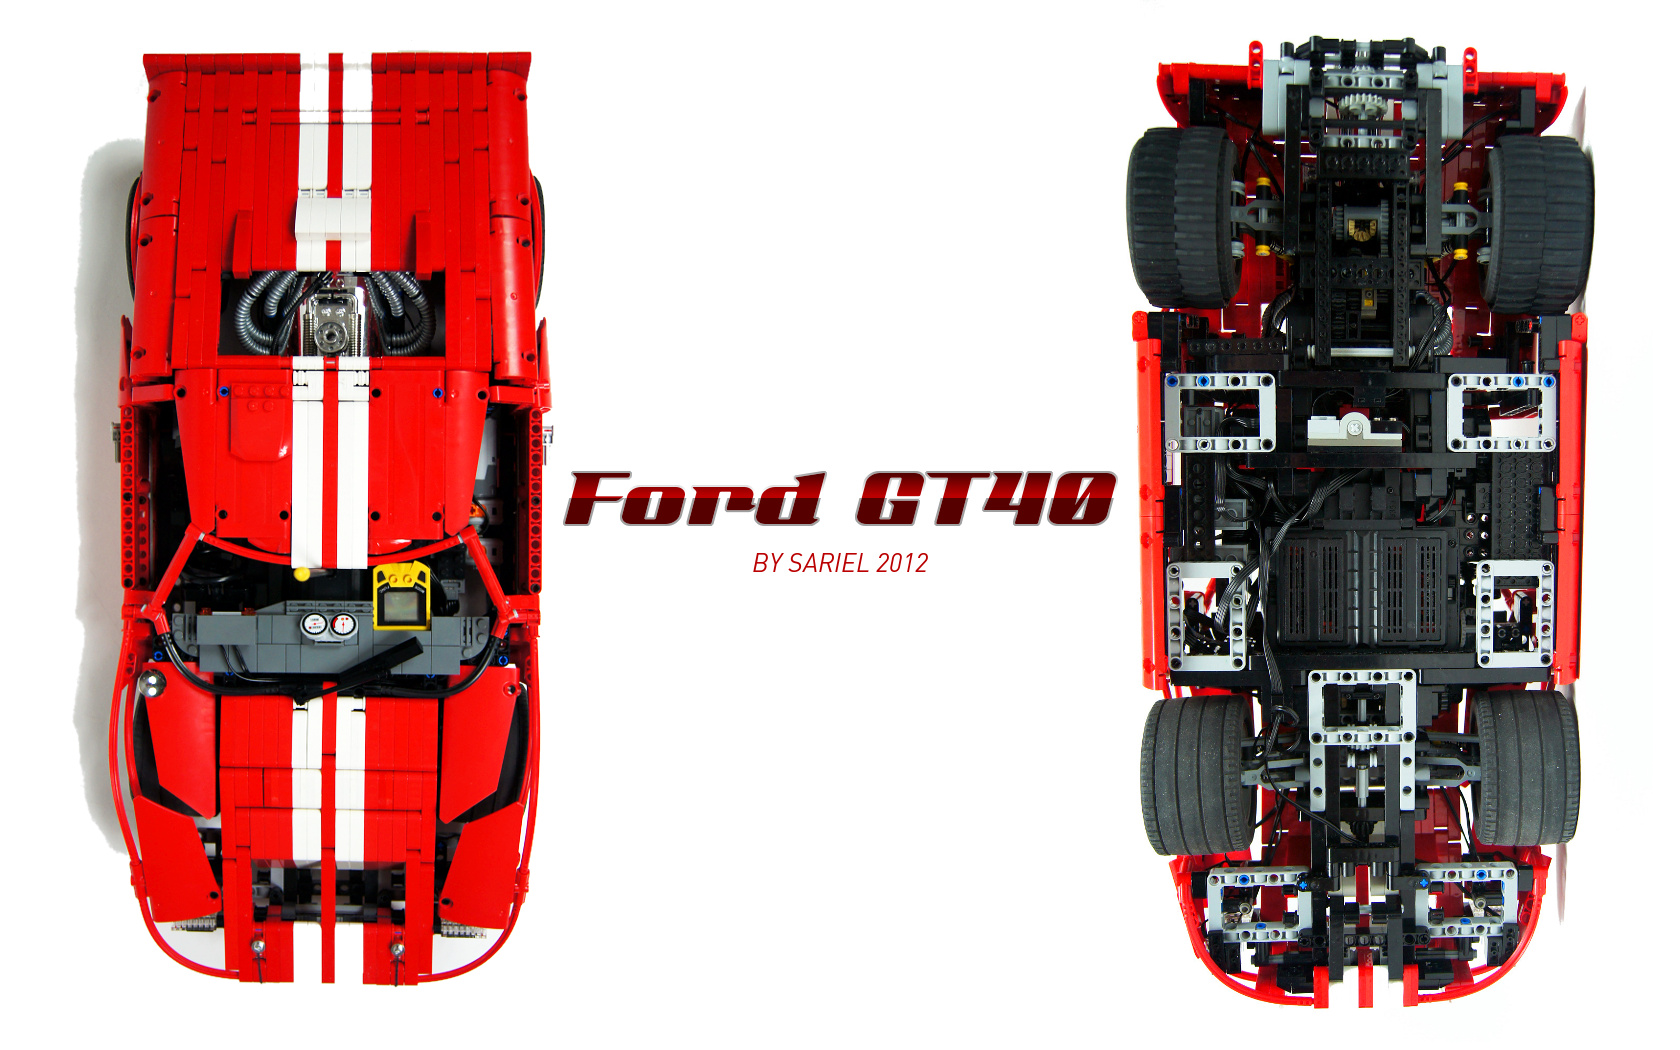
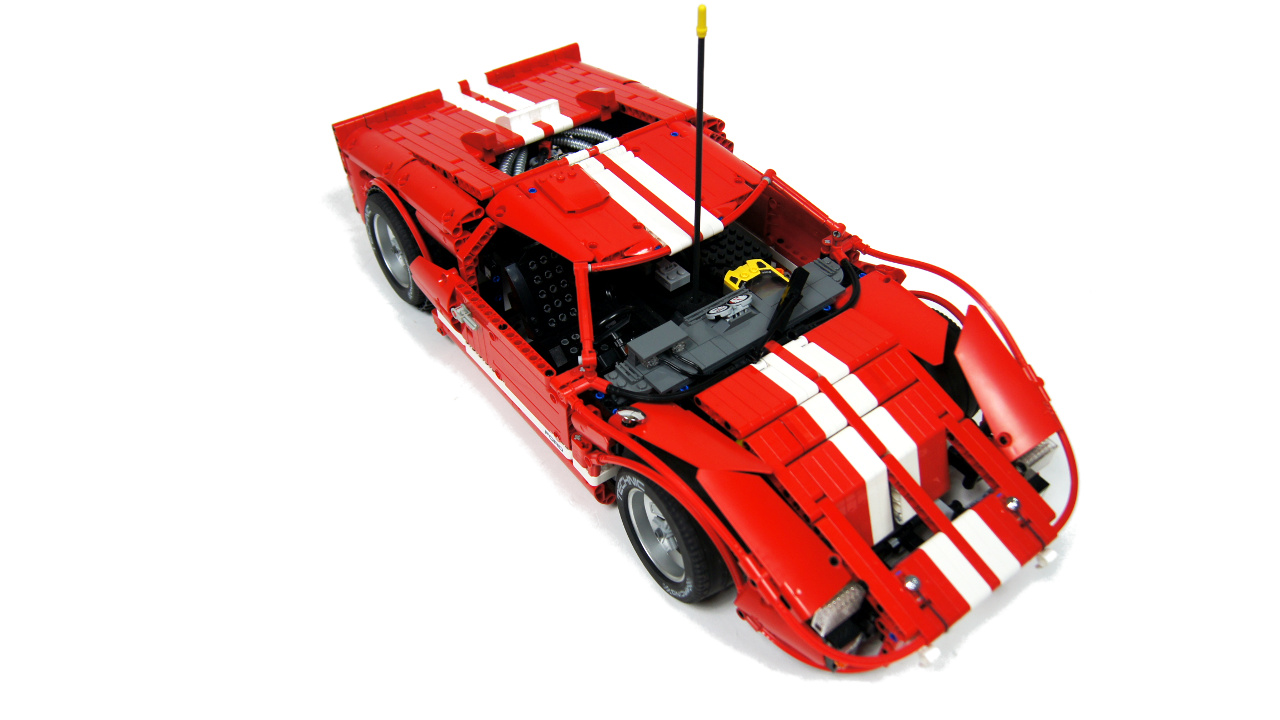
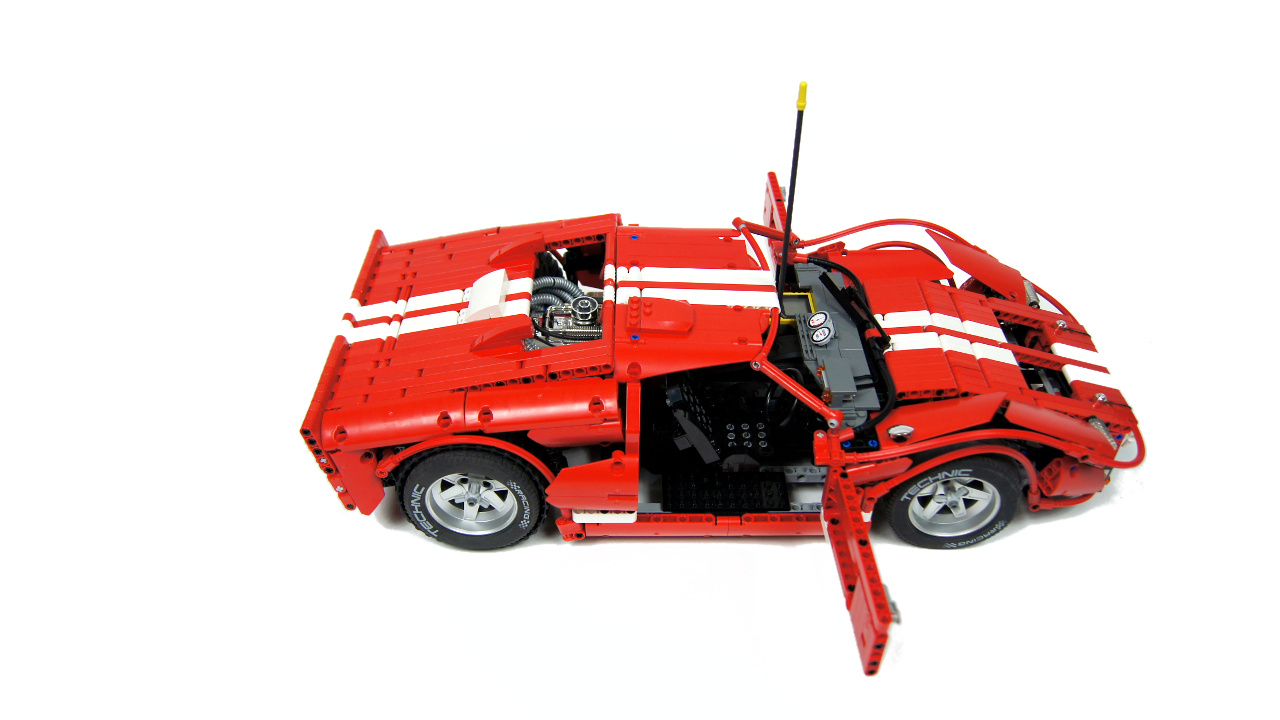
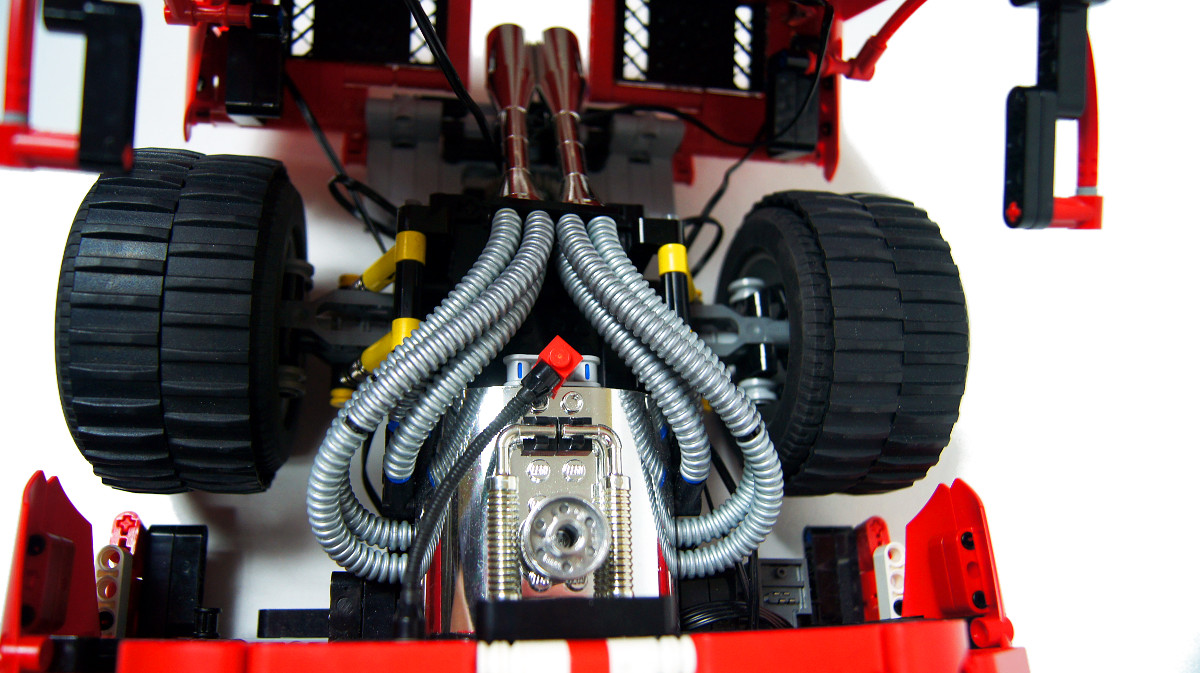
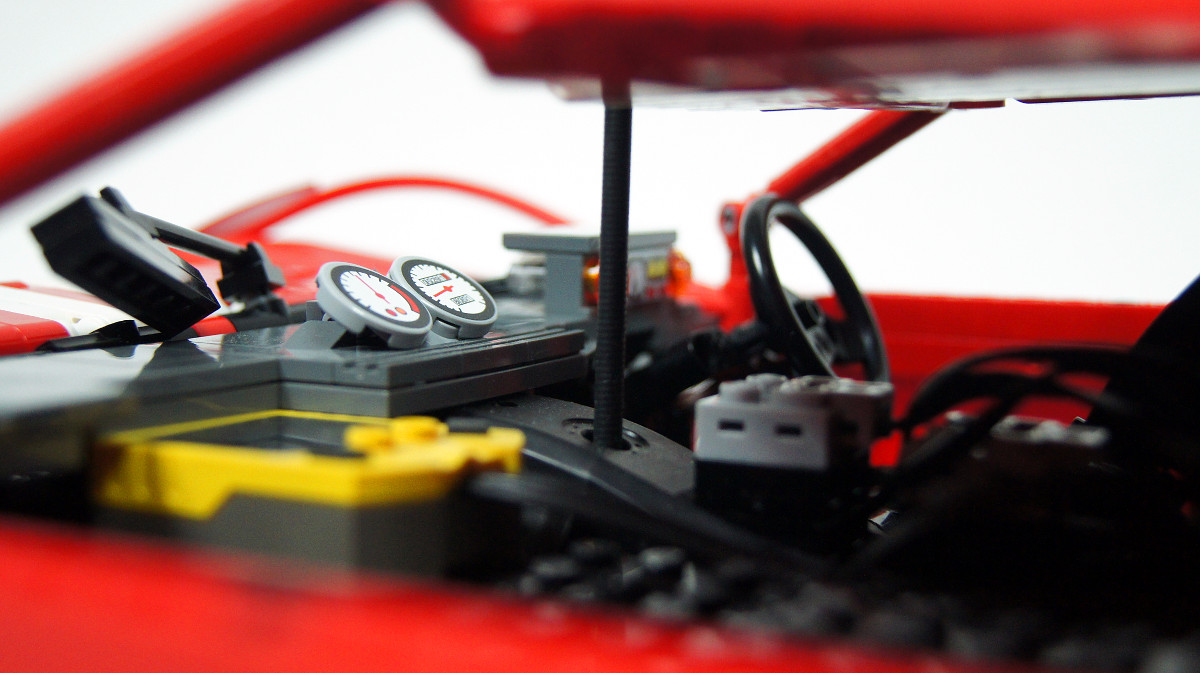
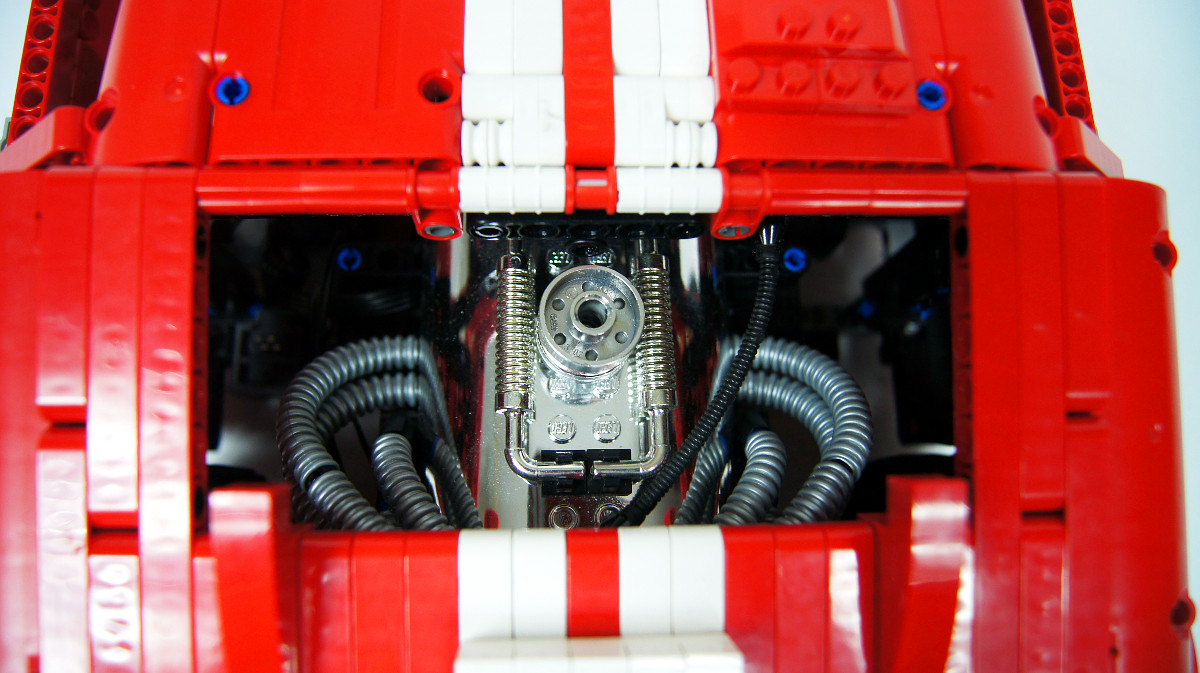
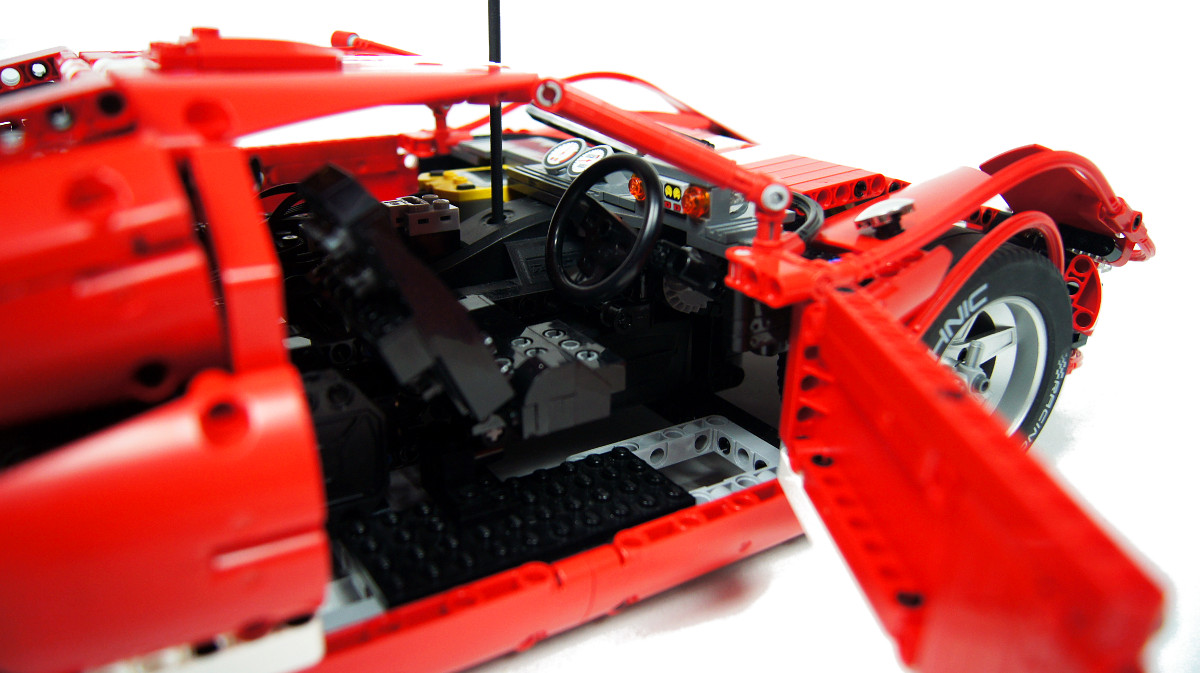
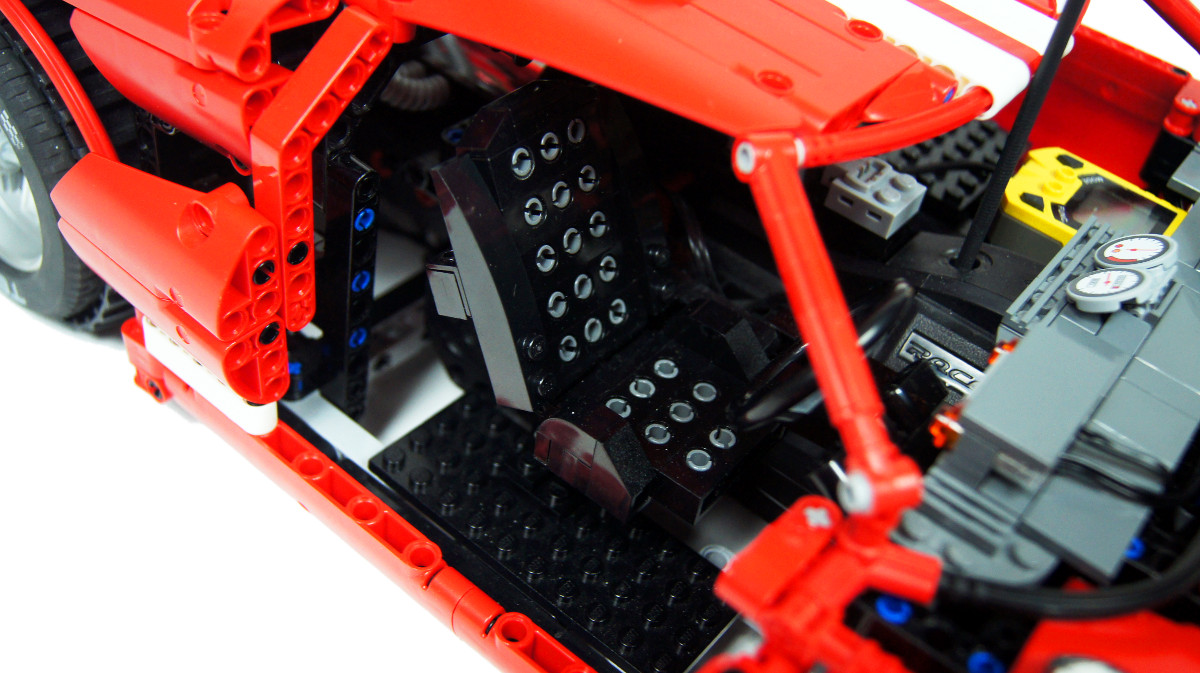
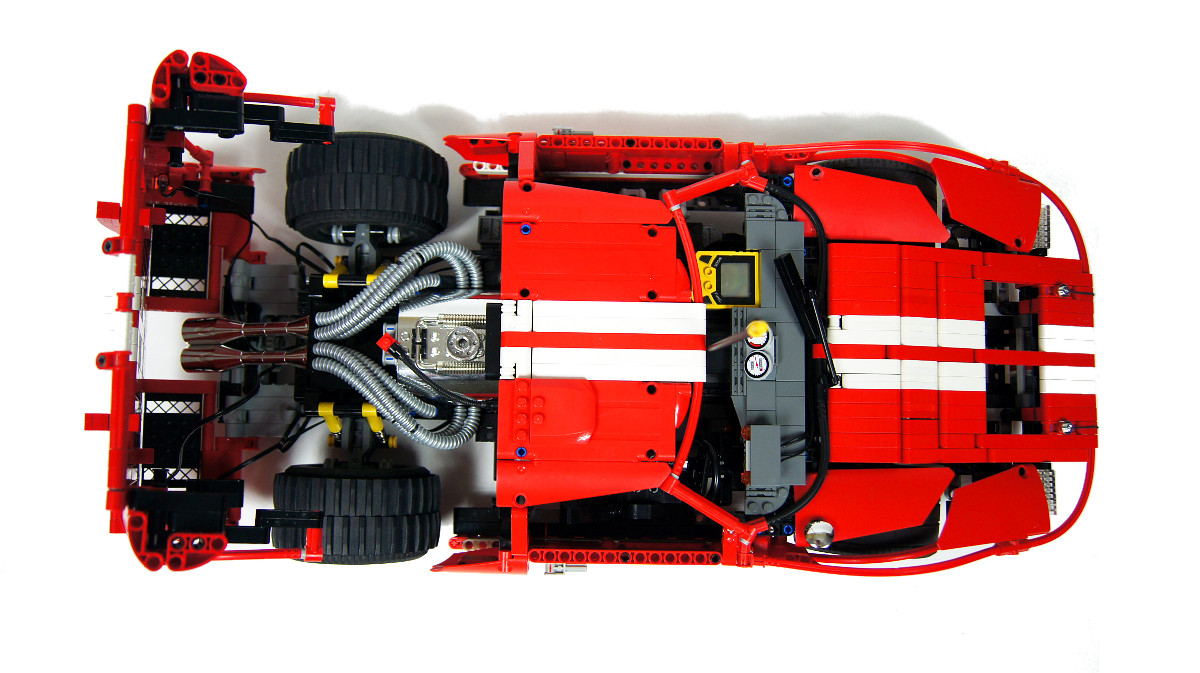
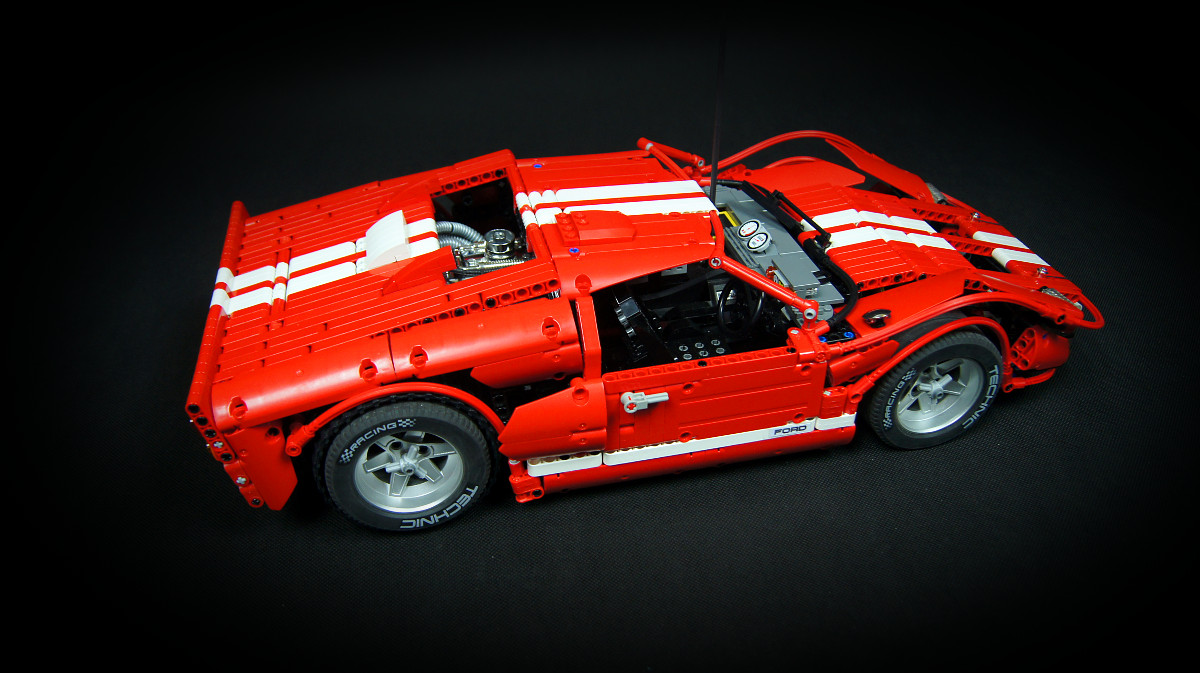
The model had only driver’s seat in the cabin, and it was moved to the side because of the RC unit occupying the center. The dashboard was completely inaccurate – it rested on top of the bearing frame, so there was no space to experiment with shaping it. The exhaust pipes were tilted downward a little more than they should, allowing the rear bonnet to open up further. Behind the cabin, there was a simple, static mock-up of the engine with some details, but less than I intended to include – I didn’t want to make the model heavier than it already was.
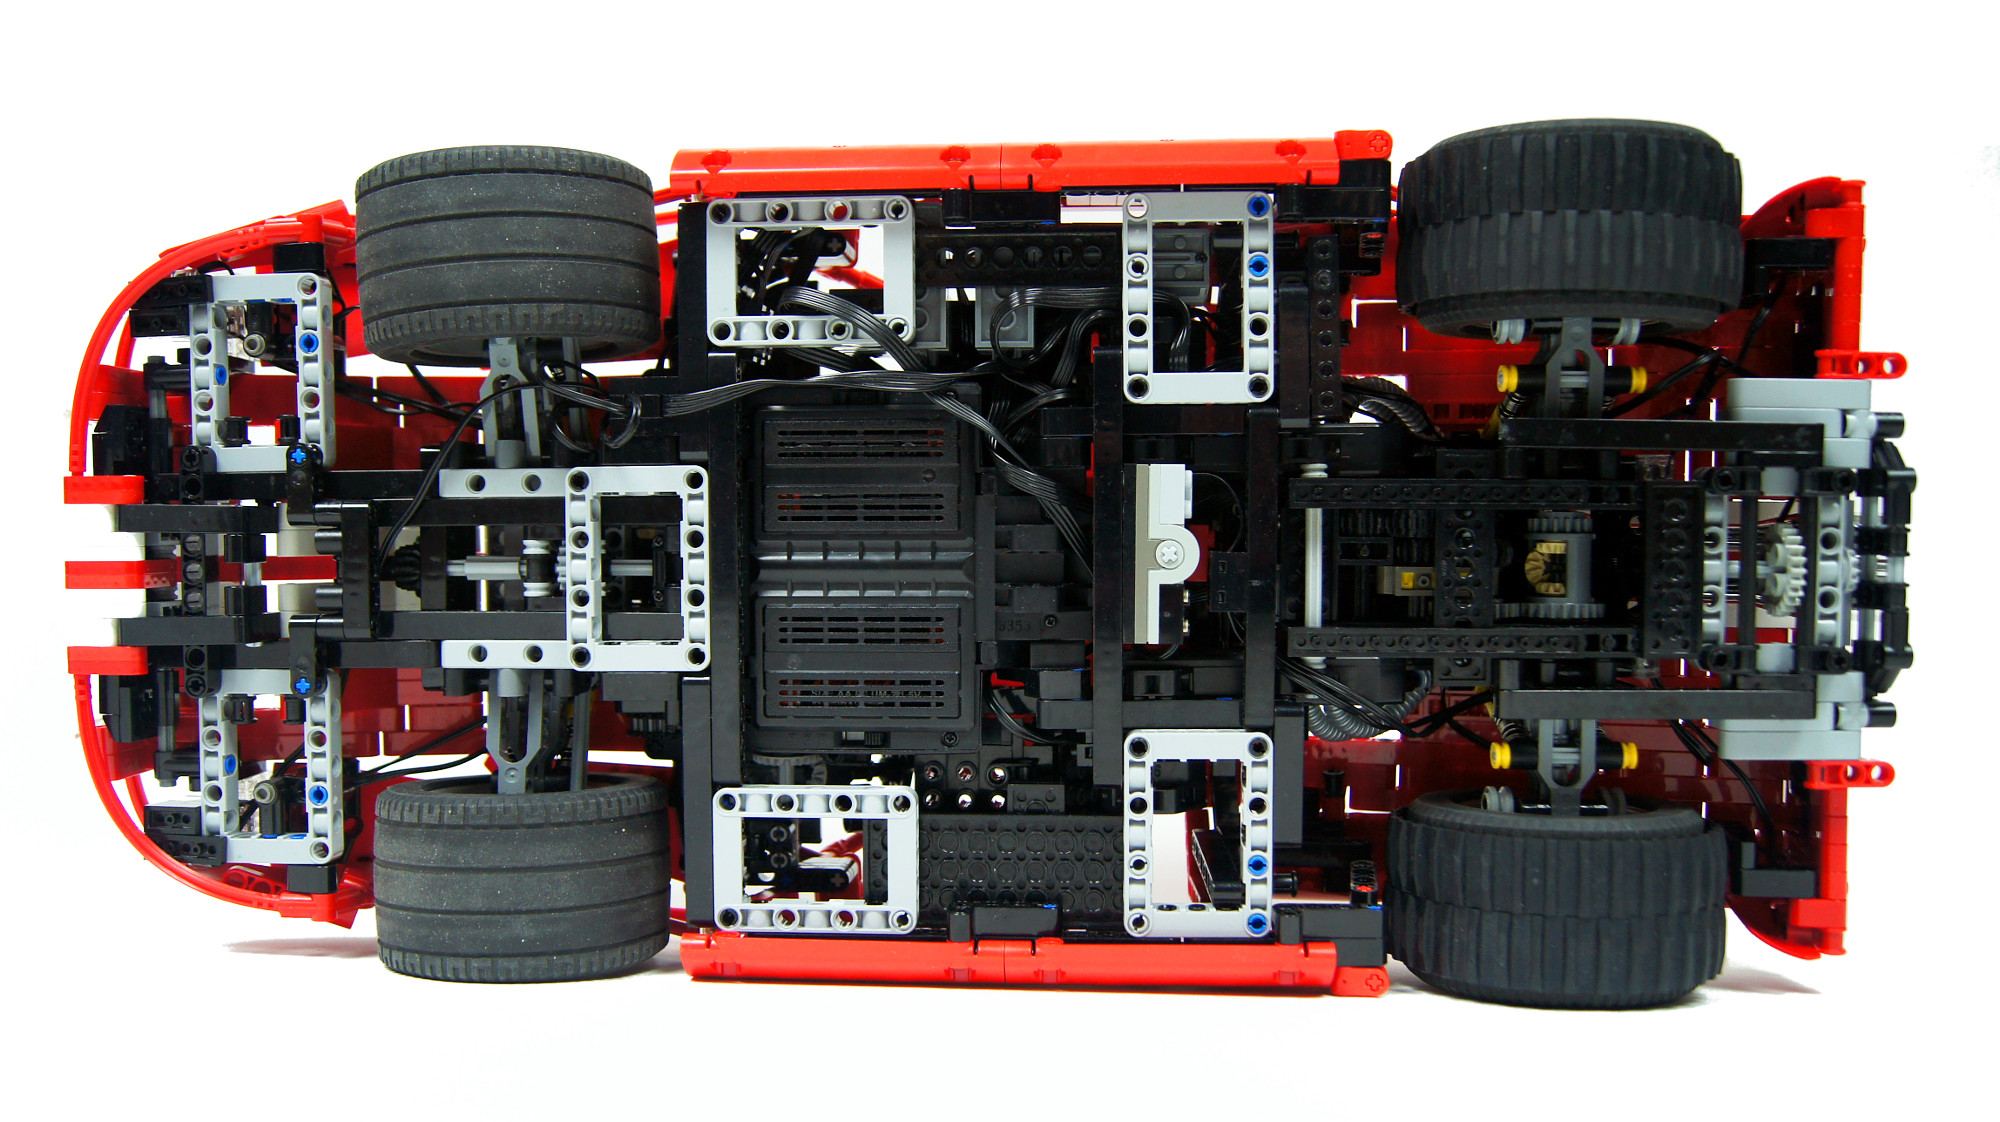
The construction of the model was 95% studless, with only rear axle using studded bearing structure around the differential. The bearing frame was built around the RC unit which was moved forward into the cabin, practically right next up to the front axle. The frame was rigid, but not completely – therefore the rear bonnet could be locked to the back of the cabin, thus providing extra stiffness to the top-rear part of the body.
While the model was not technically complex, it was challenging to integrate all the functions I wanted it to have with the RC unit and with the way it works.
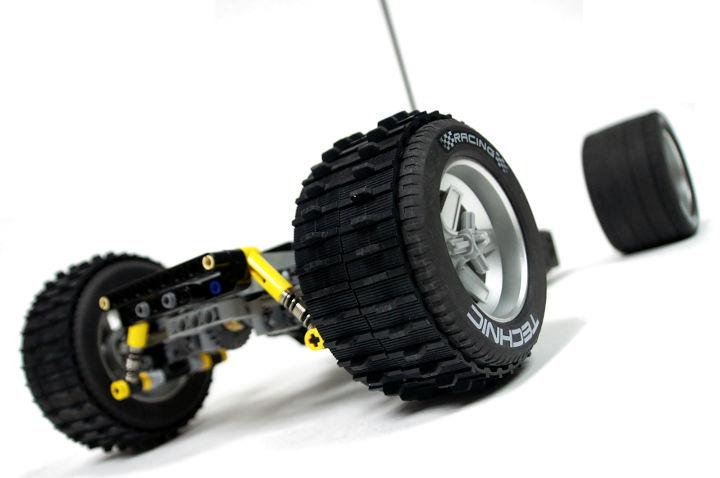
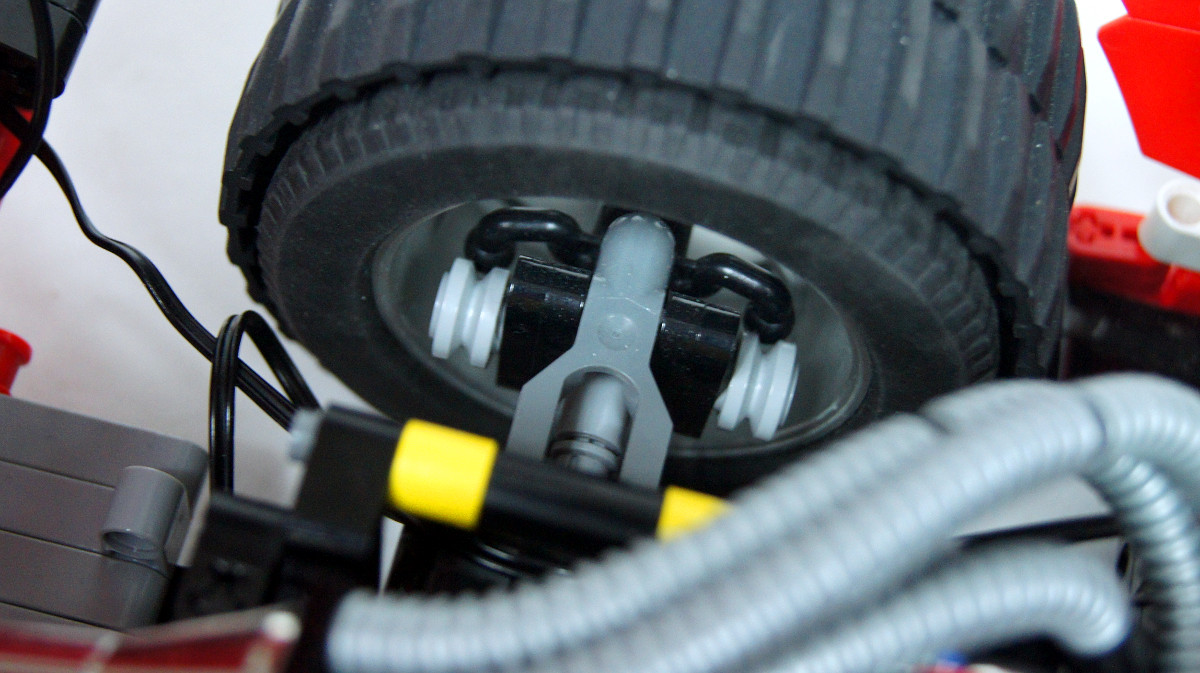
The propulsion system consisted of two hard-coupled RC motors connected to the rear axle’s differential with 5:1 gear reduction (that is larger reduction than shown on photos – I had to increase it after taking photos). The transmission system also included a Lego speedometer, with the display integrated into passenger’s side of the dashboard. The model is rather slow – I was hoping to keep its weight under 2 kg, and with the final weight being much larger the motors were so strained that the batteries in the RC unit lasted about 5 minutes.
The suspension used typical Lego double wishbone independent suspension, with two short yellow shock absorbers per each wheel. It was soft, particularly the rear axle which carried most of the model’s weight. Just like in the original car, the front suspension is slightly narrower and the rear wheels wear bigger tires – in this case, tires were enlarged by putting two rubber treads over each of them. It should be noted that the model drove better without the treads that with them.

The steering system used steering output of the RC unit. The RC steering module could not be used because it was much too narrow. The steering wheel was attached to the RC unit’s output too through a series of gears. The steering lock was small – the RC steering unit rotates by small angle, and I couldn’t gear it up because there was no space for large gear wheels under the low bonnet.
The front and rear lights, using three pairs of Lego LEDs, were connected to the same output as the propulsion motors. They only shone when the model was driving, and they blinked when it started because of the RC motors taking all the power available.
The turn signals system, which took quite a lot of work to include, was based on my earlier mechanism. This time, however, it was remote-controlled rather than automated. I simply wanted to try remote-controlling it freely, and besides it would be nearly impossible to use it with the RC unit’s steering output. Instead, it was connected to the RC unit’s auxiliary output and it consisted of two parts connected only with wires – which was necessary to fit it in. First part was a micromotor driving an old 9V switch, located vertically at the back of the cabin, between the RC motors. The second part was a PF Medium motor rotating two PF switches, coupled with old toothed half-bushes so that turning one switch on turned the other one off. I wanted to control them with another micromotor, leaving enough space for passenger’s seat, but it proved too weak. The turn signals could be made with just two pairs of Lego LEDs, except that their wires were too short. I had to use four pairs instead, and since the GT40 has single turn signals, I ended up with two spare LEDs in front and two in back. I have installed the front LEDs into the dashboard, creating turn signals indicator in front of the driver, and I have simply hidden the two rear ones.
The model had its imperfections and compromises, but in general it was fun, looked good and it was a great experience in studless building. I can say it was slower than I expected but looked better than I hoped. I think the photos of it are among the best I’ve ever made, and I also put a lot of work into the video, with a good effect. It was a good lesson for my future supercars, because it was example of a very typical supercar, with central engine, low ground clearance and rear axle drive.
Work in progress photos:


Photos:


Video:
Media reference:
8 studs (Polish only), TechnicBRICKs, Technic Delicatessen, The LEGO Car Blog

@Reinhard
You won’t notice the range difference indoors. If propelled by no more than two PF XL motors, yes, it could work with one batter box.
True. I think the IR would have less range. Would it be lighter with only one 9v battery box or does it require 2?
@Reinhard
It sure takes a lot of practice, but some natural skills too, probably. The IR version is possible, its effectiveness would be similar.
Realy nice. I like the way you make your cars look so realistic. Is it because of years of practice or is it just natural? Could it be run via IR or are the RC more effective?
There is no word in the English language that describes how realistic this looks and is. U did an awesome job
@gabry
Because this way works.
Why is it geared down in this way?
Your ford Gt looks jut like jeremy clarckson’s one. They should show it on Top Gear!
@Tristan
I’m sure I only had a few sets. Possibly not a single Technic set.
Okay well thanks anyway. Because i am also trying to become a lego technic moc builder. but i am only 12 so its alot harder to get stuff and my knowledge is not as big yet. So i just wanted to know what you had at that age an how good you were.
@Tristan
I don’t remember.
As a kid did your mocs often fail ? And how many sets did you have at the age of 12 ?
@tuur
To make them bigger, as you can read in the description.
why does it has those black thing’s around the rear wheels??
p.s. nice work
tuur
awesome!!! I want to buy!!!
nice job sariel. you are great with this kind of stuff!
@Frode
Everyone has seen this, I think 🙂
Very nice work…
Btw, seen this:
http://mocpages.com/moc.php/113937
Wow.
@Shlomi Gondabi
Not possible. I’ve taken it apart a long time ago.
Hello,
Will you consider making a “lite” version instructions – meaning unmotorized FORD GT40?
I know it is quite a headache, but this magnificent creation must be preserved by instructions…
Shlomi
I really appreciate your help!! THANKS@Sariel
@TwinTurbo
Yes.
OMG this is awesome!!! This friday i will get my HOT FLAME at 60 dollars!!! One more question can i use the PF battery with the RC MOTORS???@Sariel
@momis99
Yes.
adn is it this unit??:
http://www.bricklink.com/catalogItem.asp?P=6272c01
@TwinTurbo
With this: http://www.bricklink.com/catalogList.asp?q=extension+wire
hi sariel!
how do you connect the PF M motor to the RC unit???
@momis99
You posted a link to a store, not to a specific part.
is it this???: http://www.bricklink.com/store.asp?p=murauer77
@momis99
At Bricklink, for example.
can you tell where i can buy that big RC-unit?
Thank you.
@Paul
Sure: http://www.bricklink.com/catalogItem.asp?P=22969c04 and http://www.bricklink.com/catalogItem.asp?P=680c01
If you don’t mind me asking, do you know what the Bricklink part numbers for the Wheels/Tires and Tracks on the back tires are?
@jostein
No.
hawe you designed the gt40 in mlcad
@Zac
I model and render some LEGO parts using MLCad and LDview and then I put it over photos that I insert into the video. It’s a fairly complex process, really.
Very nice! I really liked the video editing. What video editing software do you use and how did you do the shots of the components like that @ 0:55, 1:01, 1:09, 1:18, and 1:27? I thought those were really cool!
Haha, the only thing that would make it cooler is if it had the old school Le Mans colour scheme 😉
@qwertyuiop
Why don’t you download instruction for the 8297 set and look at its suspension design? It shows everything, with the newest pieces: http://technic.lego.com/en-us/BuildingInstructions/8297%20Group.aspx
@Sariel
yes, very much so. im only asking because there are various suspension parts that all look very similar but do different things.
@qwertyuiop
So you want to have drive in your suspension or not?
@Sariel
ok thanks. can you link me to all the parts i need if possible? i am clueless at which pieces are the right ones
@qwertyuiop
1. None, because suspension components you linked to don’t allow to drive wheels.
2. Depends on its angle and point of attachment.
3. Like I said, these pieces don’t allow drive.
i am looking to buy independent suspension parts from bricklink, and i have a few questions:
1. how many u-joints do you need per wheel (if any)?
2. will two normal-spring shock absorbers on each wheel be able to support a model of around 1.5kg?
3. do i require any parts other than:
http://www.bricklink.com/catalogItem.asp?P=32195b and http://www.bricklink.com/catalogItem.asp?P=32186
i will appreciate any help you can give me
@Rastwo
Then there must be a really huge torque involved, or perhaps your differential is faulty somehow.
@Sariel
Oh,ok, I got it. But when I am building something, diff slips. Everytime I use 2 NXT motors for drive, geared 1:1 or more( to torque). I also put it in frame, but it only limited slip.
Thanks for the Gt40!:D
@qwertyuiop
Oh, I’m so sorry, I though you meant it’s not a supercar. I moved it to the supercars category, I forgot I even had one 🙂
@Sariel
yes, as in your 2011 plans you said “I am determined to build at least two supercars this year, the most probable choices being the Lamborghini Reventon and the Ford GT40.”
after mentioning the gt40 as a supercar, i simply questioned it when it wasnt in the supercars category along with the charger
@Minotaur
I wanted to say “was”, thanks for the correction and for the kind words 🙂
Hi,Sariel
I’ve been a fan of your work for 3 years and this is the best model you’ve yet!Keep doing what you do man!
B.T.W In the documentation you have a typo under the black GT40 picture “The model had only driver’s seat in the cabin, and it wa moved to…..”you wanted to say wanted,right?
@qwertyuiop
Are you serious?
very nice creation! however, it doesnt seem to be in the “supercars” category. is it meant to be?
@Zozoleon
Jest tak, jak na filmie. Dlatego promień skrętu jest taki mały.
Mogę się dowiedzieć, na jakim przełożeniu działa sterowanie? Mam ten RC unit (bardzo, bardzo fajny), ale ma mały kąt skrętu, a dużo siły. Na filmie wygląda jakbyś użył jedynie zębatki 16 zębowej na osi wychodzącej prosto z silniczka, a cała reszta jest po to, by skręcała kierownica. Czy jestem w błędzie? Odpowiedzią bardzo mi pomożesz (zakupiłem zawieszenie z “Off-Roadera” i mam problem ze skręcaniem)
No words can describe this piece of art! Beautiful creation! You must create instructions for this model – even a “lite” one (without remote control)… Always a pleasure to watch your creations!
@Rastwo
No. It never slips. Ever. It’s just that I couldn’t put a speedometer in there with the new differential.
It looks and works awesome. But why you firstly wanted to use new differential and then you used old one? It slips? I guess yes
Congratz on an epic model 😛 I luv your work.
The model is great! Very detailed
Very beautiful.
@Marin
I’m glad someone enjoys my effort 🙂
I enjoyed every bit (text, pictures, video…).
This… This… This is pure epicness.
it looks diabolical from the front 🙂
nice job!
I watched the video that you linked in the description, and one thing that struck me was how small this car was in reality! Today’s beasts are larger, this seems so tiny 🙂
very nice!!!!!!!!!!!!!!!!!!!!!! i like your documentation 😀 but i like your car more