NXT Automated Gearbox

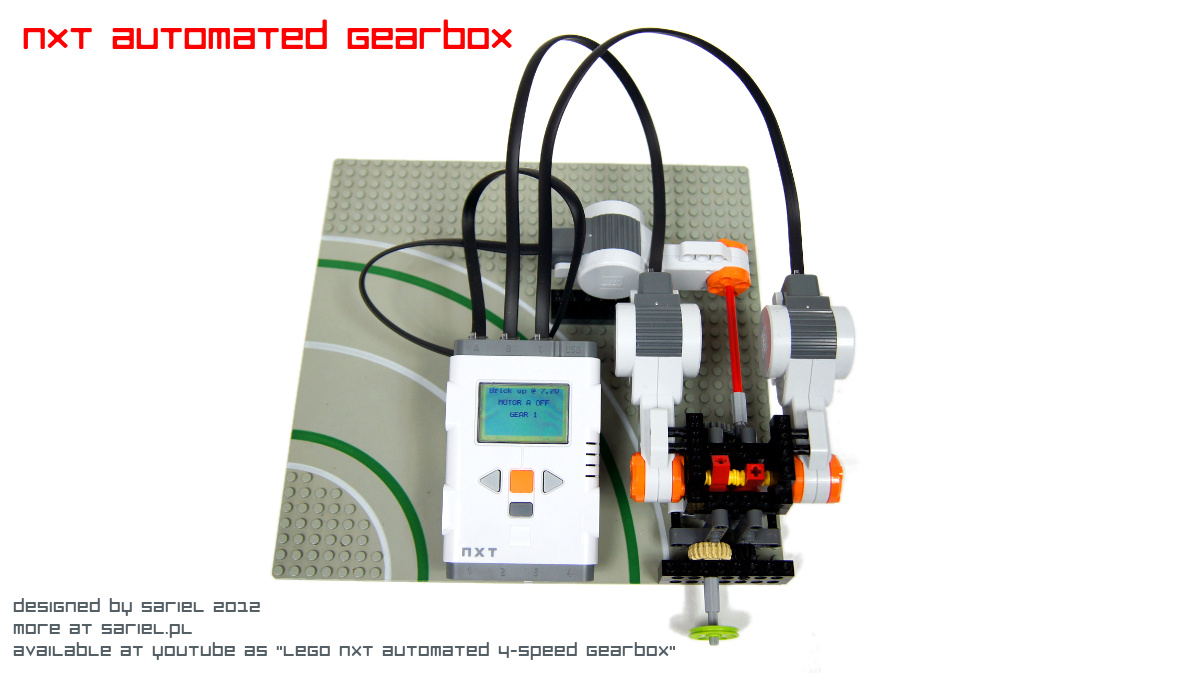
My first MOC using the LEGO Mindstorms NXT. Features a simple 4-speed gearbox that shifts automatically based on changes in the speed of the motor driving the gearbox.
Datasheet:
Completion date: 25/02/2012
Power: electric (NXT brick)
Language: ROBOTC
Bricks: 1
Motors: 3 x NXT motor
Sensors: none
Having recently finally bought the LEGO Mindstorms NXT set, I have been looking for an opportunity to practice some programming. The default NXT-G software was a nightmare to me, so I was hesitating between leJOS and ROBOTC, finally settling for the latter.
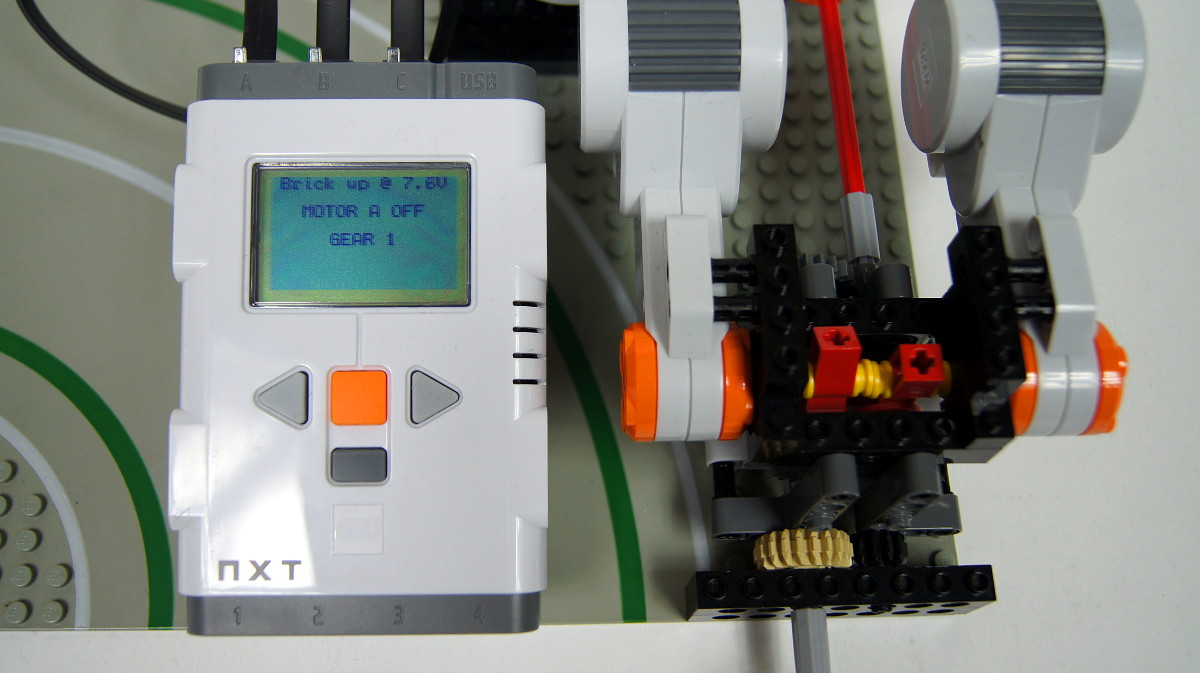
The gearbox uses my 4-speed compact gearbox design, together with two motors that change speeds and a third motor that drives the gearbox and whose speed is being monitored by the program.
The program, which can be found complete below, consists of three task: one main and two subtasks included in it. One subtask monitors the use of the NXT brick’s buttons (because the program replaces their default functionality), while the other monitors the voltage of the brick’s battery (which can change quite a lot, depending on the load on the motors). This is my first ROBOTC program, and I suppose I will be using these two subtasks on a regular basis.
The main tasks launches the two subtasks and controls all three motors. Once the propulsion motors is started, it monitors its speed counting the amount of degrees of rotation 10 times per second. Thus the basic speed unit is degrees/0.1 second, and depending on the condition of the batteries I’m using it’s usually around 70. There are two threshold speed values declared in the program, and if the motor exceeds one of them, the gearbox shifts up or down accordingly. Then it waits for a given interval to allow the motor to work a while with the changed gear ratio, and gets back to monitoring its speed.
The three values – lower and upper speed threshold value and the shifting interval – are declared right at the beginning of the program for easy adjustment. I found it to be convenient and I will be probably doing so in my future programs as well.
The gearbox is synchronized and non-sequential, so it can be switched from any speed to any other speed. For simplicity, or more specifically to limit the number of possible combinations, I have designed the program to switch only between “adjacent” speeds – so it can swicth from 3rd to 4th or from 3rd to 2nd, but not from 3rd to 1st. There is one exception: shutting down. The program can be instructed to shut down by pressing the brick’s default exit button, and upon doing so it shifts the gearbox down to 1st. Obviously, to do so it needs to keep tracks of the currently selected gear – this information is stored in the variable gear, and updated when shifting down or up.
Programming the gearbox was an interesting experience and it taught me a lot about ROBOTC. I was surprised to found that rotating the “control” motors by a given degree proved less accurate than rotating them for a given time interval. By adjusting precisely their running time, I was able to achieve great accuracy needed to shift the transmission driving rings in the gearbox without pushing them too strongly into other parts of the gearbox.
Program:
// config start
int mspeed_high = 78;
int mspeed_low = 75;
int shift_time = 3000;
// config end

int gear = 1;

task Buttons()
{
  while(true)
  {
    nNxtButtonTask  = -2;
    nNxtExitClicks = 2;

    if(nNxtButtonPressed == 0)
    {
      eraseDisplay();
      motor[motorA] = 0;

            switch(gear)
            {
              case 1:
                break;

              case 2:
                motor[motorB] = -100;
                wait1Msec(120);
                motor[motorB] = 0;
                break;

              case 3:
                motor[motorC] = 100;
                wait1Msec(60);
                motor[motorC] = 0;
                wait1Msec(500);
                motor[motorB] = -100;
                wait1Msec(70);
                motor[motorB] = 0;
                break;

              case 4:
                motor[motorC] = -100;
                wait1Msec(60);
                motor[motorC] = 0;
                wait1Msec(500);
                motor[motorB] = -100;
                wait1Msec(70);
                motor[motorB] = 0;
                break;
            }

      StopAllTasks();
    }
  }
  return;
}

task BatLev()
{
  while(true)
  {
    nxtDisplayCenteredTextLine(0, "Brick up @ %3.1fV", nImmediateBatteryLevel / (float) 1000);
    wait1Msec(50);
  }
  return;
}

task main ()
{
  StartTask(Buttons);
  StartTask(BatLev);

  motor[motorA] = 0;
  bool mstatus = false;
  nMotorEncoder[motorB] = 0;
  nMotorEncoder[motorC] = 0;
  nxtDisplayCenteredTextLine(2, "MOTOR A OFF");
  nxtDisplayCenteredTextLine(4, "GEAR 1");
  wait1Msec(50);

  while(true)
  {
    if(nNxtButtonPressed == 3)
    {
      if (mstatus == true)
      {
        PlaySound(soundBlip);
        motor[motorA] = 0;
        mstatus = false;
        nxtDisplayCenteredTextLine(2, "MOTOR A OFF");
        nxtDisplayClearTextLine(5);
        nxtDisplayClearTextLine(7);
        wait1Msec(500);
      }
      else
      {
        motor[motorA] = 100;
        mstatus = true;
        nxtDisplayCenteredTextLine(2, "MOTOR A ON");
        wait1Msec(500);
        int mspeed = nMotorEncoder[motorA];

        while(nNxtButtonPressed != 3)
        {
          nMotorEncoder[motorA] = 0;
          wait1Msec(100);
          mspeed = nMotorEncoder[motorA];
          nxtDisplayCenteredTextLine(5, "Speed: %d", mspeed);

          if (mspeed > mspeed_high) // gearing up
          {
            nxtDisplayCenteredTextLine(7, "Gearing up...");
            switch(gear)
            {
              case 1:
                motor[motorB] = 100;
                wait1Msec(110);
                motor[motorB] = 0;
                gear = 2;
                nxtDisplayCenteredTextLine(4, "GEAR 2");
                wait1Msec(shift_time);
                break;

              case 2:
                gear = 3;
                motor[motorB] = -100;
                wait1Msec(60);
                motor[motorB] = 0;
                wait1Msec(300);
                motor[motorC] = -100;
                wait1Msec(60);
                motor[motorC] = 0;
                nxtDisplayCenteredTextLine(4, "GEAR 3");
                wait1Msec(shift_time);
                break;

              case 3:
                motor[motorC] = 100;
                wait1Msec(110);
                motor[motorC] = 0;
                gear = 4;
                nxtDisplayCenteredTextLine(4, "GEAR 4");
                wait1Msec(shift_time);
                break;

              case 4:
                nxtDisplayClearTextLine(7);
                break;
            }
          }
          else if (mspeed < mspeed_low) // gearing down
          {
            nxtDisplayCenteredTextLine(7, "Gearing down...");
            switch(gear)
            {
              case 4:
                motor[motorC] = -100;
                wait1Msec(110);
                motor[motorC] = 0;
                gear = 3;
                nxtDisplayCenteredTextLine(4, "GEAR 3");
                wait1Msec(shift_time);
                break;

              case 3:
                motor[motorC] = 100;
                wait1Msec(60);
                motor[motorC] = 0;
                wait1Msec(300);
                motor[motorB] = 100;
                wait1Msec(60);
                motor[motorB] = 0;
                gear = 2;
                nxtDisplayCenteredTextLine(4, "GEAR 2");
                wait1Msec(shift_time);
                break;

              case 2:
                motor[motorB] = -100;
                wait1Msec(110);
                motor[motorB] = 0;
                gear = 1;
                nxtDisplayCenteredTextLine(4, "GEAR 1");
                wait1Msec(shift_time);
                break;

              case 1:
                nxtDisplayClearTextLine(7);
                break;
            }
          }
        }
      }
    }
  }
}


@EV3fan
I’m just downloading Robotc for Ev3 and I’m intending to try it out withi the 10-Day trial because the licenses are quite expensive but I think I’ll be able to build and program much better robots now!
I have been prgramming my Ev3 with Ev3 -G (the default programming language) for quite a while now, but I’m starting to wonder whether I should learn robotc. But the programs look a bit confusing to me as a beginner – for example this program you wrote for the gearbox is still quite understandable, but there are details where I just think “What?”. But hopefully I’ll learn all this someday.
@EV3fan
And pointless, too. I know ev3 specs, I know what it can do, and I’m not interested in it. And you wonder why I’m not a fan of your comments.
the comment I posted before was a bit hard to understand
I’ve seen NXT-G and it really is an alp-dream. But the new ev3 software is quite good. Also the ev3 has got four motor outputs and also a medium moror smaller and lighter than the large one so you could build a car with 4-speed auto gearbox ,large motor for propulsion (it’s torque is 20 Ncm!) and medium motor for steering. Or you could go for low weight and use old 9v motors with the convertion cable for shifting gears and a mechanical return-to-center mechanism for each of them to get three “positions”:gear one , neutral and gear two.
@Nuclr
It’s right there in the second paragraph.
instruction link!
@Nuclr
What link?
where is the link!
@cri2fast
No, I don’t think it is.
This gearbox is good for truck trial 6×6?
@vr99
And I gave you a link to a step by step guide.
I was referring to a step by step guide. But thanks anyways… @Sariel
@victor
There’s a link in the second paragraph of the description. So, as you see, it would help if you read it.
where can I find it?@Sariel
@victor
I already did.
hi, would you insert the manual for the construction of this project?
@Random Man
Have you considered checking that in Google?
Where can you get ROBOTC?
@maxitechnic
Well, then you have to copy the code I posted and paste it into new ROBOTC files.
thank you for your reply
I know vaguely RobotC.@Sariel
@maxitechnic
Do you know anything about ROBOTC?
hello
I would like to save this program in my nxt brick, but I do not know how to proceed. Can you help me
you should incorporate this into a smaller veicle. maybe one day we’ll have LEGO drag racers that do a 4 meter instead of a quarter-mile
Pretty cool, I just got the Energy Meter. It can measure Amps which can loosely translate to torque. I when I get back home I would like to replicate this with two servos for shifting and a PF motor for driving. Hopefully the energy meter will sense the load based on the amps being drawn and adjust similar to yours, but with out the voltage variable.
@Ed
There is a link right up there in the second paragraph of the text.
sorry for the stupid question, but in the video description it says that there are instructions. I can’t find them. Help?
@Luke321
just one more thing, you could use the absolute Encoder Values of the Nxt motors, combined with your own motor controller to achieve the best precision.
And yes, RobotC’s build in Motor Control is not the best, especially when you have high loads…
i want to do something similar when i’m done with my current project using this modification of your gearbox design
http://www.youtube.com/watch?v=Vc3_rxaF36c
with one motor you could change all 4 gears and use the other 2 for driving…
and nice to see that someone else uses RobotC!
@Spiller
Thank you for this insight. I’m basing my usage of the ROBOTC mainly on my experience with PHP, so using multiple tasks is something new to me.
I realize this was just for practice but it would have been more useful if you used a gearbox design which only required one motor to change gears. A sequential with at least 3 gears would be interesting.
A few notes about the programming:
For the configuration variables use const so that they cannot be changed later in the program.
Secondly, avoid using multiple tasks when you can as it is far more error prone than people realize. Consider what would happen if tells it to shut down while it is shifting gear. The two tasks will both try to control the motors so they will end up interfering with each other and the results will be (in practice) unpredictable.
If you want to work with robotics regularly I strongly recommend you to read a bit about concurrent programming so you know the pitfalls and how to prevent them as you often can’t avoid having multiple tasks completely.
I’m mentioning this in particular as people new to Mindstorms tend to add a task for every problem they need to solve without knowing the issues this can cause.