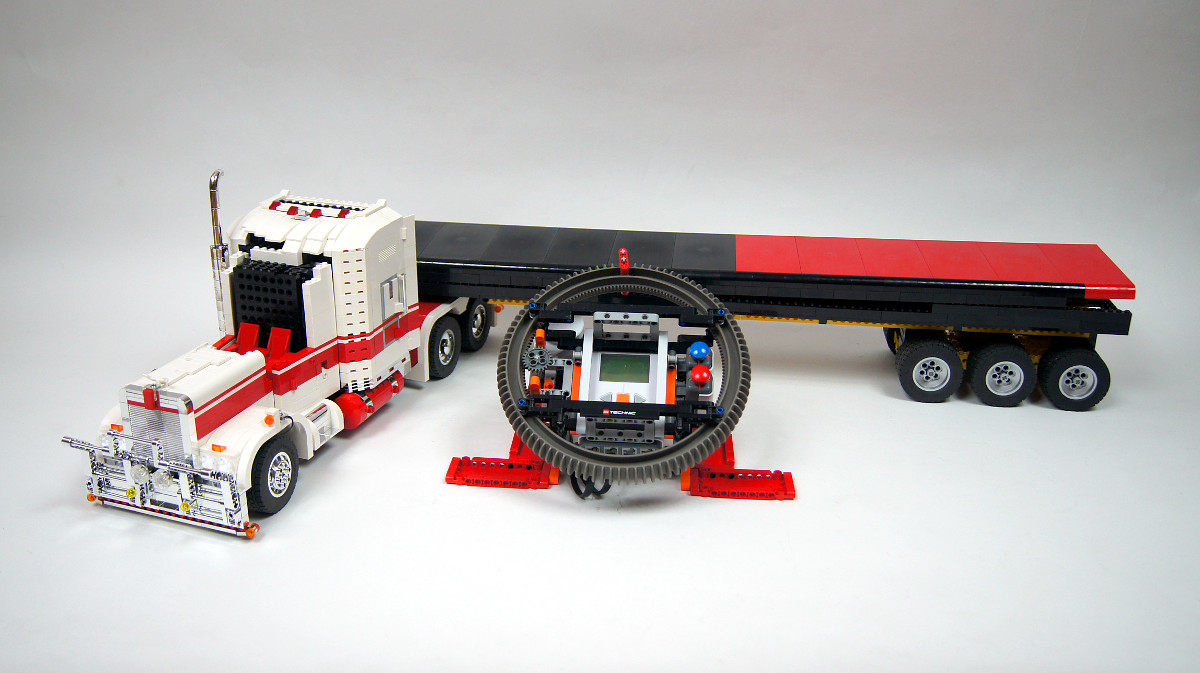
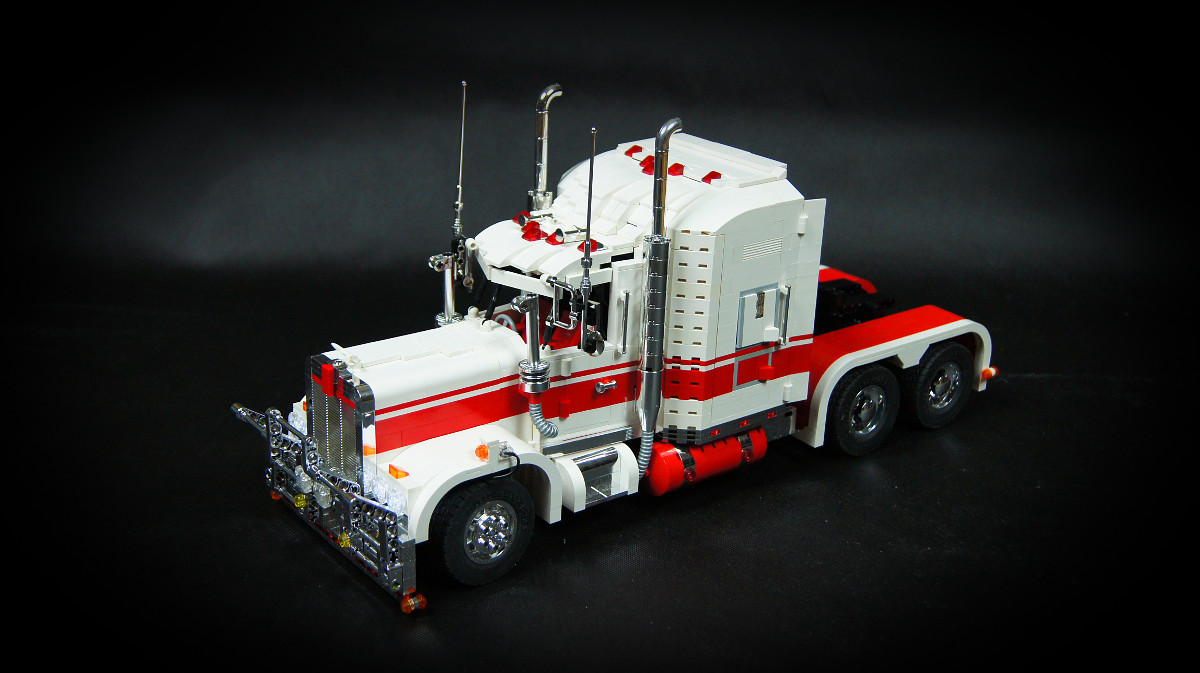
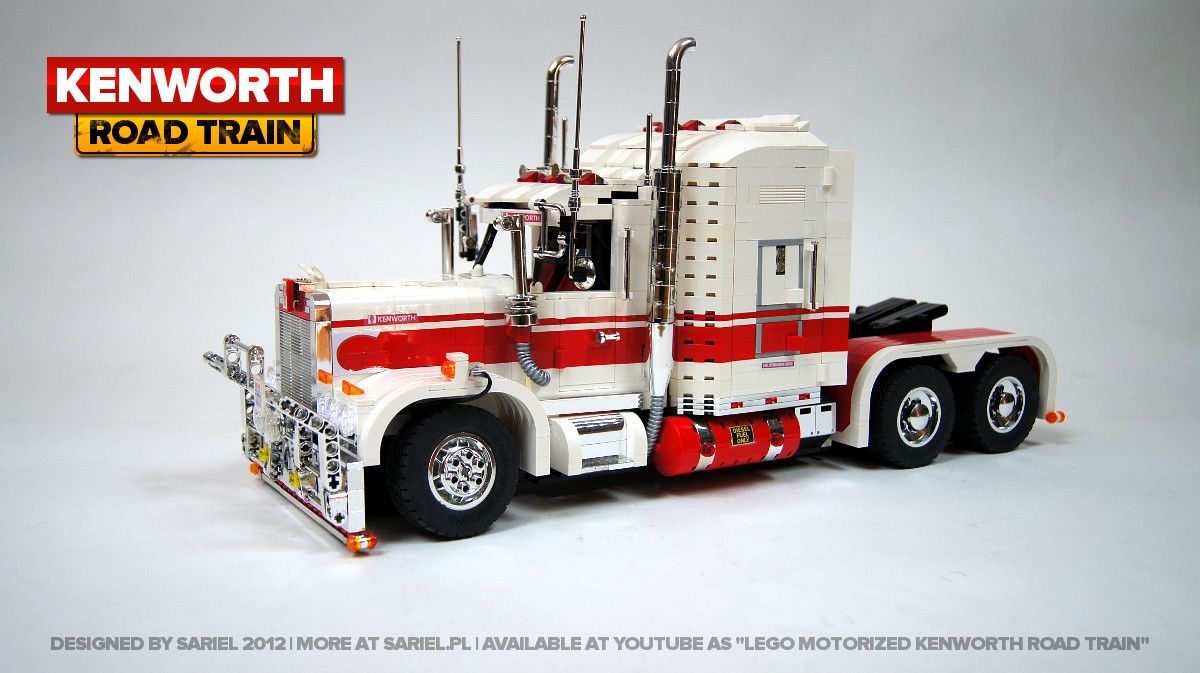
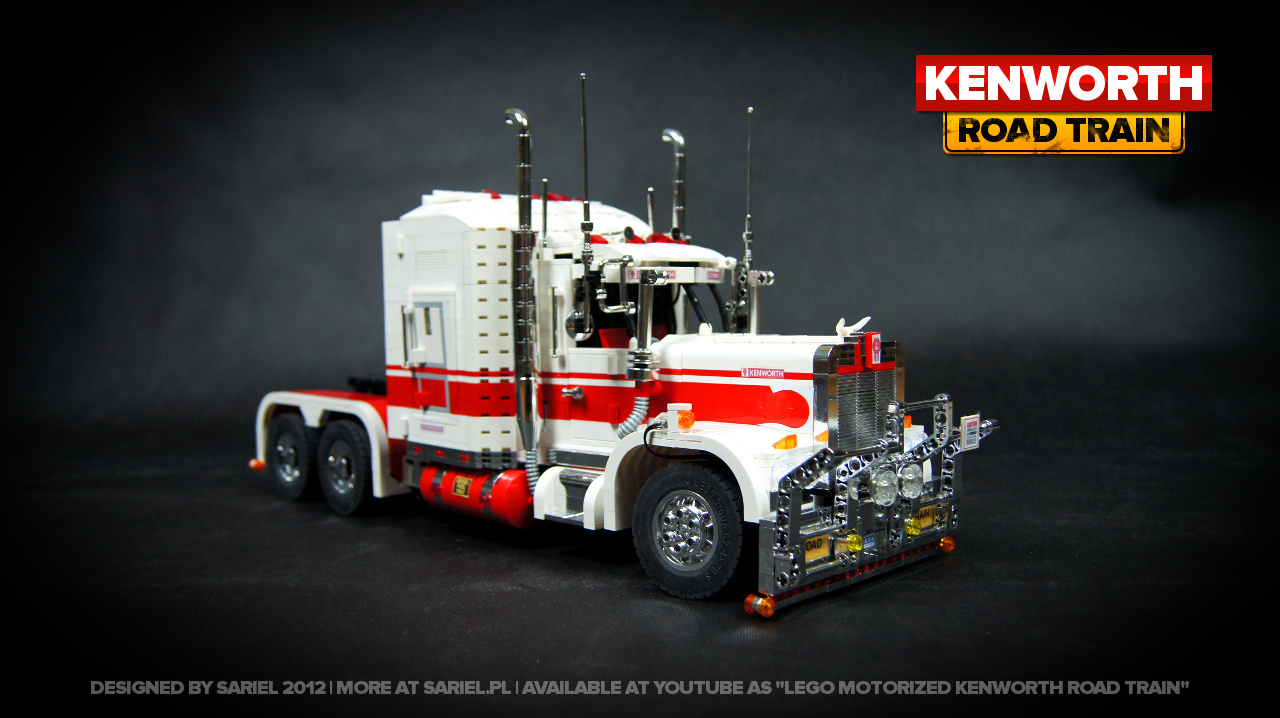
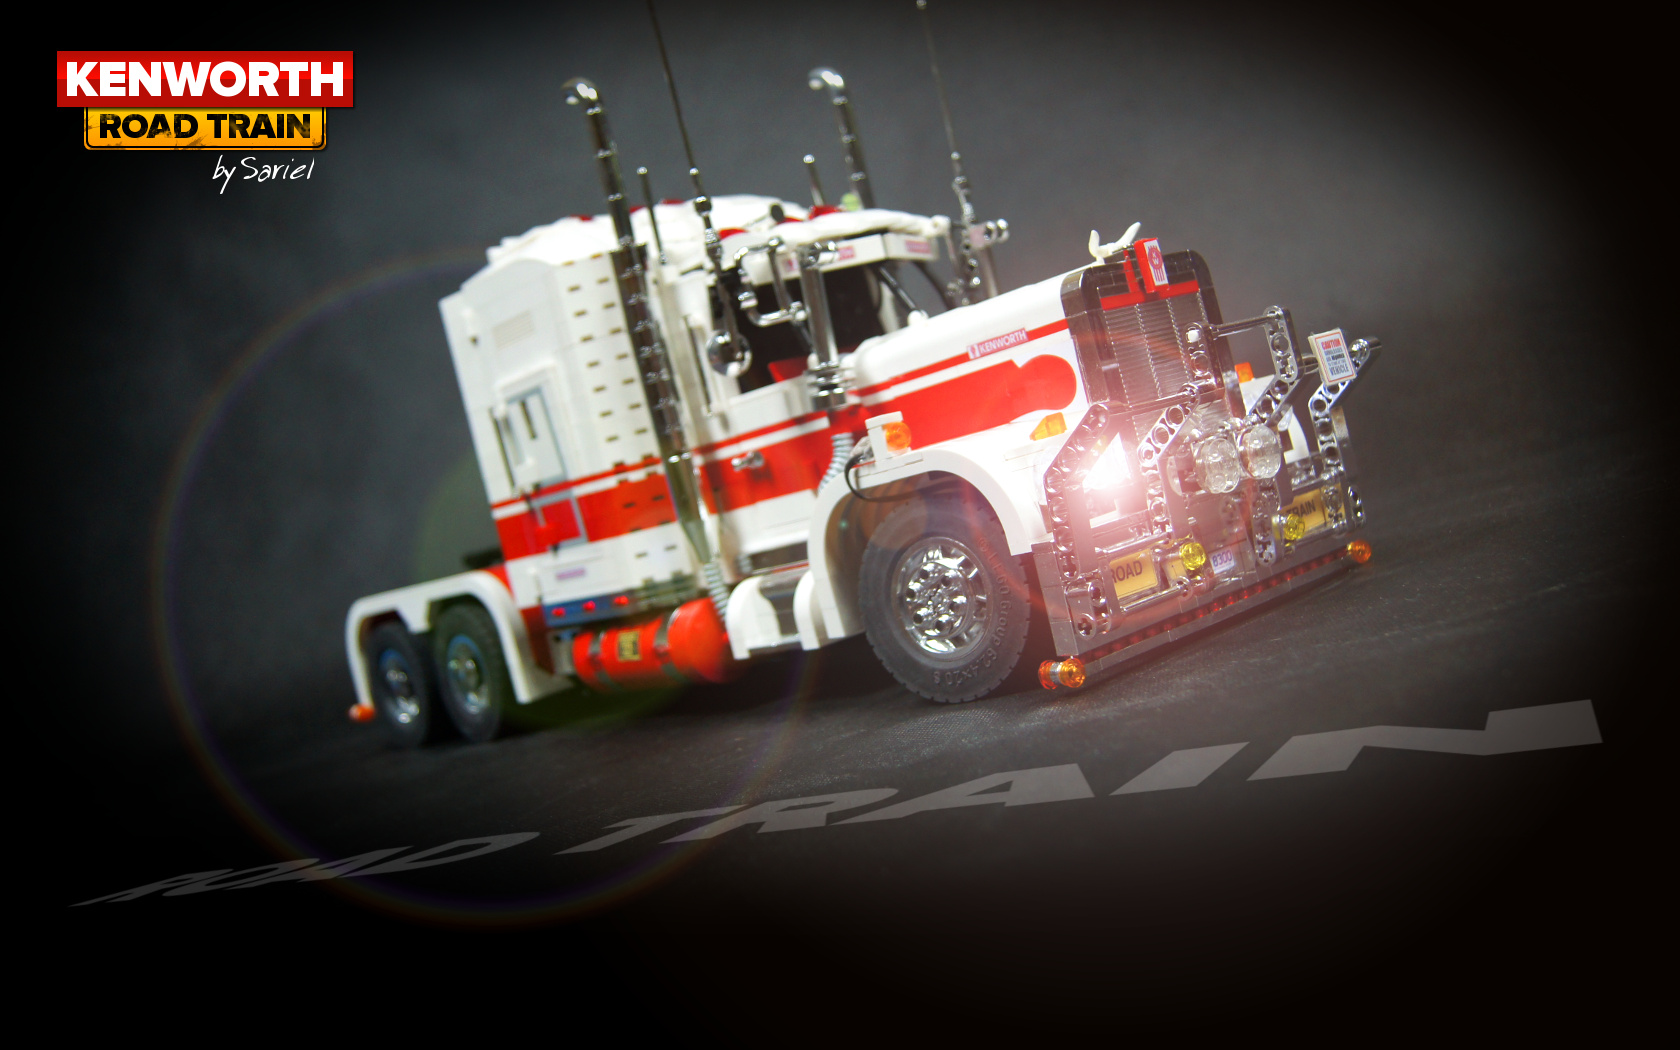
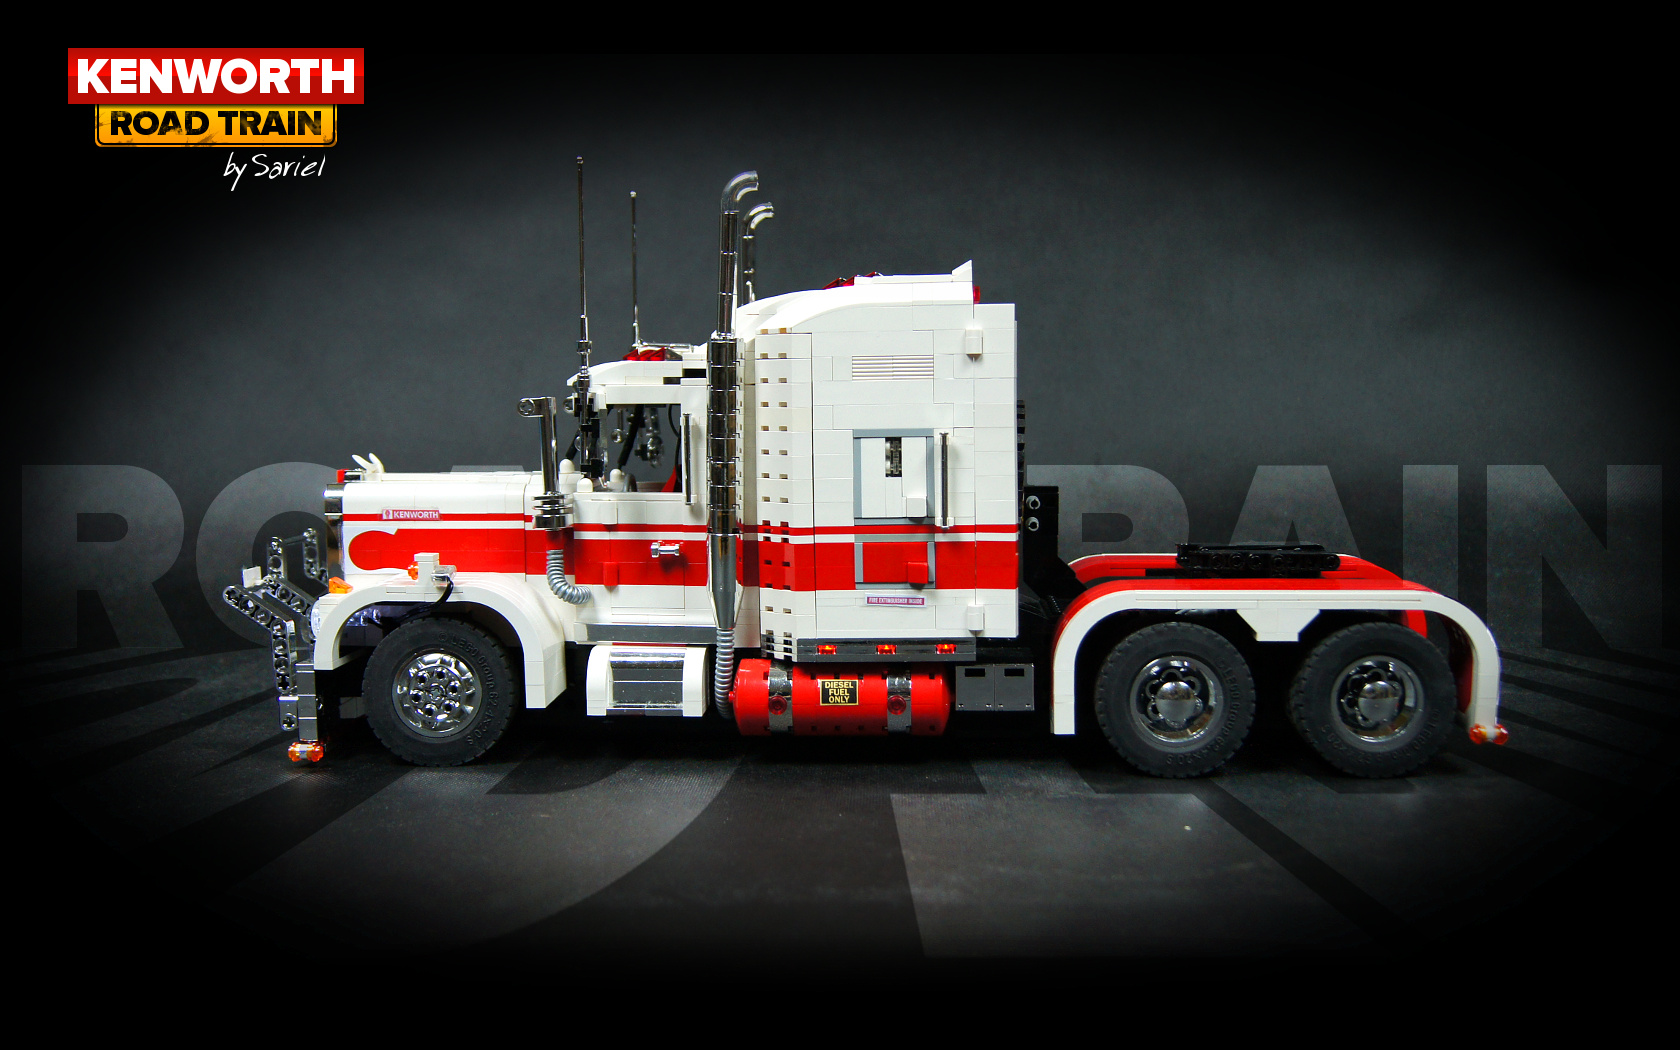
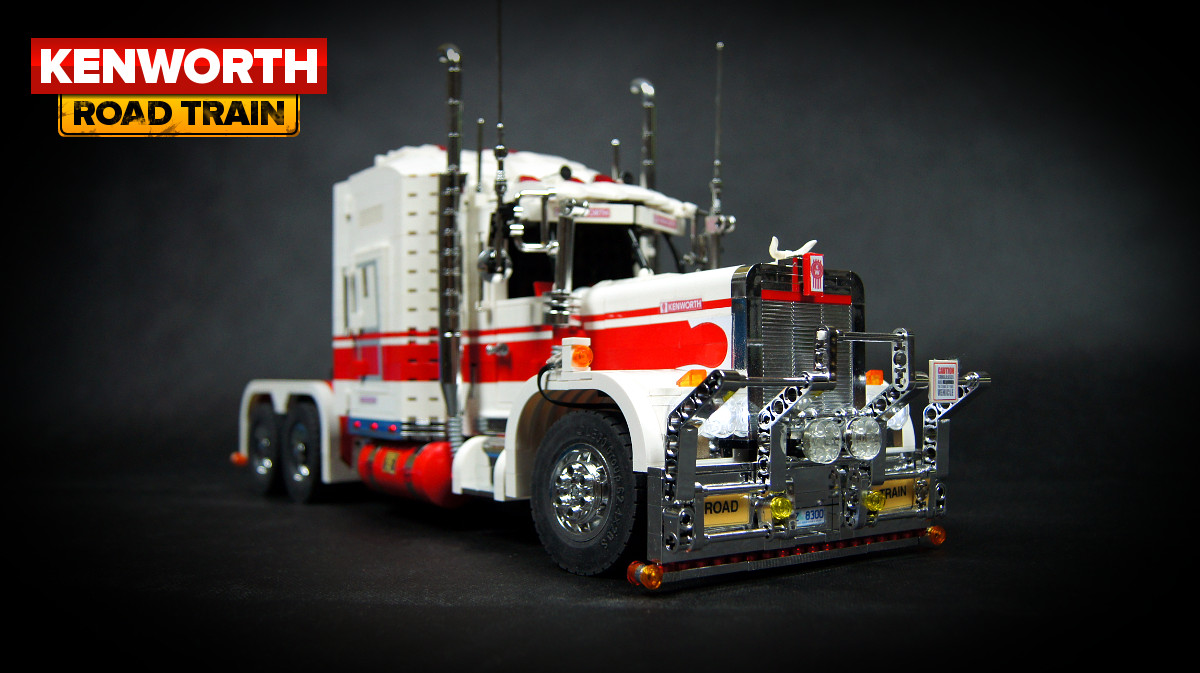
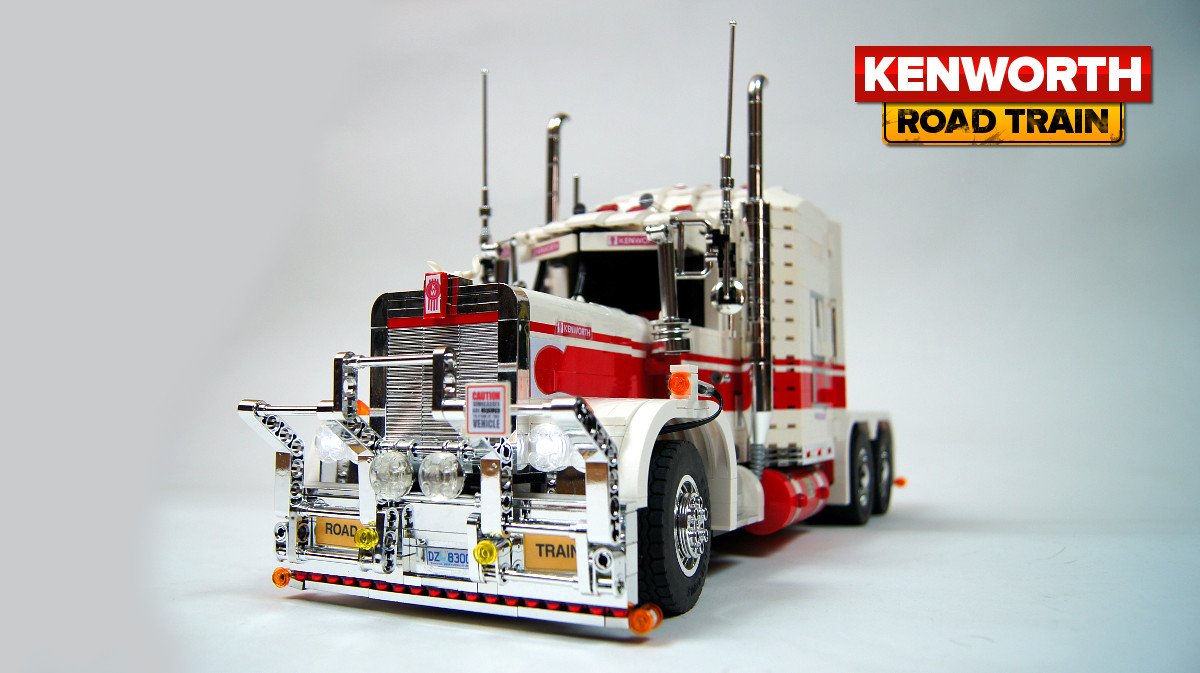
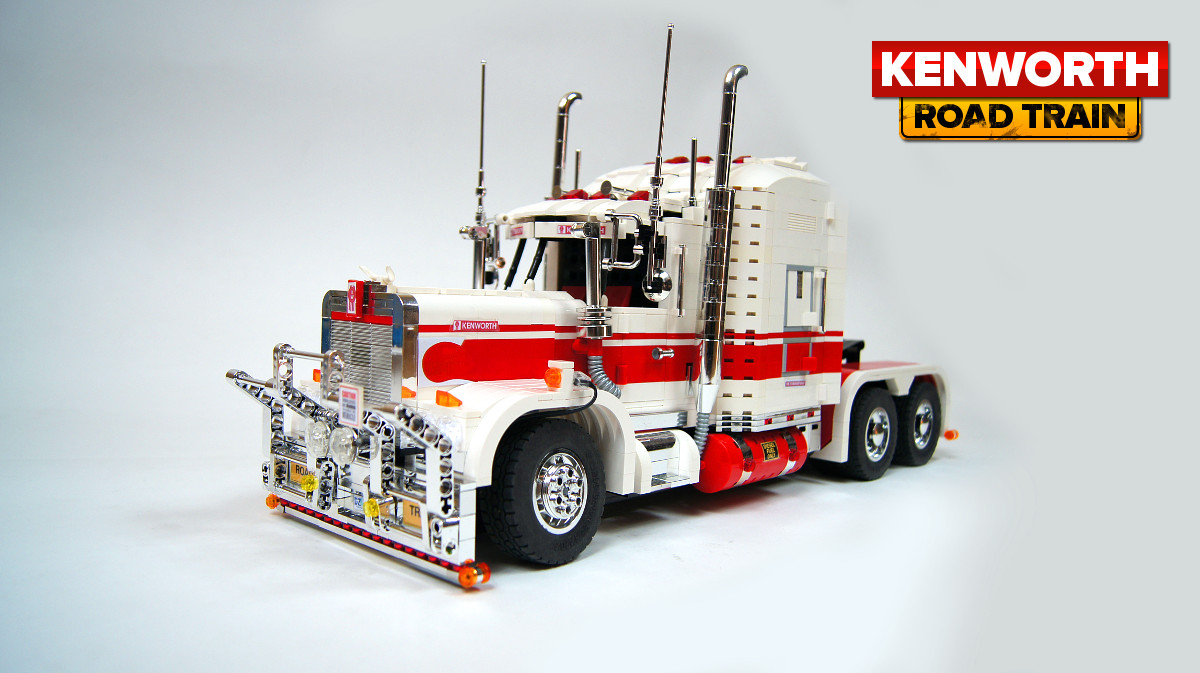
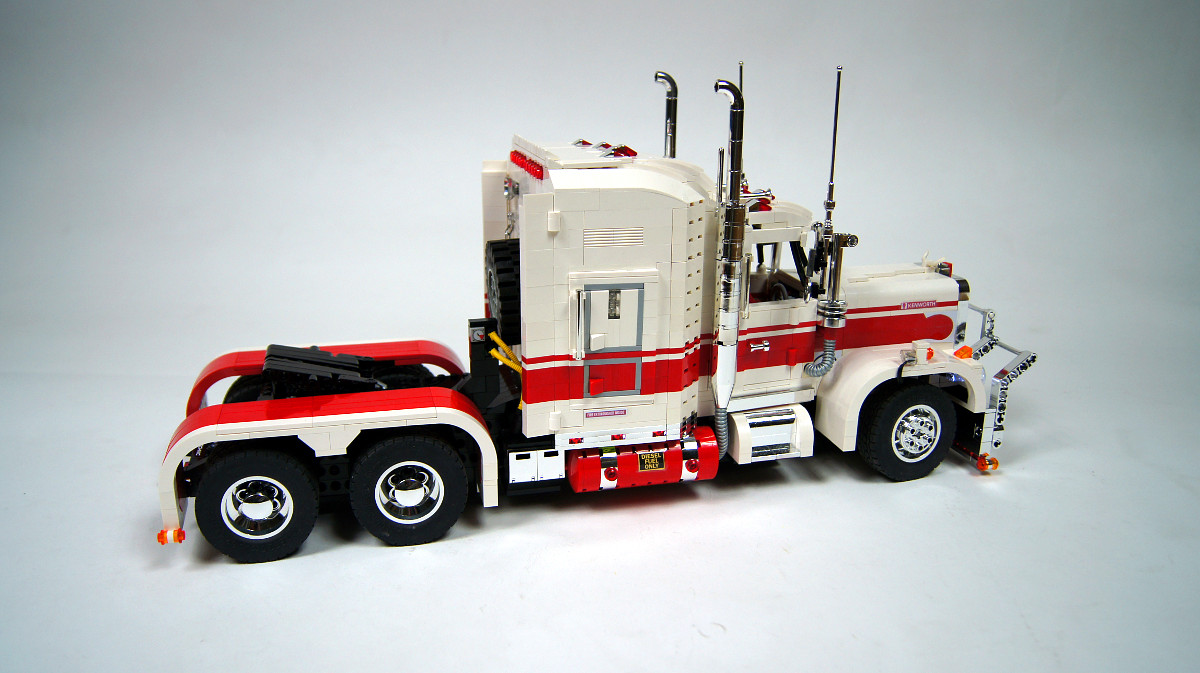
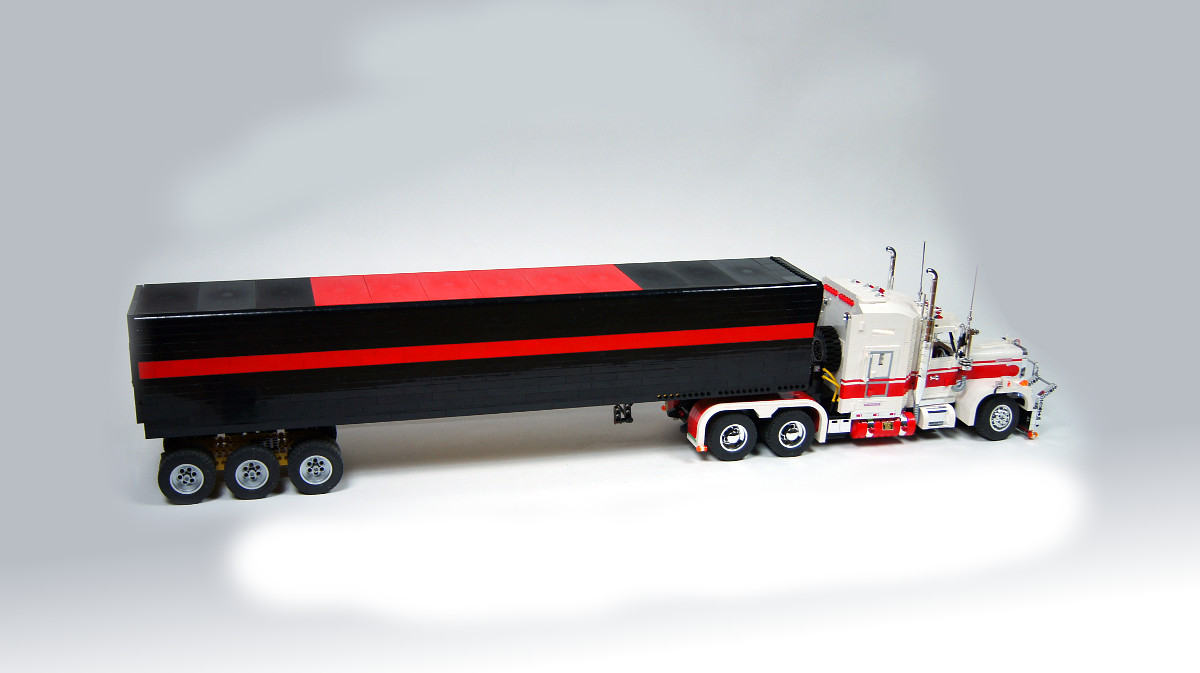
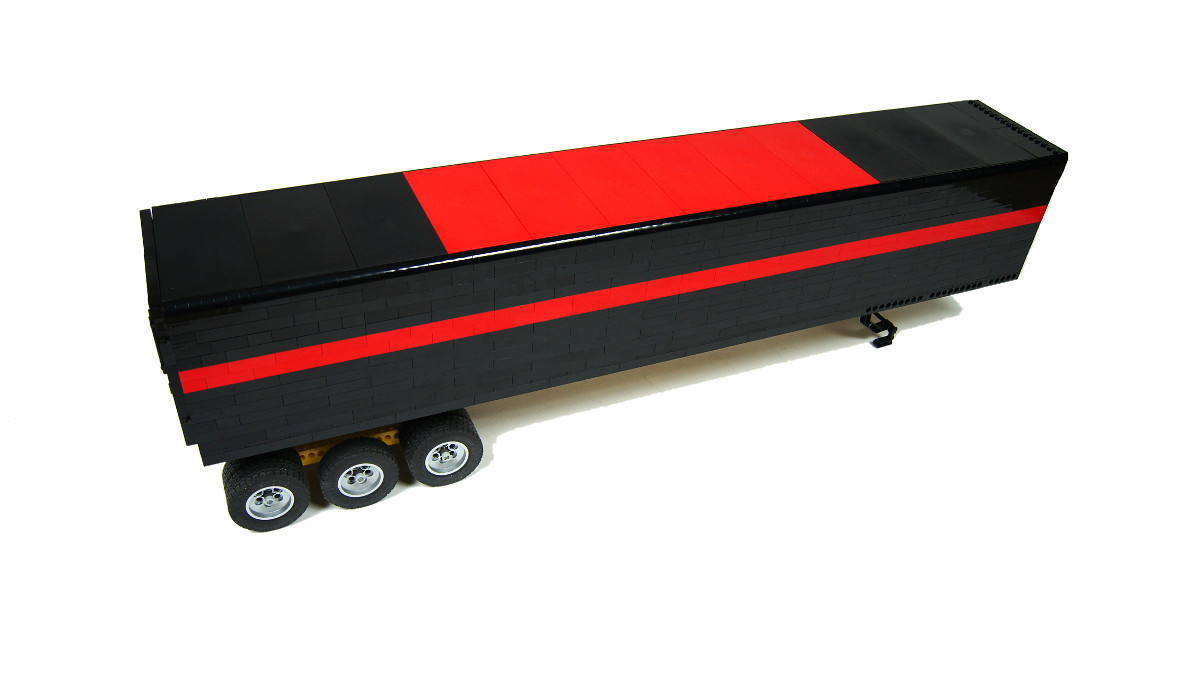
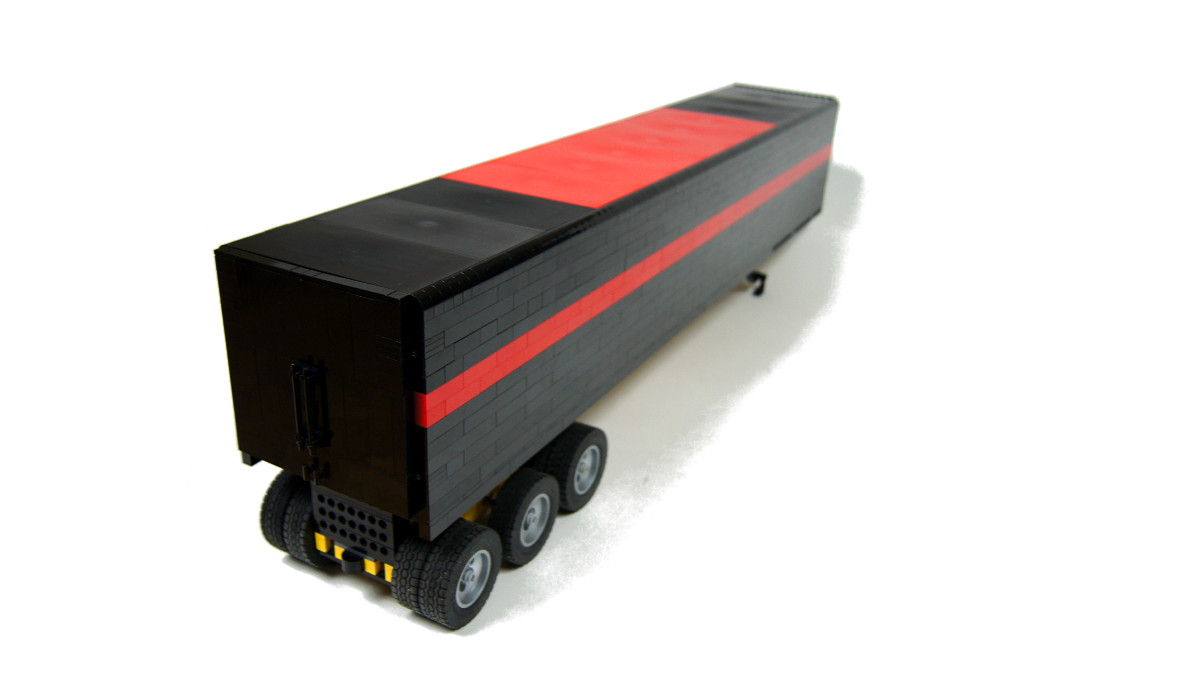
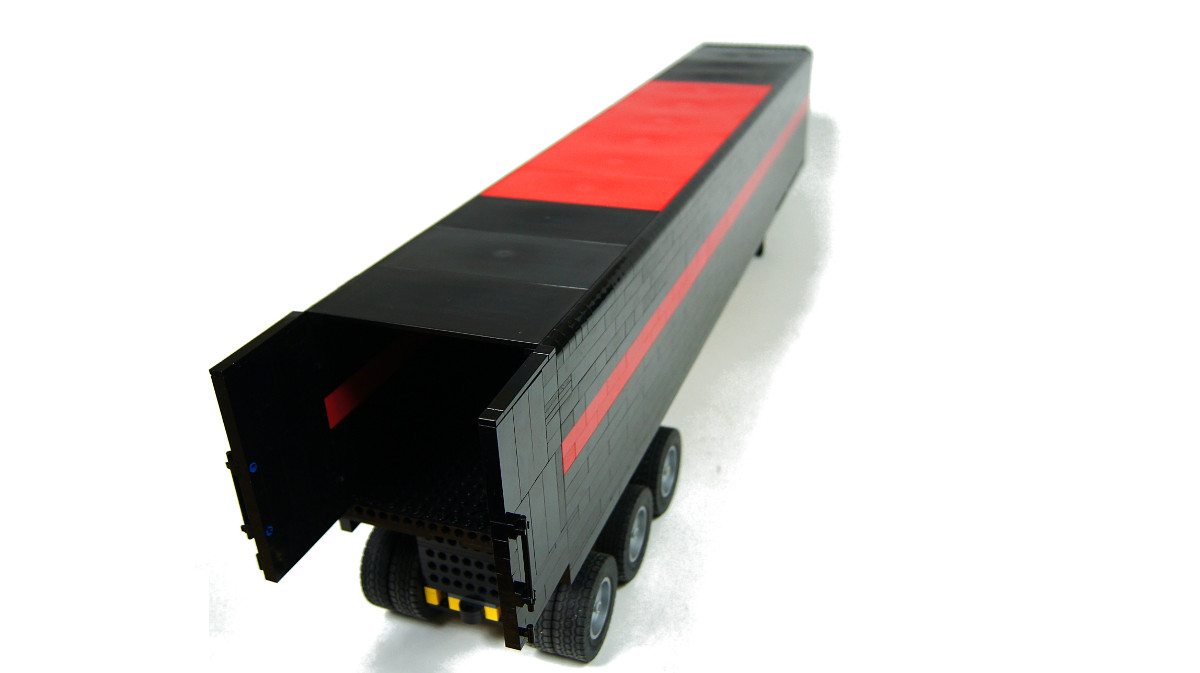
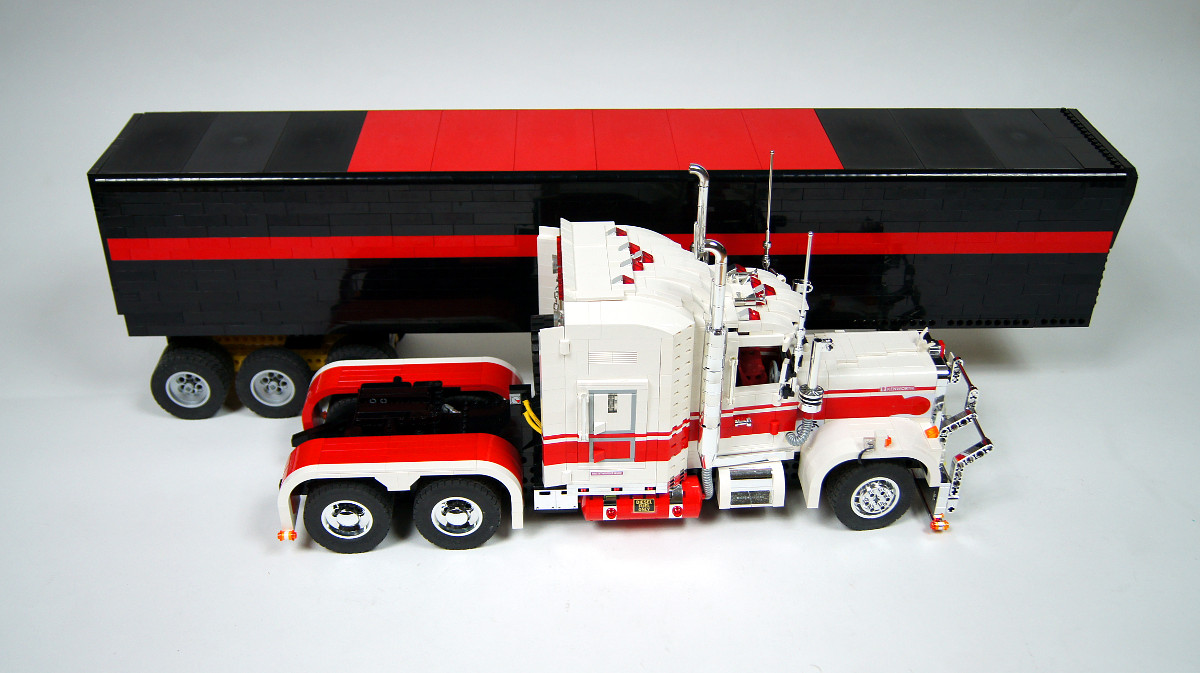
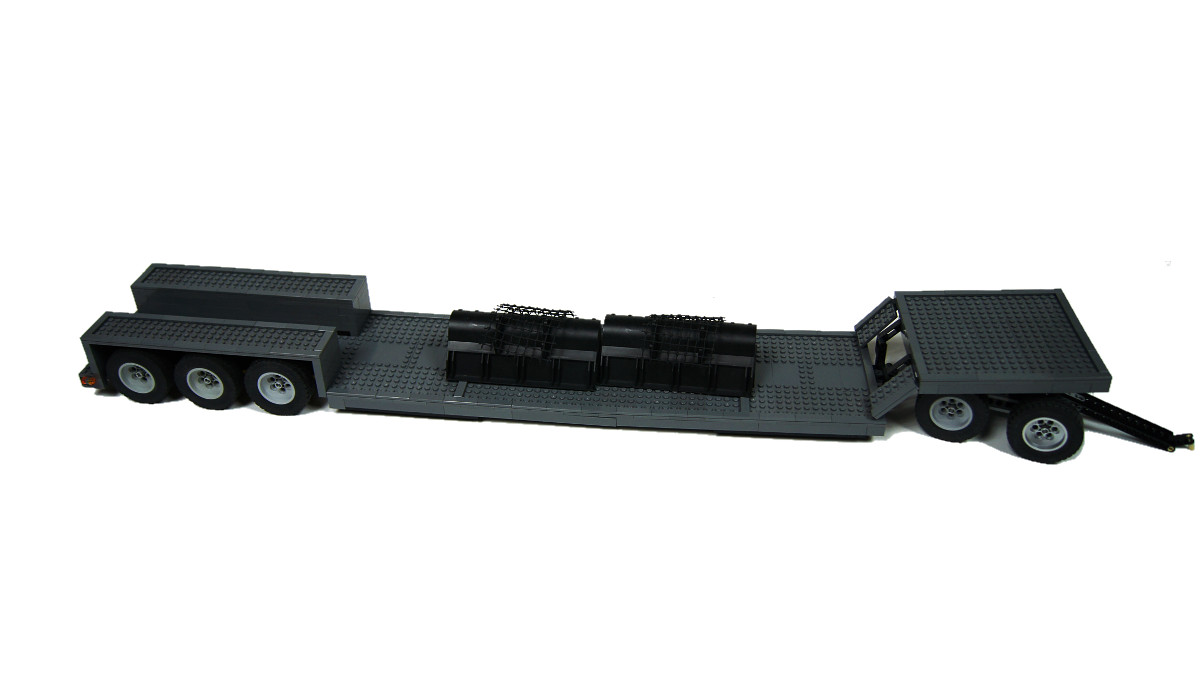
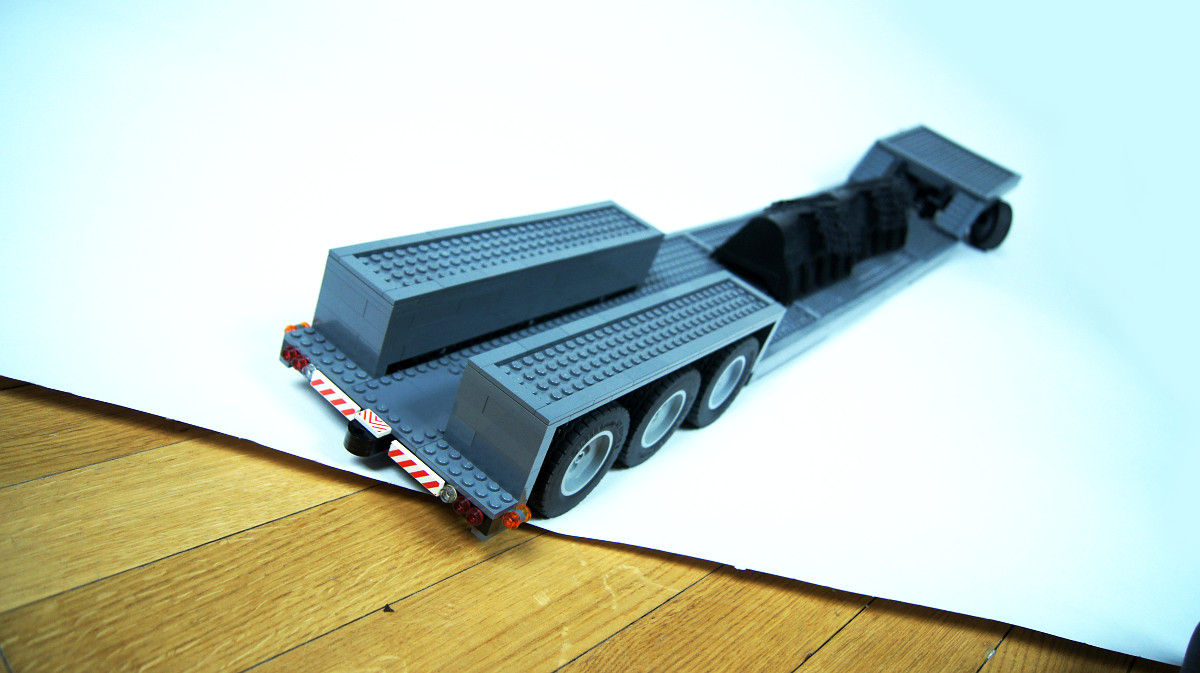
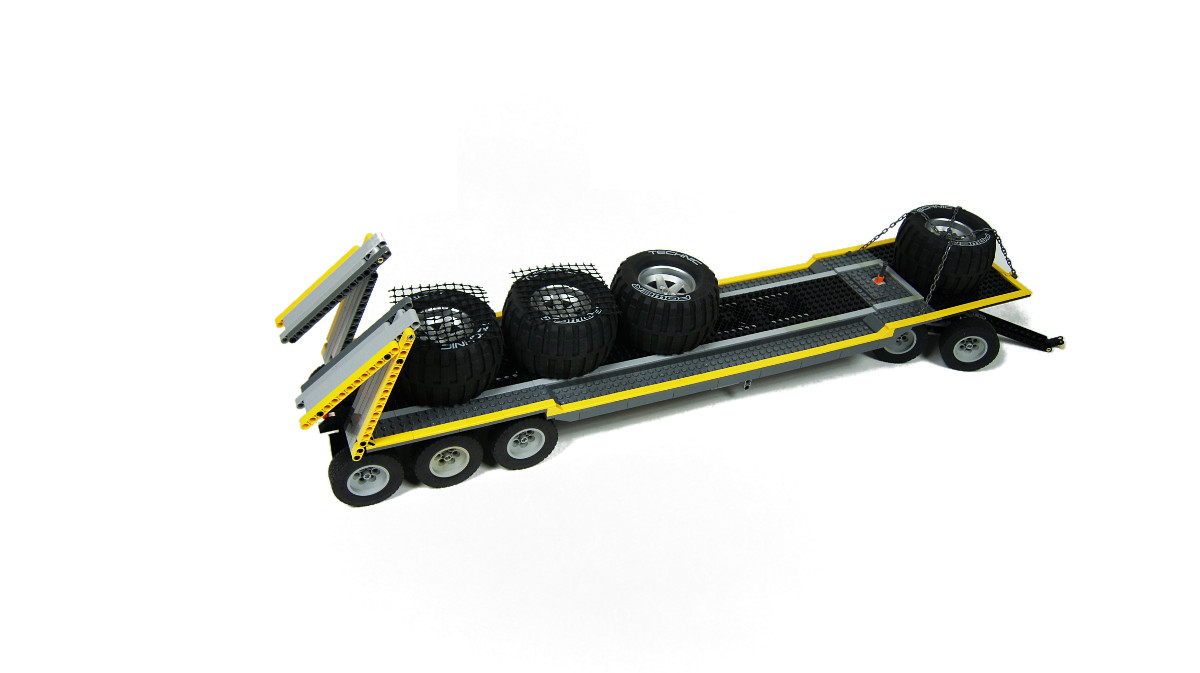
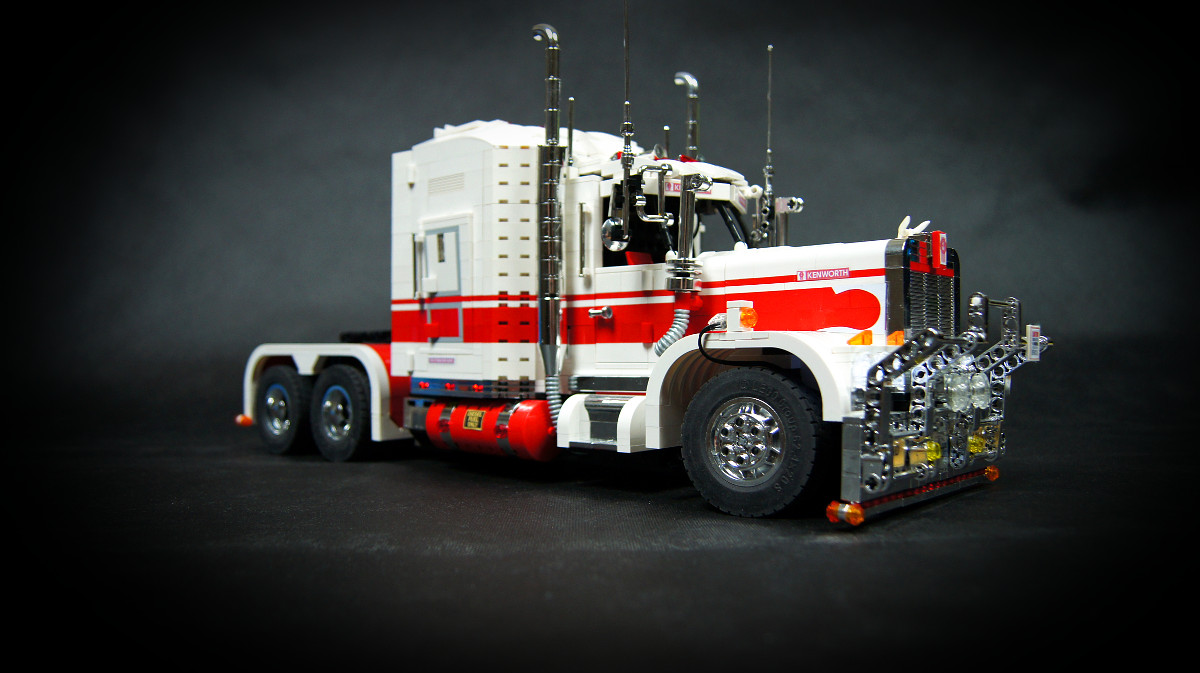
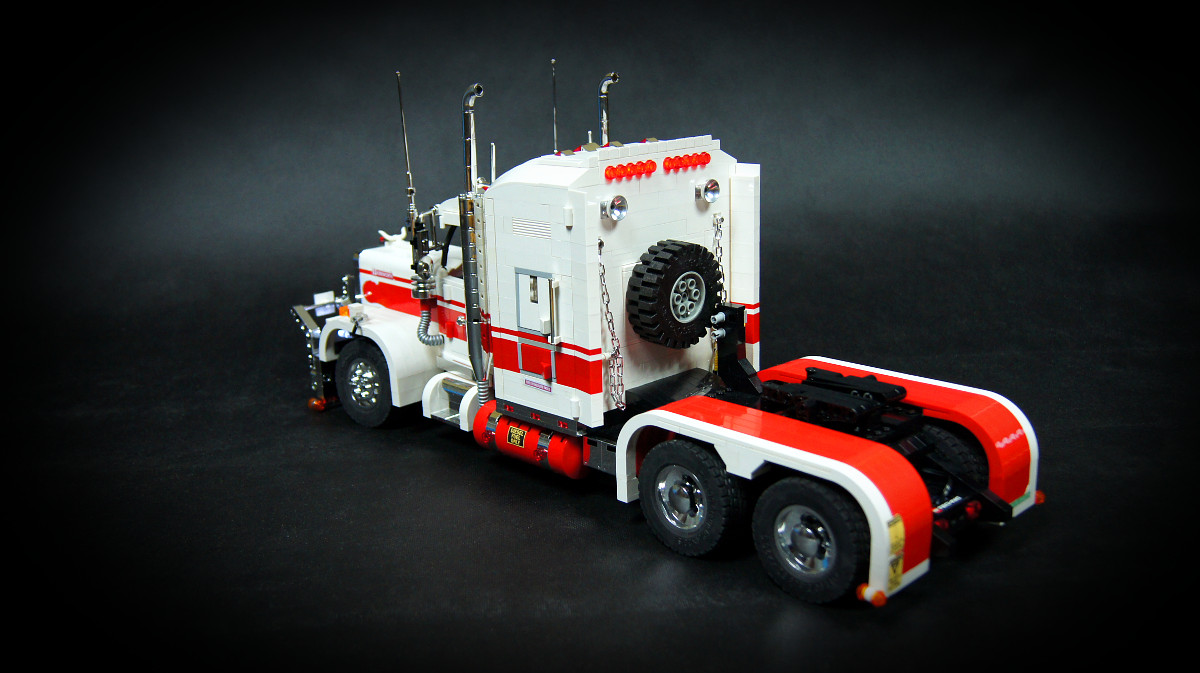
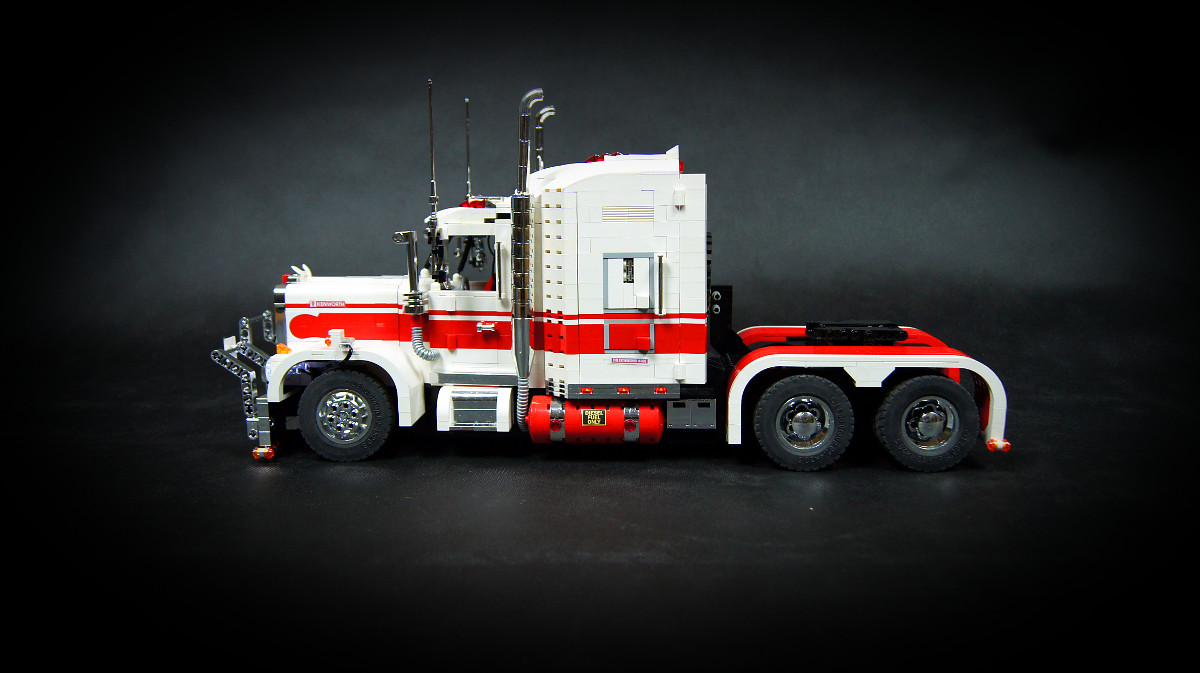
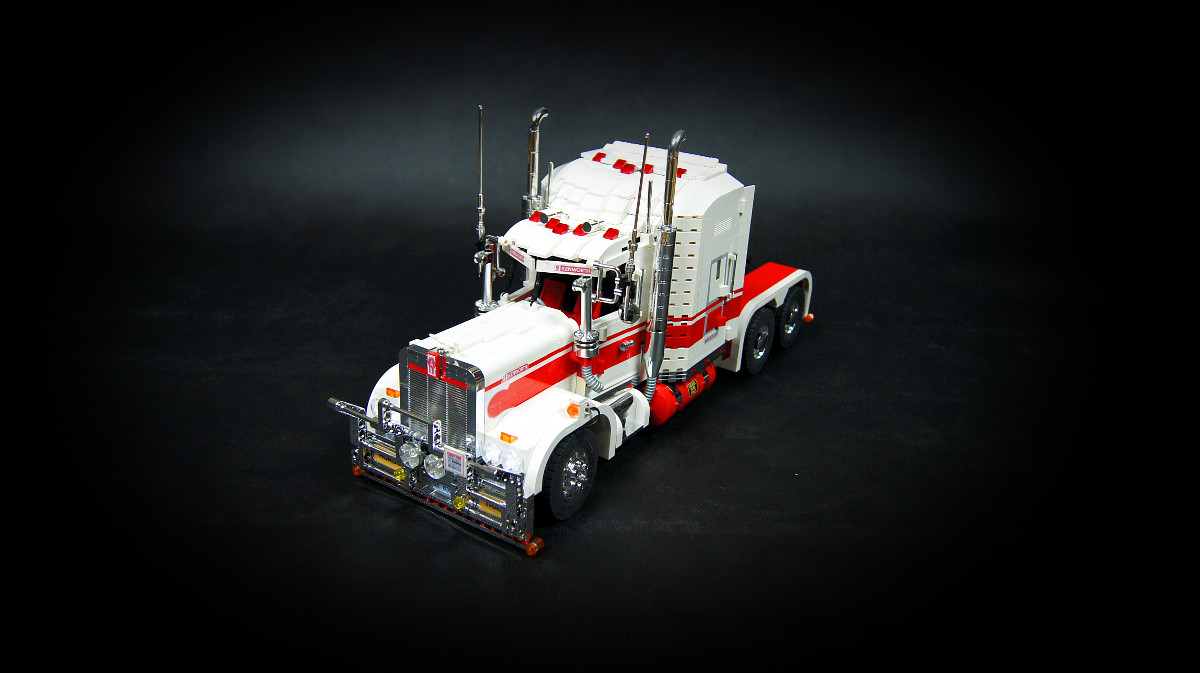
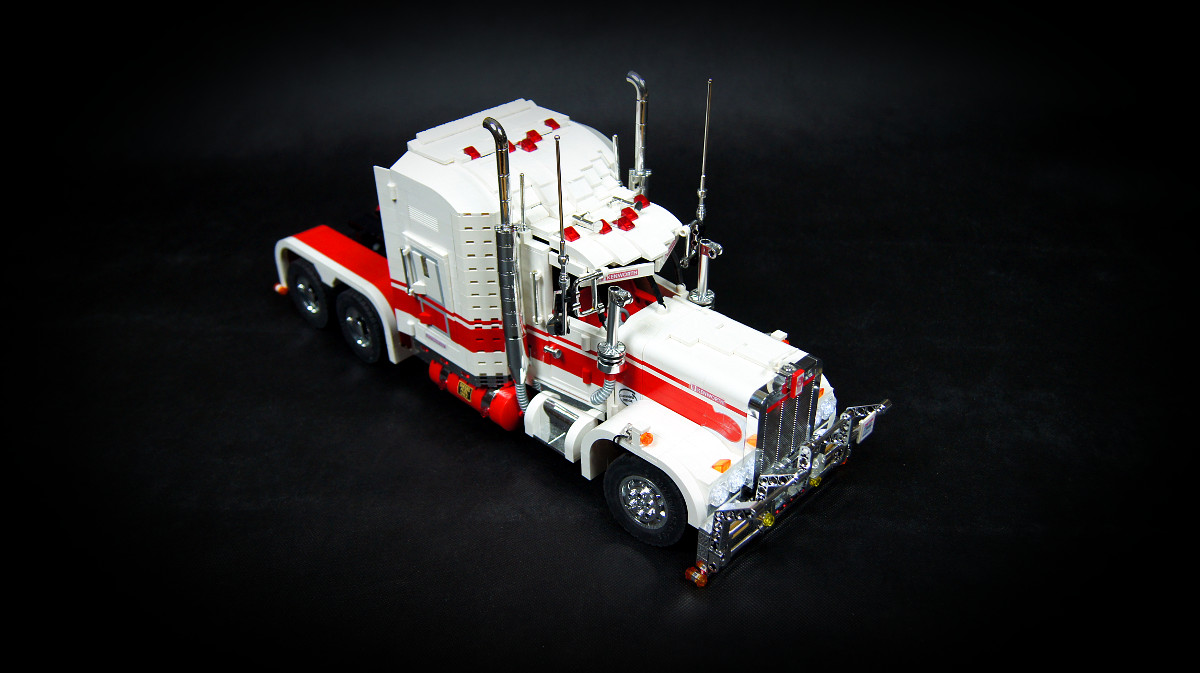
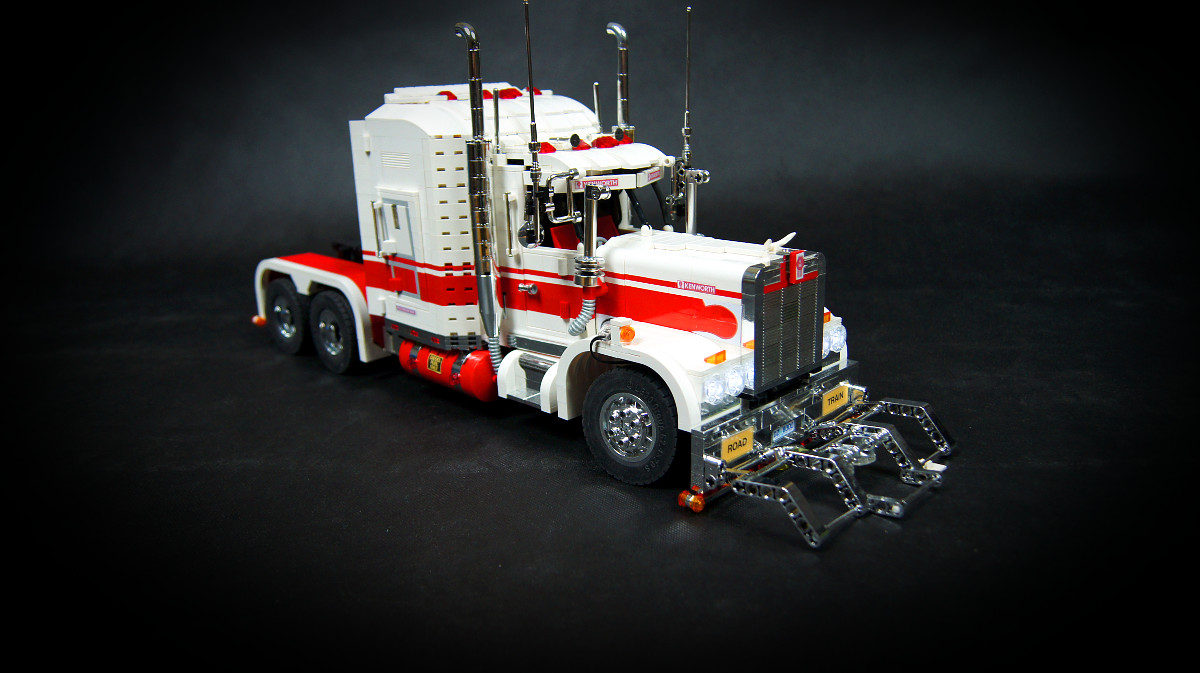
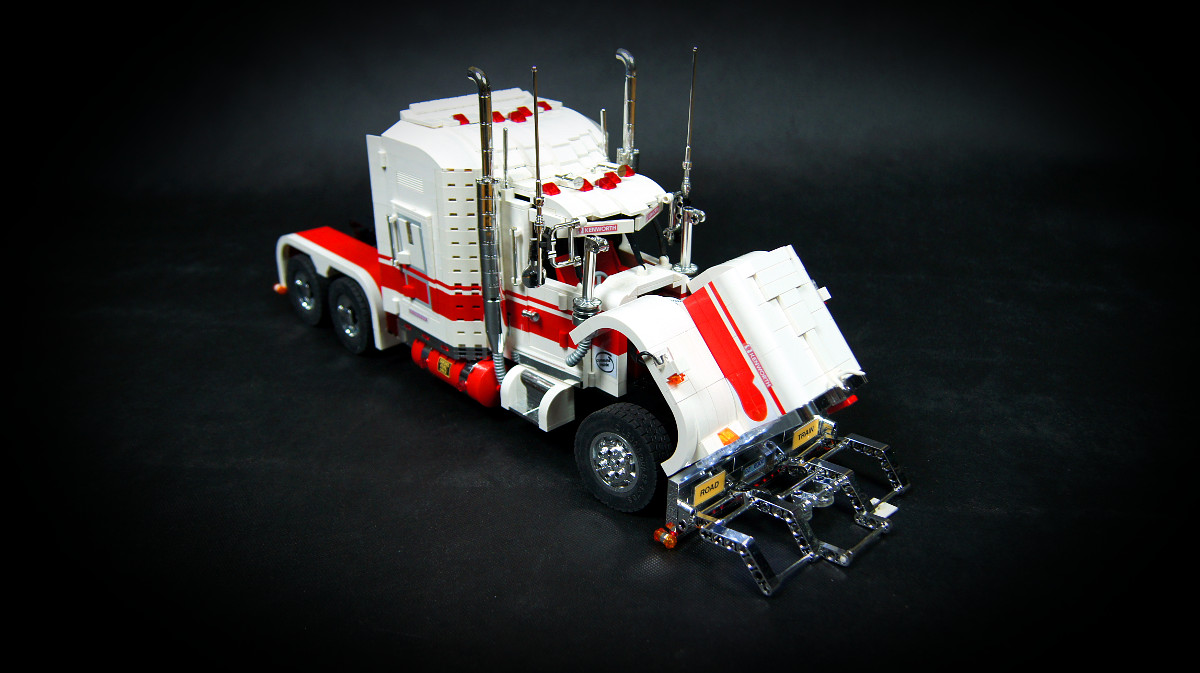
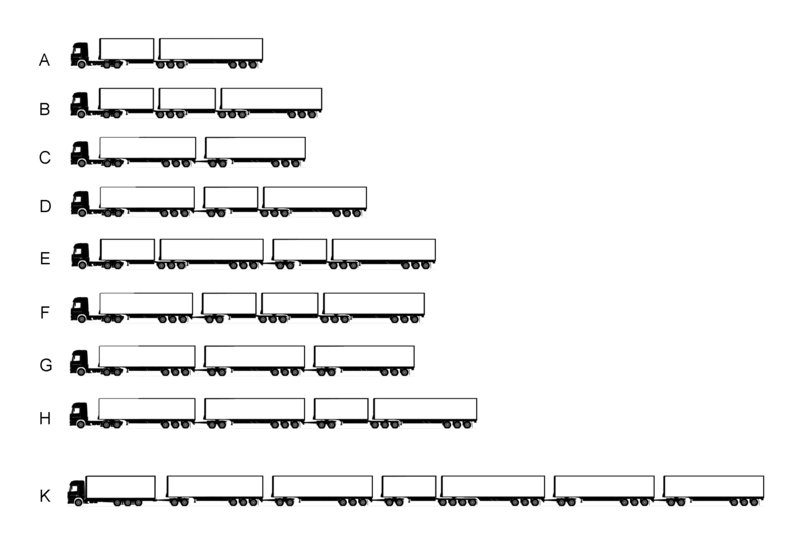
Kenworth Road Train

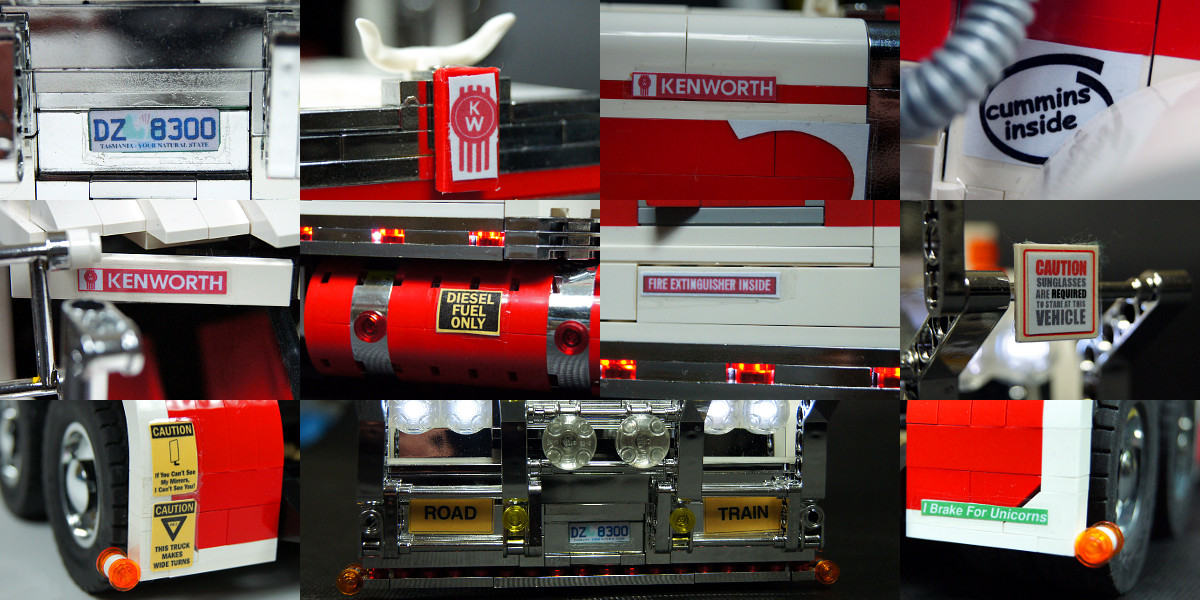
Model of the Kenworth T900 truck in the Australian road train variant. Features proportional steering using the NXT unit, remotely locked fifth wheel, working turn signals, three trailers, lights and custom stickers.
Datasheet:
Completion date: 14/05/2012
Power: electric (Power Functions / NXT)
Dimensions: truck: length 67 studs / width 20 studs / height 31 studs, trailer #1: length 103 studs / width: 18 studs / height: 28 studs, trailer #2: length 122 studs / width 18 studs / height 9 studs, trailer #3: length 97 studs / width 18 studs / height 24 studs
Weight: truck: 2.891 kg, trailer #1: 2.378 kg, trailer #2: 1.440 kg, trailer #3: 2.194 kg
Suspension: none
Propulsion: 1 x NXT motor geared 3:1
Motors: 3 x NXT motor
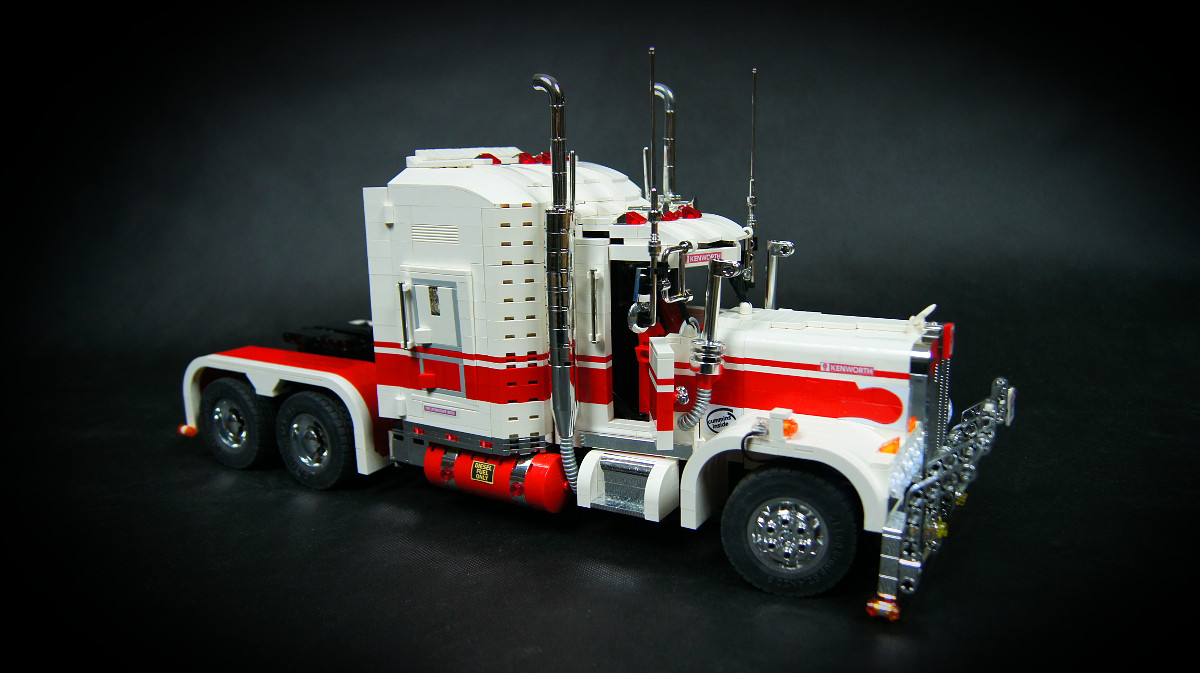
This model was based on the Kenworth T900 truck converted to an Australian road train version. At the same time, it was an experiment on merging NXT functionality with a Model Team look.
I have started by modeling a pure T900 truck, adding some modifications typical for road trains along the way. The result is neither a stock Kenworth T900 nor a classic road train, but it still fits within the wide array of customizations popular among Australian drivers (and sheep).
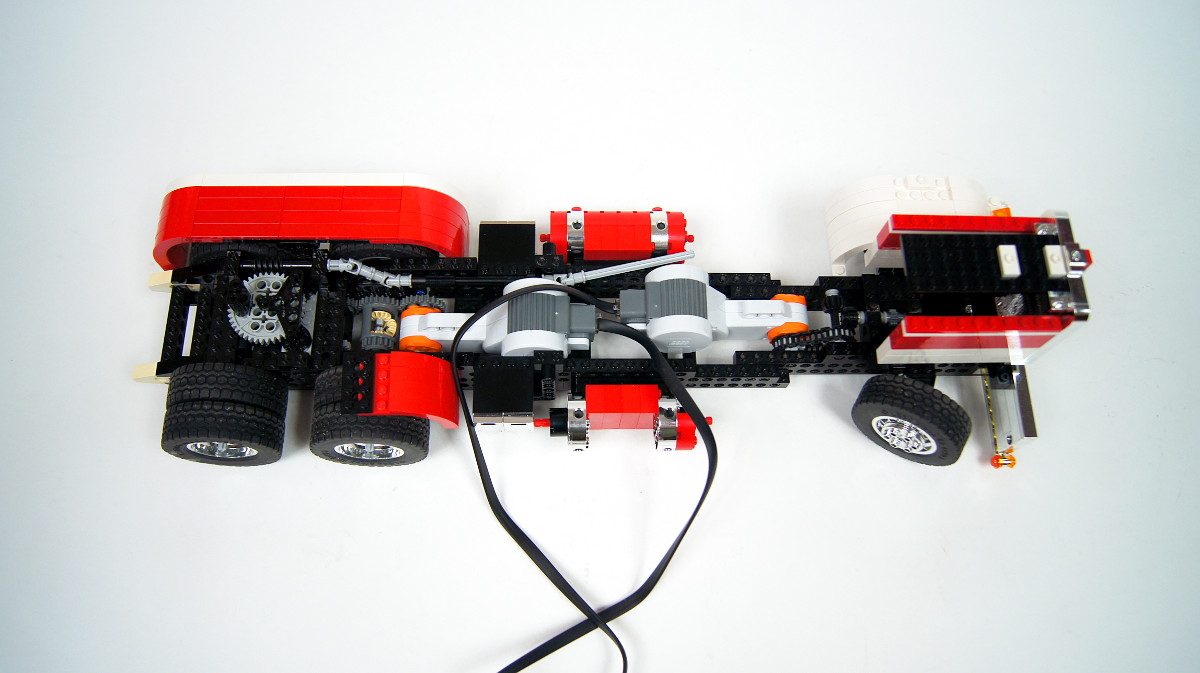
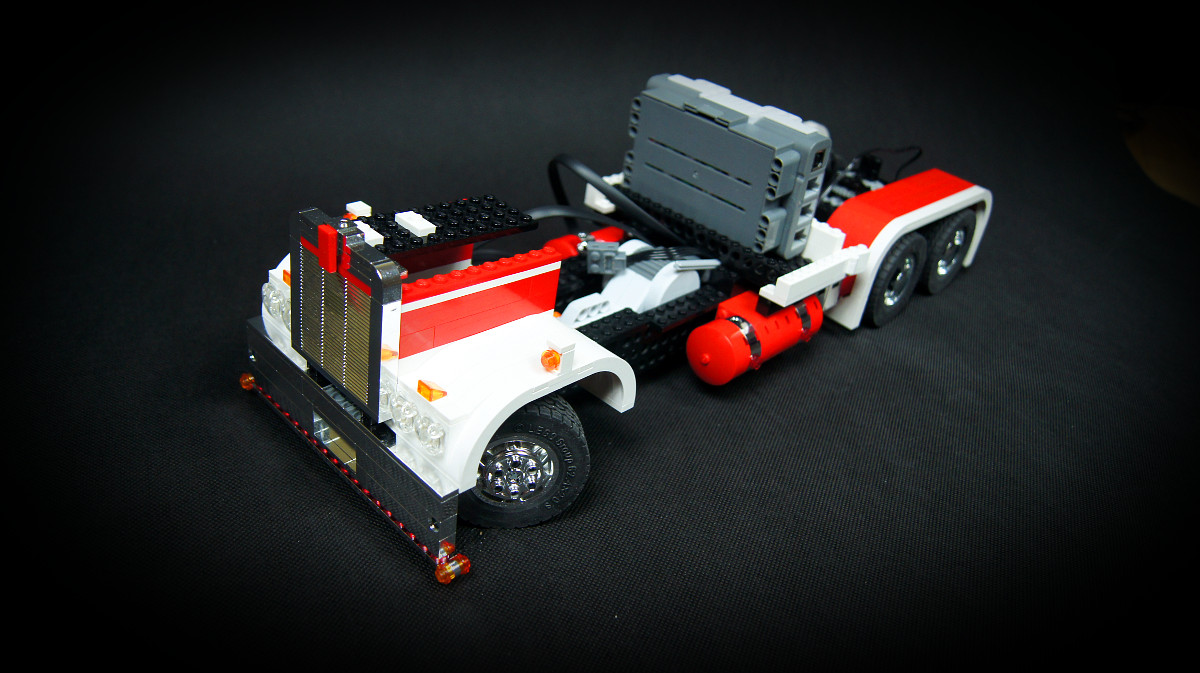
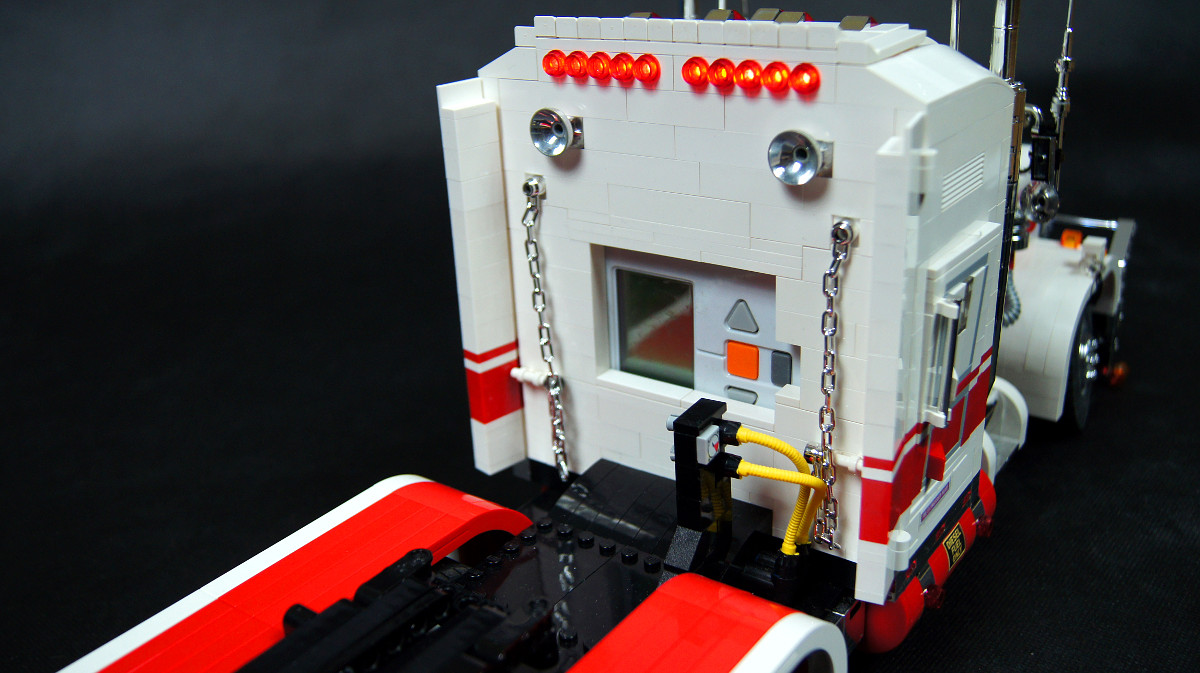
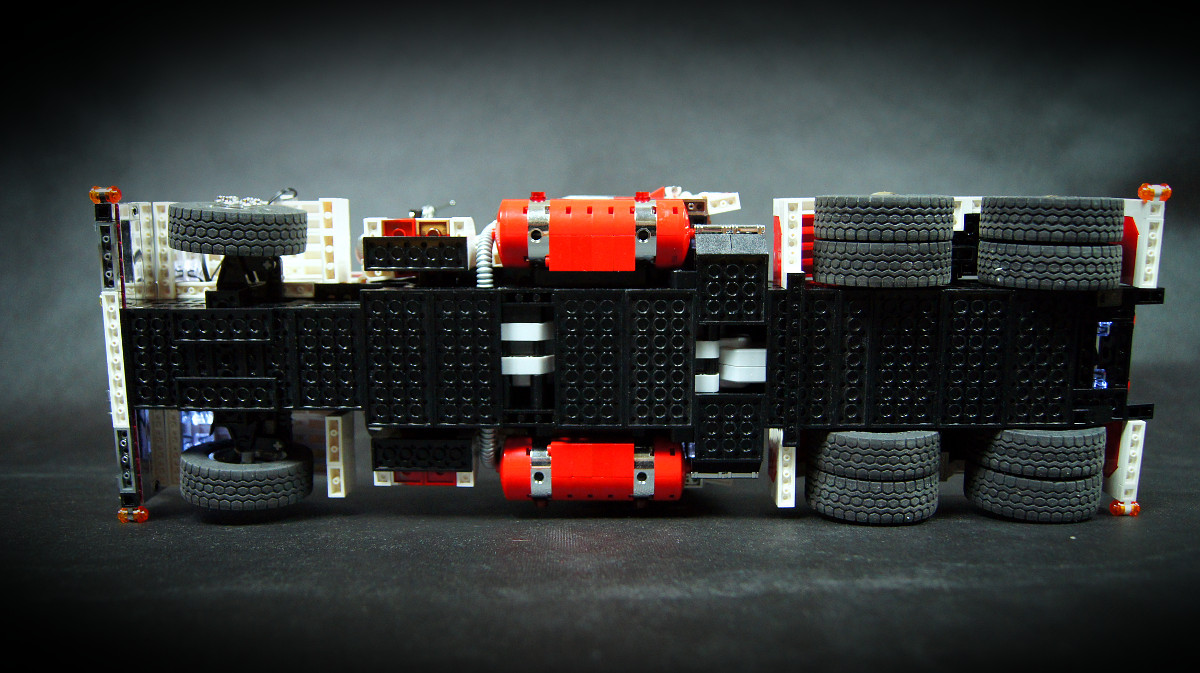
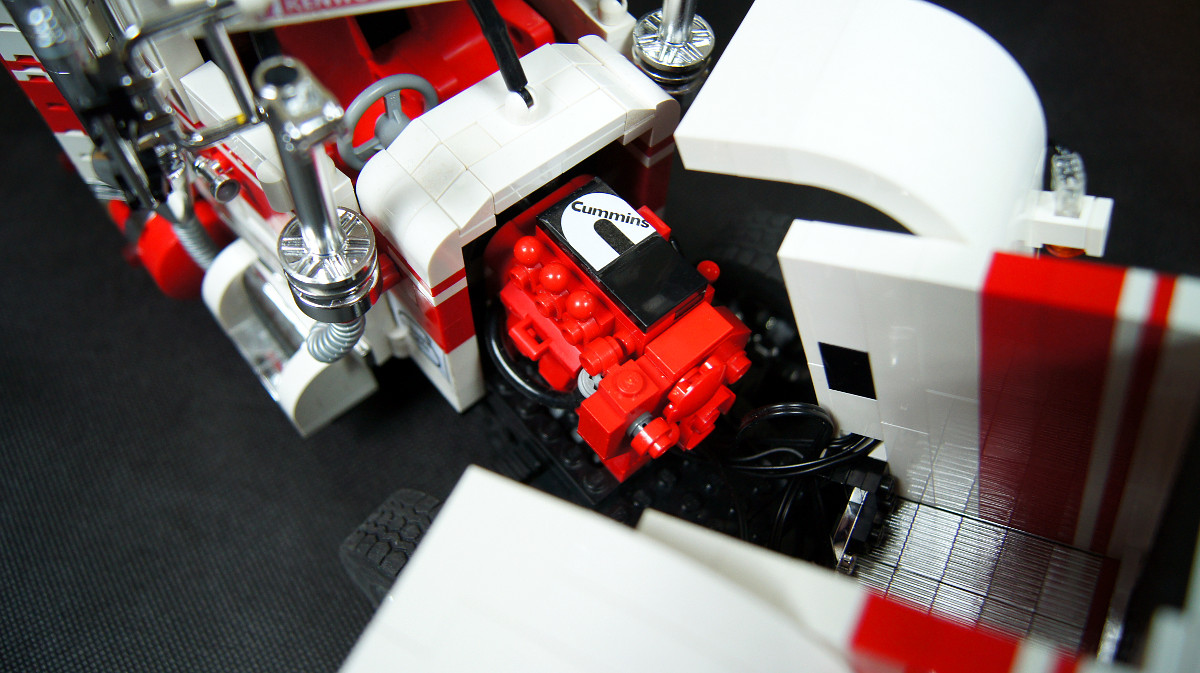
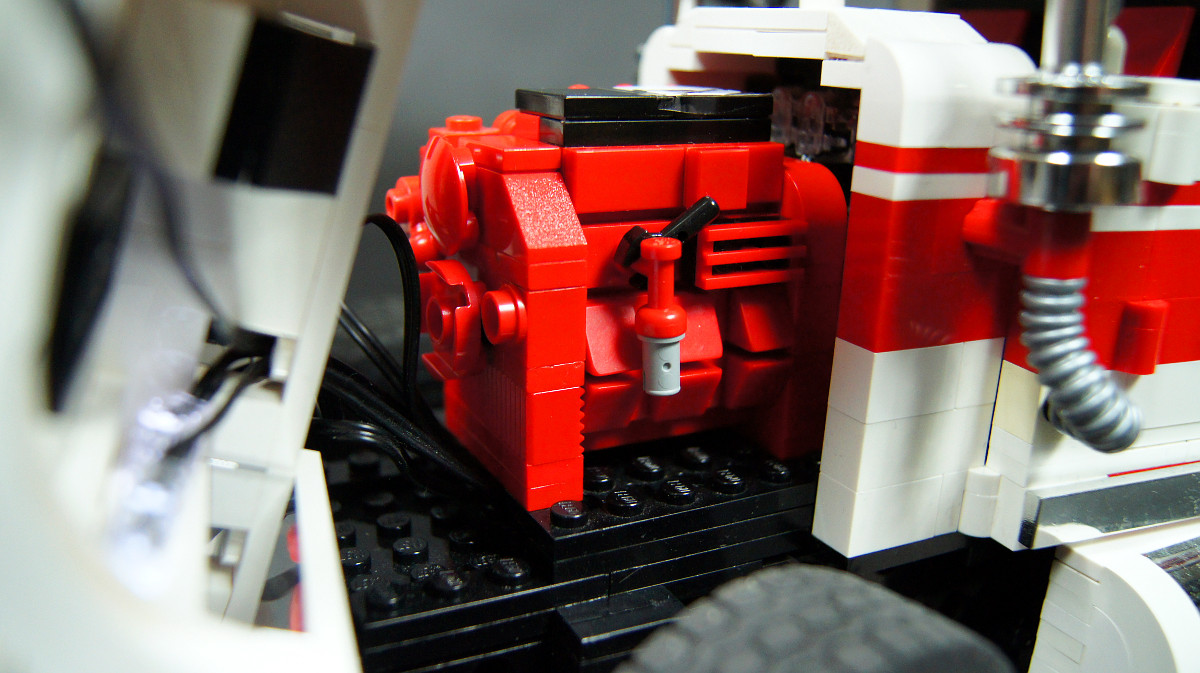
The heart of the model was a NXT unit located at the back of the sleeper module. Since the chassis was entirely taken by two NXT motors (yes, they are this big), the sleeper was actually where almost all mechanical and electric elements were housed. Among them was a third NXT motor used to lock and unlock the fifth wheel, the 8878 rechargeable Power Functions battery for powering lights and turn signals, a Power Functions IR receiver for controlling the turn signals and HiTechnic IR Link sensor for allowing the NXT unit to send commands to the IR receiver.
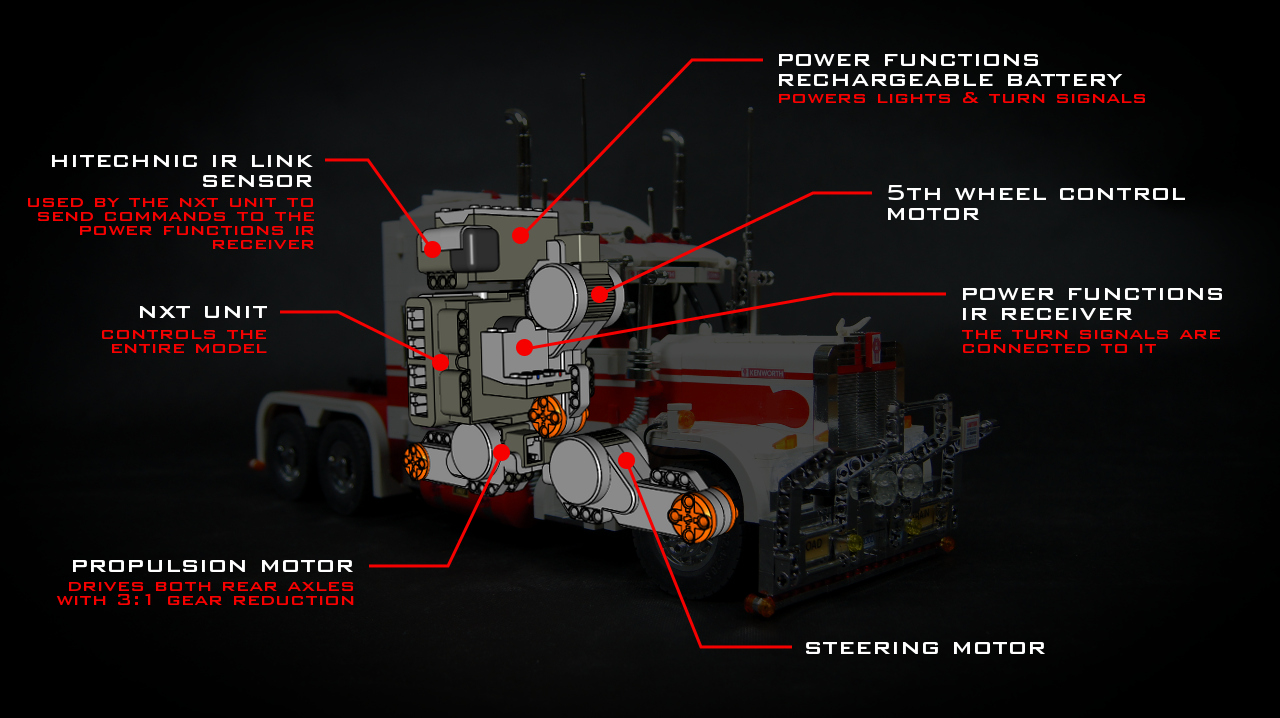
It may come as a surprise that the model had an IR receiver housed inside next to the IR link sensor, but it resulted from sensor’s poor IR range. I was initially hoping to be able to install the sensor on an external NXT controller, thus having a chance to add IR receivers and turn signals in the trailers too, but with a model of that size the sensor simply wouldn’t reach the truck and all trailers at the same time. Also, with all the effort put into steering the model over a Bluetooth link, it would be a waste to be limited by the poor IR range.
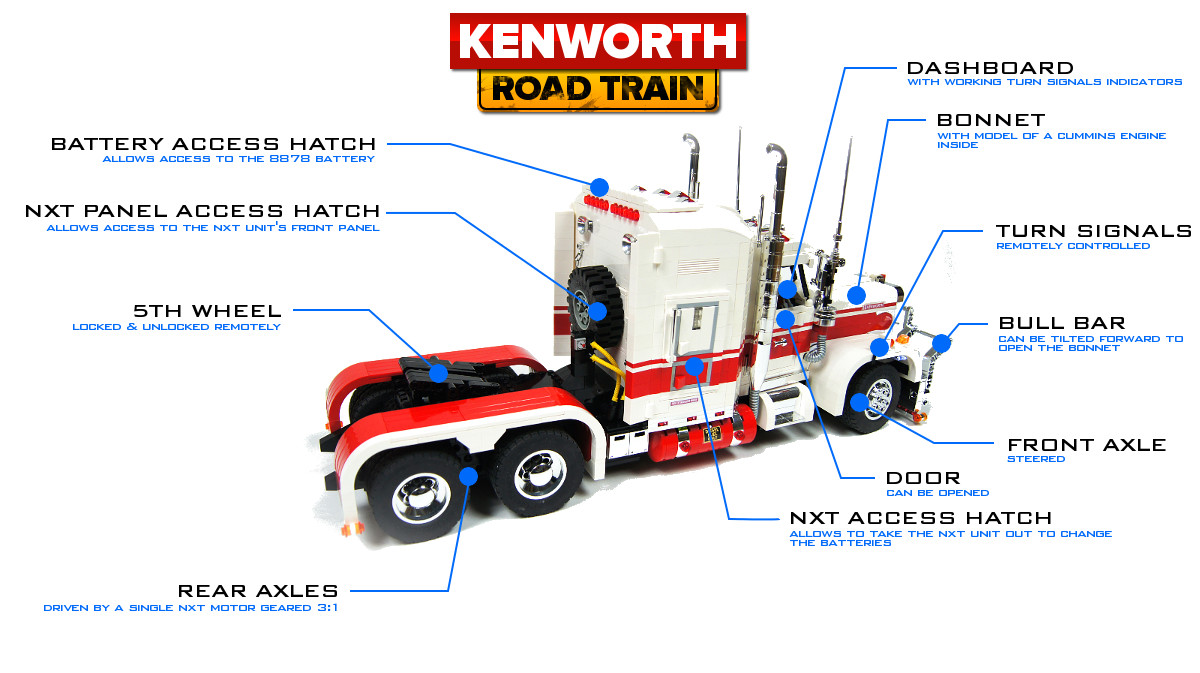
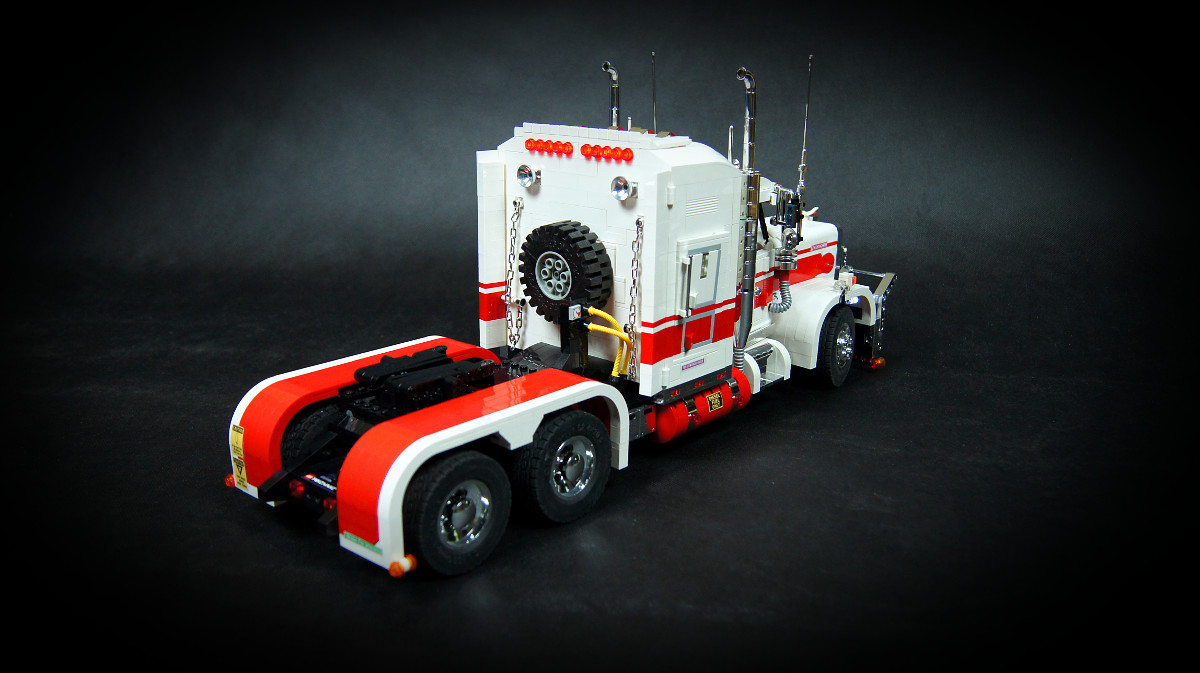
The model had just a few functions. Both rear axles were driven by a single NXT motor geared 3:1, and the front axle was steered by another NXT motor without a clutch. There was no suspension, as it would affect the look of the model and it was hardly needed since it was never supposed to leave my apartment’s floor. The fifth wheel was locked and unlocked using a horizontal 40-tooth gear with a short beam on its side, driven by the third NXT motor located in the sleeper. By rotating the wheel, the beam would block and unblock the fifth wheel’s only “exit”.
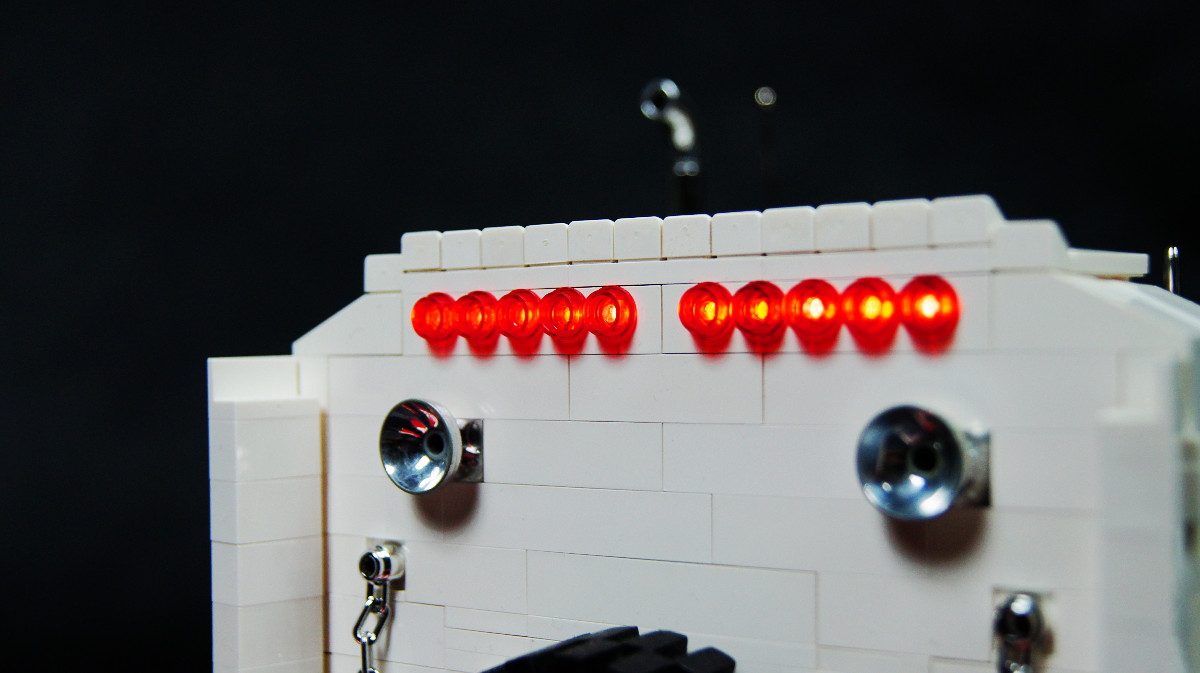
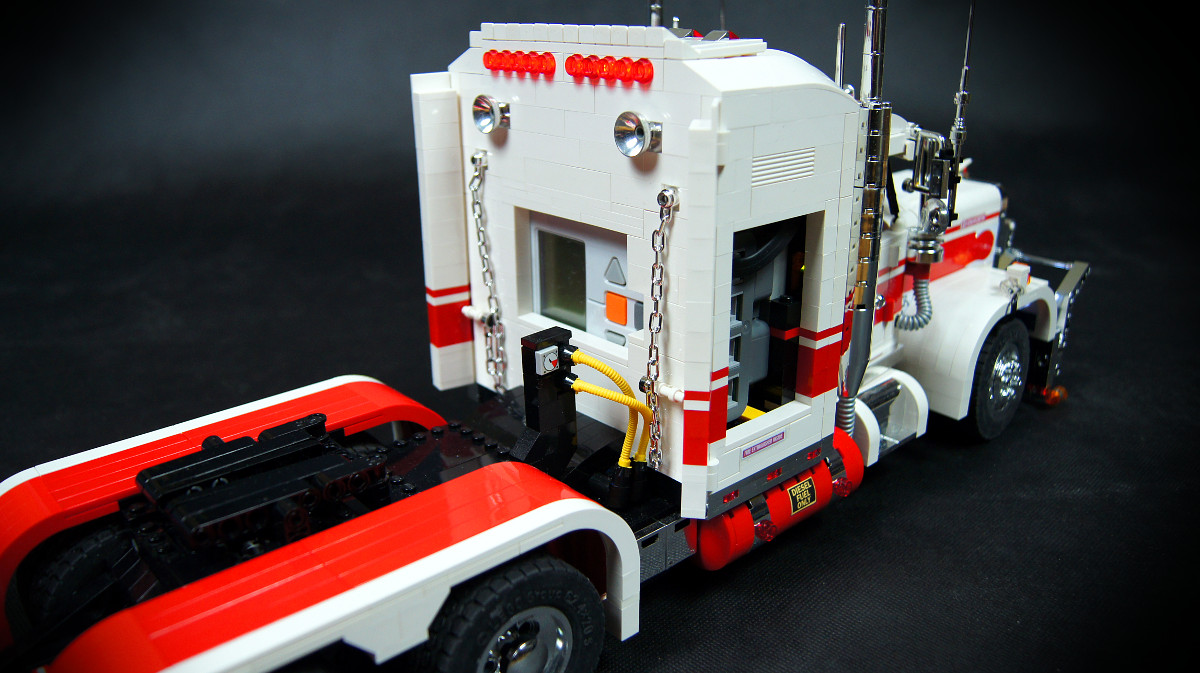
The front turn signals were controlled remotely and operated by the software, that is by the NXT unit turning them on and off repeatedly using the IR Link sensor. I did not install rear or any other turn signals for the fear of compromising the truck’s look with too many exposed wires and LEDs, but I have added working turn signals indicators on driver’s dashboard. I have also used the speaker of the truck’s NXT unit to honk (or rather beep) on command, and to beep while on reverse. It was a very simple thing and I have omitted it when trying to shorten the video.
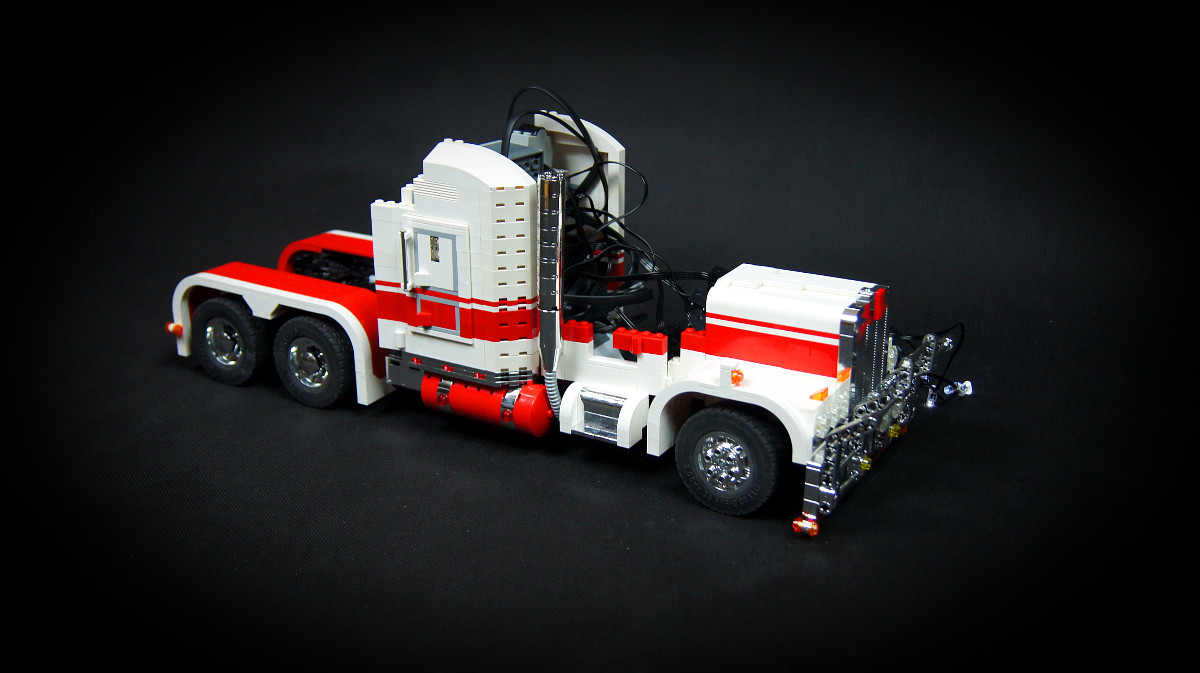
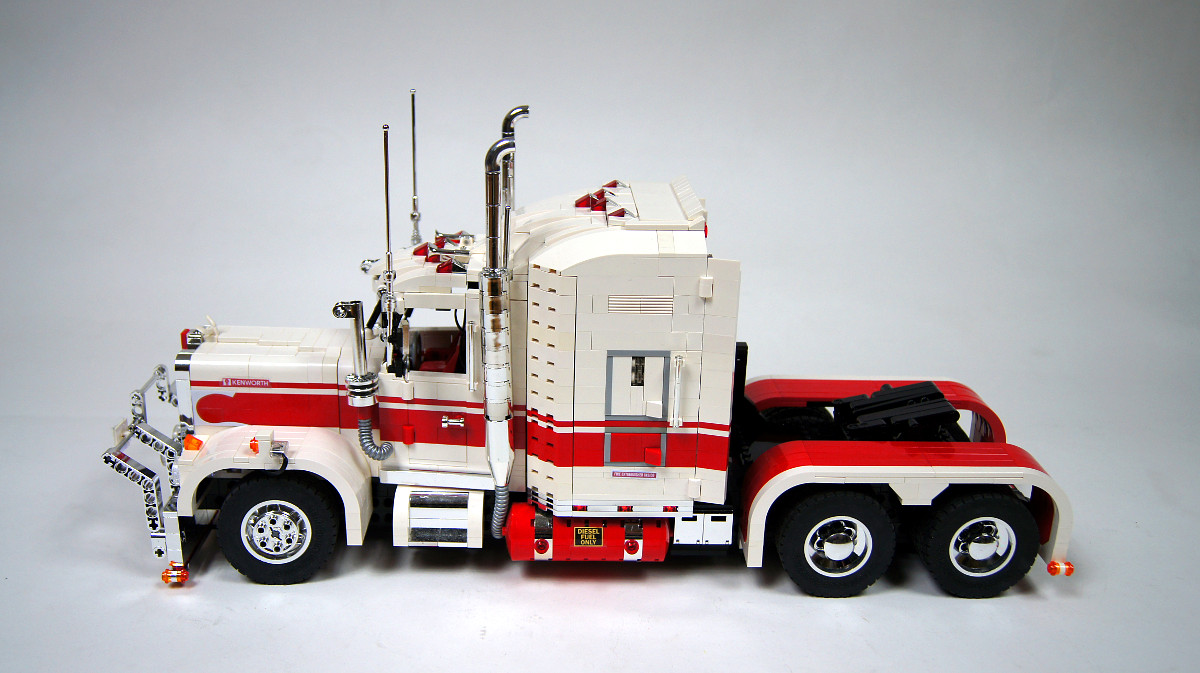
The sleeper module was literally bursting at seams with electric elements and wires. There were three access hatches in it: top one for the 8878 battery, rear one for the NXT unit’s front panel, and a side one for taking the entire NXT unit out for battery replacement. The wires, especially the stiff NXT wires, proved problematic because they had to be arranged so as to allow moving the NXT unit out and back in. Eventually, the whole space at the back of the cabin was taken by wires and the side access hatch tended to stick out a little.
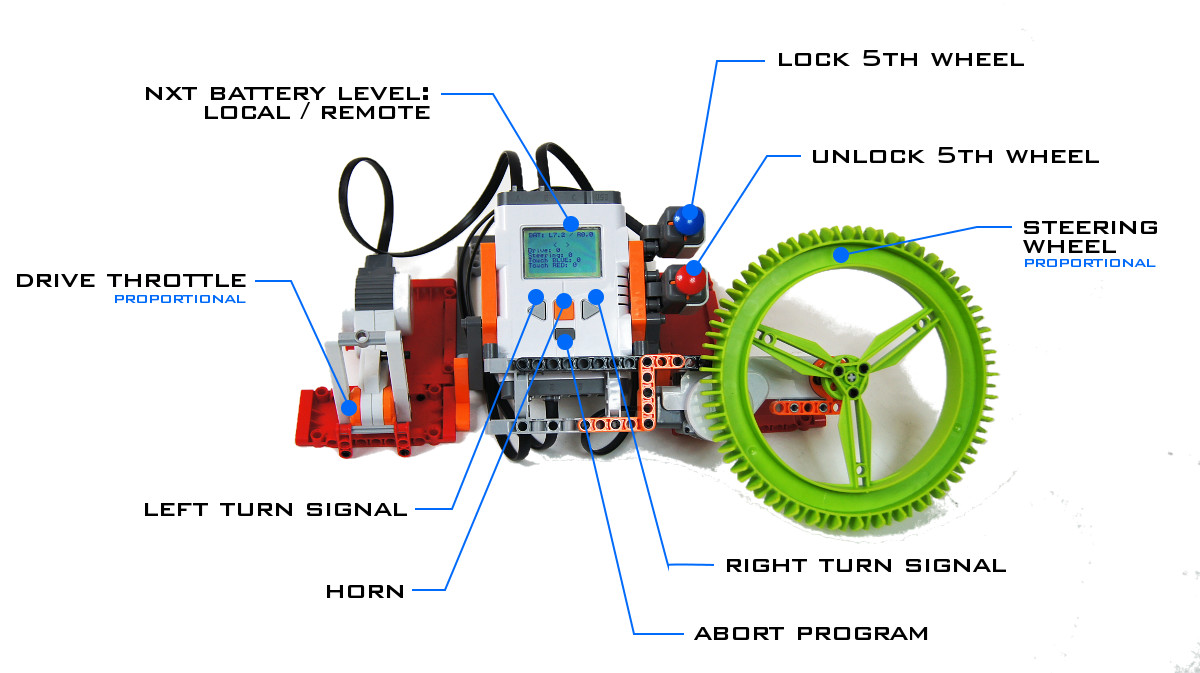
The entire set-up, that is the truck and three trailers, was controlled by a very simple external controller using another NXT unit. I have initially attempted to use the Hailfire Droid’s wheel as a steering wheel, but it proved unusable because using it to drive any regular gear wheel created very high gear acceleration which generated plenty of resistance. Gearing down in the latter stage was not an option, as a very considerable backlash in gear wheels was created. I was also tempted to build a pedal-like device to control the throttle, but with the NXT wires being quite short and impossible to connect in series, it proved pointless – I would have to keep such a pedal right next to the NXT unit.
The controller was a variation of my NXT brick-to-brick remote, allowing proportional steering and drive with a speed control, as well as controlling all the remaining functions with touch sensors and NXT unit’s buttons. It was running the RobotC software, resulting in delay in the other NXT unit’s reactions over Bluetooth link. A secondary, more comfortable way of controlling the model was to use a computer with a gaming pad. Using a Bluetooth link and the RobotC software, it allowed to control the model with minimum delays and the gaming pad provided plenty of buttons and two analog joysticks which were used for speed-control for both drive and steering.
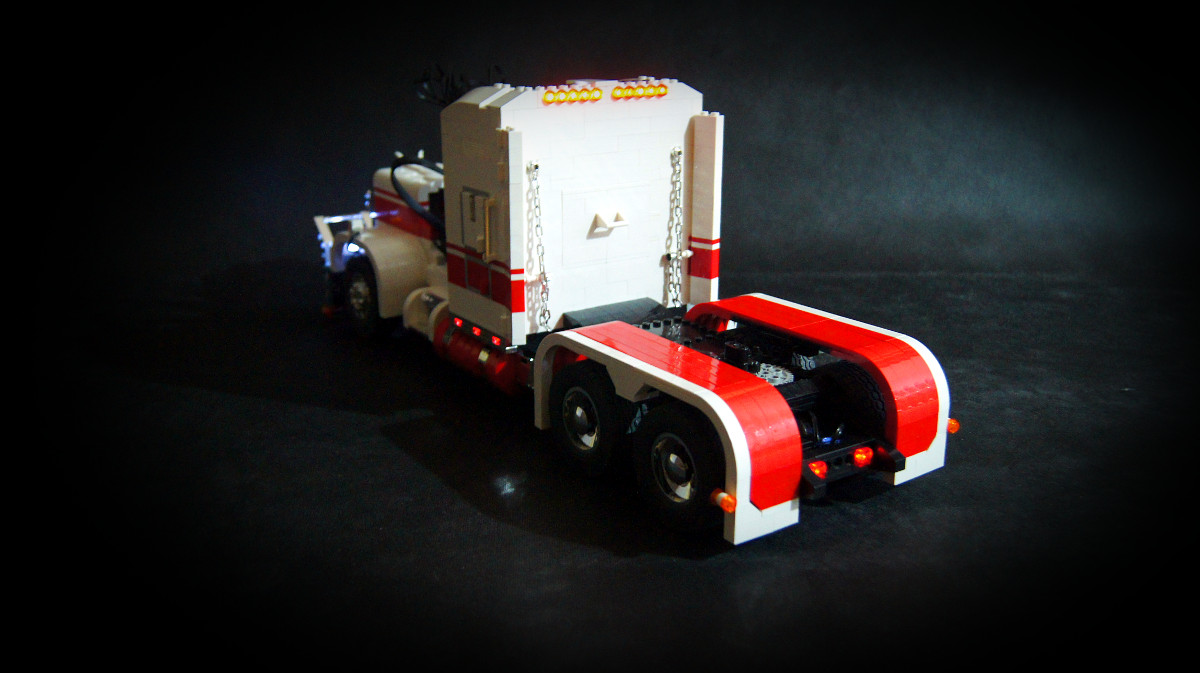
I was not fully happy with the model. Its functionality was troublesome, with a lot of effort required to start and connect the two NXT units, with delays in steering, and most importantly with the enormous amount of space taken by the NXT elements. Its look was somewhat compromised, with some simplifications in the bonnet and cabin’s roof area, and with the side air filters shortened to allow to open the bonnet up – the only alternative here was to cut the front bumper to move the bonnet’s hinge lower, which I didn’t want to do. I was afraid it was the kind of model that makes a good first impression, and goes downhill from there. Still, it was an interesting experience in using the NXT elements and in merging them with the PF ones.
Gaming pad control program:
#pragma config(Sensor, S4, HTIRL, sensorI2CCustom)
#include "drivers/HTIRL-driver.h"
#include "JoystickDriver.c"
tPFmotor SignalLeft = pfmotor_S4_C1_A;
tPFmotor SignalRight = pfmotor_S4_C1_B;

task Signals()
{
  while(true)
  {
    if(joy1Btn(2) == 1)
    {
      PFMotor(SignalRight, 7);
      nxtDisplayCenteredTextLine(5, " < [>]");
    }
    else if(joy1Btn(4) == 1)
    {
      PFMotor(SignalLeft, 7);
      nxtDisplayCenteredTextLine(5, "[<] > ");
    }
    else
    {
      PFMotor(SignalRight, 0);
      PFMotor(SignalLeft, 0);
      nxtDisplayCenteredTextLine(5, " <  > ");
    }
    wait1Msec(250);
    PFMotor(SignalRight, 0);
    PFMotor(SignalLeft, 0);
  }
}

task main()
{
  bMotorReflected[motorB] = true;
  bMotorReflected[motorC] = true;
  StartTask(Signals);
  while(true)
  {
    getJoystickSettings(joystick);
    motor[motorB] = 0;
    motor[motorC] = 0;
    motor[motorC] = joystick.joy1_y1 / 1.28;
    motor[motorB] = joystick.joy1_x1 / 1.28;
    nxtDisplayCenteredTextLine(0, "BATTERY: %3.1fV", nImmediateBatteryLevel / (float) 1000);
    nxtDisplayTextLine(2, "B: %d", motor[motorB]);
    nxtDisplayTextLine(3, "C: %d", motor[motorC]);

    if(joy1Btn(1) == 1)
      motor[motorA] = -100;
    else if(joy1Btn(3) == 1)
      motor[motorA] = 100;
    else
      motor[motorA] = 0;
  }
}
NXT-to-NXT control sender program:
#pragma config(Sensor,S1,touch1,sensorTouch)
#pragma config(Sensor,S2,touch2,sensorTouch)

bool leftturn = false;
bool rightturn = false;
bool soundhorn = false;

task BatLev()
{
  ubyte valueReceived[1];
  valueReceived[0] = 0;
  while(true)
  {
    cCmdMessageRead(valueReceived, 1, 1);
    nxtDisplayCenteredTextLine(0, "BAT: L%3.1f / R%3.1f", nImmediateBatteryLevel / (float) 1000, valueReceived[0] / (float) 10);
    wait1Msec(50);
  }
  return;
}

task Buttons() //0 = Gray Rectangle  1 = Right Arrow  2 = Left Arrow  3 = Orange Square
{
  nNxtButtonTask  = -2;nNxtExitClicks = 2;
  nxtDisplayCenteredTextLine(2, " <  > ");
  while(true)
  {
    if(nNxtButtonPressed == 1)
    {
      if (rightturn == false)
      {
        nxtDisplayCenteredTextLine(2, " < [>]");
        rightturn = true;
        leftturn = false;
      }
      else
     {
        nxtDisplayCenteredTextLine(2, " <  > ");
        rightturn = false;
        leftturn = false;
     }
    }
    else if(nNxtButtonPressed == 2)
    {
      if (leftturn == false)
      {
        nxtDisplayCenteredTextLine(2, "[<] > ");
        rightturn = false;
        leftturn = true;
      }
      else
     {
        nxtDisplayCenteredTextLine(2, " <  > ");
        rightturn = false;
        leftturn = false;
     }
    }
    else if(nNxtButtonPressed == 3)
    {
      soundhorn = true;
    }
  wait1Msec(350);
  }
}

task main()
{
  StartTask(BatLev);
  StartTask(Buttons);
  bFloatDuringInactiveMotorPWM = true;
  btConnect(1, "NXT2");
  while(true)
  {
    ubyte valueToSend[7];
    valueToSend[0] = nMotorEncoder[motorA];
    valueToSend[1] = nMotorEncoder[motorB];
    valueToSend[2] = SensorValue(touch1);
    valueToSend[3] = SensorValue(touch2);
    valueToSend[4] = rightturn;
    valueToSend[5] = leftturn;
    valueToSend[6] = soundhorn;
    cCmdMessageWriteToBluetooth(valueToSend, 7, 1);
    nxtDisplayTextLine(3, "Drive: %d", valueToSend[0]);
    nxtDisplayTextLine(4, "Steering: %d", valueToSend[1]);
    nxtDisplayTextLine(5, "Touch BLUE: %d", valueToSend[2]);
    nxtDisplayTextLine(6, "Touch RED: %d", valueToSend[3]);
    wait1Msec(50);
  }
}
NXT-to-NXT control receiver program:
#pragma config(Sensor, S4, HTIRL, sensorI2CCustom)
#include "drivers/HTIRL-driver.h"
tPFmotor SignalLeft = pfmotor_S4_C1_A;
tPFmotor SignalRight = pfmotor_S4_C1_B;
// config start
//bMotorReflected[motorA] = true;
//bMotorReflected[motorB] = true;
//bMotorReflected[motorC] = true;
bool buzzOnRev = true; // buzzing while on reverse
int steerAcc = 10; // steering accuracy margin (degrees)
// config end

int turnSignals = 0;

task Signals()
{
  while(true)
  {
    if(turnSignals == 1)
    {
      PFMotor(SignalRight, 7);
    }
    else if(turnSignals == 2)
    {
      PFMotor(SignalLeft, 7);
    }
    else
    {
      PFMotor(SignalRight, 0);
      PFMotor(SignalLeft, 0);
    }
    wait1Msec(250);
    PFMotor(SignalRight, 0);
    PFMotor(SignalLeft, 0);
  }
  wait1Msec(50);
}

task BatLev()
{
  while(true)
  {
    nxtDisplayCenteredTextLine(0, "BAT: L %3.1fV", nImmediateBatteryLevel / (float) 1000);
    ubyte valueToSend[1];
    valueToSend[0] = nImmediateBatteryLevel / (float) 100;
    cCmdMessageWriteToBluetooth(valueToSend, 1, 1);
    wait1Msec(50);
  }
  return;
}

task main()
{
  StartTask(BatLev);
  StartTask(Signals);
  nVolume = 3; // starting volume
  ubyte valueReceived[7];
  valueReceived[0] = 0;
  valueReceived[1] = 0;
  valueReceived[2] = 0;
  valueReceived[3] = 0;
  valueReceived[4] = 0;
  valueReceived[5] = 0;
  valueReceived[6] = 0;

  while(true)
  {
    cCmdMessageRead(valueReceived, 7, 1);
    nxtDisplayTextLine(2, "Drive: %d", valueReceived[0]);
    nxtDisplayTextLine(3, "Steering: %d", valueReceived[1]);
    nxtDisplayTextLine(4, "Touch BLUE: %d", valueReceived[2]);
    nxtDisplayTextLine(5, "Touch RED: %d", valueReceived[3]);

    // motorC (drive)
    motor[motorC] = 0;
    int afactor = valueReceived[0] / 5;
    if (afactor > 1 && afactor < 25)
    {
      afactor = afactor * 10;
      if (afactor > 100) afactor = 100;
      motor[motorC] = afactor;
      if (buzzOnRev == true) PlaySound(soundException);
    }
    else if (afactor > 1 && afactor > 25)
    {
      afactor = (51 - afactor) * -10;
      if (afactor < -100) afactor = -100;
      motor[motorC] = afactor;
      if (buzzOnRev == true) ClearSounds();
    }

    // motorB (steering)
    motor[motorB] = 0;
    int bfactor = valueReceived[1];
    if (bfactor > 1 && bfactor < 75) bfactor = bfactor;
    else if (bfactor > 1 && bfactor > 75) bfactor = (256 - bfactor) * -1;
    nxtDisplayTextLine(7,"Mtr B: %d/%d",nMotorEncoder[motorB], bfactor);
    bfactor = bfactor * 4;

    if (nMotorEncoder[motorB] < (bfactor + steerAcc)) while(nMotorEncoder[motorB] < bfactor) motor[motorB] = 10;
    else if (nMotorEncoder[motorB] > (bfactor - steerAcc)) while(nMotorEncoder[motorB] > bfactor) motor[motorB] = -10;
    else motor[motorB] = 0;

    // motorA
    motor[motorA] = 0;
    if (valueReceived[2] == 1) motor[motorA] = 100;
    else if (valueReceived[3] == 1)motor[motorA] = -100;

    // turn signals
    if (valueReceived[4] == 1) turnSignals = 1;
    else if (valueReceived[5] == 1) turnSignals = 2;
    else turnSignals = 0;

    // horn
    if (valueReceived[6] == 1) PlayTone(784, 50);
    else ClearSounds();

    wait1Msec(50);
  }
}


Hello Sariel, Your Road train is awesome. I’m verry fascinated of it and I built my own Road Train.
but I want tu use your Program. The sender Programm works. But I have a problem with the receiver program. There comes a error message becouse of the Hitechnik Ifrared Sensor. I think I need a driver for it or something else. But where can I get it and how I can include it in RobotC.
@Brad
I don’t remember, probably axle or some kind of pin.
Hi. I was wondering on the main tralier what did you use as the pin. Do you have a photo of it.
@Witherley
Or you can stop using Mac.
@Sariel
MLCad doesn’t seem to work on Mac. I tried this program called Bricksmith but it’s really trippy and the fact that it’s really hard to work with completely outweighs the positives of the extensive parts library. Looks like I’ll have to keep using LDD. 🙁
@Witherley
Personally, I’m using MLCad and Lpub to make instructions, the results are practically on par with the official instructions. I have no idea if they work on Mac – luckily, I never had one.
@Sariel
A guy named andrew (no caps) asked why it didn’t have suspension and also said something about you being able to use LDD to make models with parts you don’t own. In your reply you said that LDD was “literally the worst program for making instructions”. This poses a problem for me because there’s no way I can just buy a buncha bricks if I want to make something (my parents not letting me unless it’s the holidays, my birthday or perhaps christmas), so I normally have to resort to LDD to use bricks I don’t own. So I was just asking if there was any better program than LDD that worked for Mac.
@Witherley
What?
@Sariel
Anything better that works for Mac?
@Carolyn Bligh
You can’t buy it. It’s my own custom model.
Where can I buy a kenworth lego truck?
@David
No, it’s not free.
Where did you get the music? Is it free?
@Sariel
Yes, Thank you very much kind Sir.
@David
You mean this? http://www.bricklink.com/catalogItem.asp?P=41750
I hate to bother you with this but could you please tell what parts you used for the slope on top of the sleeper on the front outer edges? Thanks.
Could you please tell me the back ground song in this video.
@Peter
They are big enough, but the crane has no suspension pieces.
@Sariel
thank you, but 62.4×20 tires arent big enough to build with them a model with suspension?
@Brent
You can’t get one.
@Peter
If you want suspension, definitely buy the Unimog.
Where can I get one?!
Hi,
I want some help
I am thinking in buying a new lego set( number 42009 or 8110) for parts, and later i would build something whit suspension .
if I would choose the Crane, is there any kind of suspensions buildable whit the 62.4×20 tires, or I should cshoose the Unimog?
@Alf
No, thank you, it’s not really possible as the model no longer exists.
In some ways I also wish there were instructions for the truck just to see some of the smaller details and new ideas on how to get around certain issues that always come up, but in others I’m glad there aren’t. Without effort on our part there would be no real point in building it. Keep up the AWESOME work and enjoy the hobby.
Would you accept payment of $300 for the instructions only
@Sariel
really,
wow amazing
@andrew
All projects at this website are mine.
did you make the Kenworth Mammoet?
@andrew
It’s too heavy for a properly working suspension, and besides I was going to drive it on the floor only, so any suspension would be useless, really.
Lego Digital Designer is a terrible idea. There is literally no worse program for making instructions.
Hi.
well i saw this truck and it was amazing but you didnt put suspension on it and why.
One thing could you get those bricks and make a model and instructions but if you get stuck finding the bricks use lego digital designer it will help you.
thanks
Oké thanks, if i don’t get it right i will ask you
@Mees
The RobotC comes with a manual and a huge Help file. I suggest you start from there.
Wear do you fill in the codes for the nxt to game pad in the nxt programming program?
@Lamboguy59
Well, it locks the fifth wheel.
What does a 5th wheel lock do?
oh ok
@Motor
Obviously not.
could you?
@Motor
Do you expect me to make a building instruction in a comment for you?
ok, also if you wanted to put an XL motor in stead of a NXT motor how would you connect it to where it has the most power.
@Motor
Look at the second WIP photo.
Are the back wheels connected on a single axle with the differentials.
@adrian
No.
hi is there anyway you have instructions for this truck and if so can i have them emailed to me thanks
@Ken Liebgott
Look at 4:24 in the video.
Are the chromed pieces that you used on the truck stock LEGO pieces? I have tried to find them on Bricklink but I am not able to. Can you tell me where I might find them? Thank you
Yeah true that.
Awesome creations.
@Scott
Listen, it’s really simple: I have a job and a hobby. I don’t want to have two jobs and no hobbies.
Name your price, take pre-orders, and see if it is worth it for you to create the instructions. Let people be the judge if they want to buy/invest in making this model. You might be surprised.
@scott
Because it would take months of work, and in the end you there would be like 3 people in the world with enough pieces to build it.
why don’t you create instructions and sell them? I’d like to build something like this.
@NXT45
Yes, this is RobotC, and this program is here on this page, right below “Gaming pad control program”.
@NXT45 Yes but in the video at 3:47 it shows a computer program of a game controller what program is that? RobotC?
@NXT45
Right on this very page. Above the video and photos.
Hi, I was wondering in the video it says that the joystick program is avaliable on your web site but I dont see it can you tell me where it is?
@stephen alford
I don’t think so, because even if I did, there would be very few people with enough pieces to build it. It’s an extremely expensive model to build. And a very complex one to make an instruction.
@Sariel
Would u ever release instructions in the future?
@stephen alford
Thank you, but I’m not interested.
I don’t want to offend u but I would be willing to pay u $500 aud for just the instructions for this truck.
@Austin
Of course I don’t.
i am just simply amazed
Do you have the digital design on a file so i can build it my self
Simply Amazin! 🙂
@jonasvlam
I am NOT selling it. Thank you.
how much demand there for you
@garrett
I spent at least $1200 on pieces alone.
I WILL PAY $400 FOR THIS TRUCK AND THE TRAILERS
@Sariel
Yeah just saying I think you bought them all :\
@jordan thomas
All wheels are fully chromed if this is what you ask.
Chrome Block Cityare all out of 62.4 X 20 in chrome silver wheels (the ones on this truck)
oh and sariel are the inside wheels silver too? @Sariel
Hello Sariel .. great job, I’d say Lego masterpiece. it is a work of art … I saw him today and not end up looking and see photos from the various subjects that you used … amazing!
Bellissimo. Bravo and congratulations ..
🙂
Amazing truck mate…i reckon it should have a smaller sleeper…longer wheelbase and double the fuel tanks……
@Laurens
Please… you can’t seriously think that Lego would be willing to release a behemoth of several thousands pieces, including plenty of NXT and PF elements, not to mention chrome parts that Lego does not produce. It’s NOT going to happen in a million years.
why not?
Then I can buy it. 🙂
very reflective
@Zheka
http://www.bricklink.com/store.asp?p=Aurimax
Hi sariel!
Where have you bought chrome bricks for this model?
@Laurens
Please, be serious.
put this truck on “http://lego.cuusoo.com”!!!
@Black_Omega63
Technic. More reliable, more comfortable.
Wow, that’s a brilliant truck. The detail is amazing! What do you prefer, NXT or Technic, after a few MOCs? Once again, fantastic work.
Outstanding model Sariel! 🙂 I do have to say that this is one of the best trucks you have made. 😀
@qwertyuiop
Yes, clearly.
was that the “ghost ship” on the trailer at the end of the video?
@David Luders
No, but I’m tempted to go “Dark Knight” and flip the whole truck Nolan-style.
What was that bazooka-like thing at the end of the video? I hope you’re not going to “The Dark Side”! 🙂
@Ben
Yeah, probably.
would this be a good tug for pulling stuff around?
@Flidsager
It’s a simple A4 gamepad, I believe any regular USB gamepad will work.
Hi Sariel!
Fantastic Truck, you have developed there. Both the technic with the NXT, wich have inspired me to change my mind about using it in my recent moc. I’m a novice in NXT, but is has to be tried.
Also the design is great as it allways is in your creations.
I’m curios to know which kind of gamepad you have used, and where to get it?
Kind greetings from Flidsager 🙂
@GuiliuG
Because it will be disassembled soon.
Great truck ! Why wrote you your article using the past,doing as if your model is disassembled? it trouble me 🙂
@Huib
This part of video was shot before I changed gearing.
Hey, verry nice truck! I have a question about the nxt motor. You say that you gear it down 3:1. But i only see 24th gears… Can you explain? Thanks!!
i meant to put in “in” sorry :0
I live Australia!!!!!!!!!!!!!
You appear to be missing the smell of cow poo. 😛
I only ever see shiny chrome on them on the back of another truck taking them to the dealer. They are generally pretty dirty.
Anyway, nice work as normal. 🙂
this is serious competition to 2LegoOrNot2Lego’s truck models !! well done
im lost for words that is simply amazing
keep up the good work jerkerhead:)