KV-1/KV-2
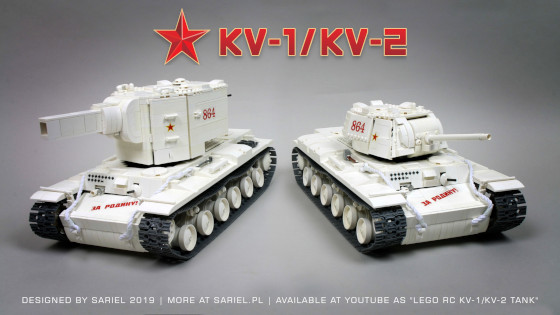
A KV tank chassis with two interchangeable turrets: KV-1 and KV-2. Features drive, steering, turret traverse, main gun elevation, a firing mechanism and custom stickers.
Datasheet:
Completion date: 18/10/2019
Power: electric (Power Functions)
Remote control: Power Functions
Dimensions: length 46 studs / width 24 studs / height 20 studs (KV-1) / length 47 studs / width 24 studs / height 24 studs (KV-2)
Weight: 2.017 kg (KV-1) / 2.205kg (KV-2)
Suspension: torsion bars
Propulsion: 2 x PF XL motor geared 5:1
Motors: 2 x PF XL motor, 2 x PF M motor
I’ve built a green tank before, so now it’s time for a white one. Or two, depending how you count. Since KV-1 and KV-2 tanks share the same chassis, the idea here was to build a single tank chassis with two interchangeable turrets. Another goal was to make this model cheap and simple, which had its drawbacks.
The original KV-1 was the first proper Soviet heavy tank and it was a nasty surprise to Germans invading the USSR. How nasty? The Soviet ace tanker Zinoviy Kolobanov, from whose tank I have taken my model’s side number, is credited with destroying a column of 43 Panzer II tanks using five KV-1’s and not losing a single one (and taking 156 hits himself). When in right hands, the KV-1 was capable of threatening even the legendary King Tigers, even though the war was eventually won by the mass-produced, cheap and simple T-34. KV has quickly become obsolete as the war raged on, its initially incredible armor being outpaced by the new German heavy tanks’ guns, and the attempts to upgrade the KV led to creation of the KV-85 tank which was a starting point to the entire line of IS tanks. Also, another result of work on the KV tank was the KV-2.
KV-2 was a good example of crazy wartime idea: let’s take a giant 152 mm howitzer and install it on a tank. The KV chassis was selected for this project, but a giant turret was needed to house the howitzer. The initial version of the KV-2 turret was big and tall, but actually rather complex, with some profiled armor. But facing the pressure of limited time and resources, the Soviets have quickly moved on to a version of this turret called MT-2, which was just a big box of armor plates welded at right angles. The enormous and extremely tall turret caused stability problems for the tank, it could only be rotated when on level ground, and it been dubbed “the barn” or “Stalin’s fridge”. The resulting KV-2, half-tank, half-SPG, enjoyed a dubious success but it became famous in the World of Tanks game for being a “derp tank” – that is, a tank that requires no aiming, just pointing the gun in the enemy’s general direction.
I have started building my model in dark bluish grey, like most of my tank models, but then it was suggested to me that a Red Army tank would look fitting in winter camo. So I made it all white. White isn’t a great color to work with, because even though I’ve been trying to buy brand new pieces whenever possible, the final result looked like “50 shades of the ABS plastic’s yellowing process”. I did entertain an idea of turning this model into instructions for sale or even a set for sale, which is why from the very start I was trying to keep it simple and cheap, using only the most common Power Functions components such as the AA battery box. In the end, this proved to be a flawed experiment for several reasons.
The big battery box, which could only fit in the back, meant that I had to drive front sprockets rather than the rear ones. I used to think that it makes little difference for the performance of a tracked model whether front or rear sprockets are driven, but KV has proven to me that driving the front sprockets is a terrible solution. Two major problems that it creates are: slacking track section between the front sprocket and the first road wheel, the very section of the track that’s first to hit obstacles, as well as severely stressed rear sprocket, which essentially has the weight of the model wrapped around it. The road wheels posed another problem. They looked well, but they were quite wide and thus sat far from the trailing arms. This resulted in problems with rigidity of the trailing arms and as a result, the road wheels had a tendency to tilt inwards under model’s weight. They also didn’t work so well with the tracks, jumping rather than rolling over them, which caused the entire model to vibrate. Finally, the interchangeable turrets weren’t actually attached to the chassis, just sitting on top of it, so their stability was somewhat compromised.
In the end, the model featured a 1942 KV-1 turret variant (late, fully cast variant, not the early welded one) and the famous MT-2 KV-2 turret variant, and it struggled with driving. The turrets worked fine and – having an option to install one motorized mechanism in each of them – I’ve decided to make them work differently. So the KV-1 turret had a remotely controlled main gun’s elevation, while the KV-2 turret had a fixed gun but a remotely controlled firing mechanism. The mechanism was based on idea I’ve had for quite a while: it used multiple LEGO 1×4 spring shooters which were moved through the mechanism like an ammo clip, discharging its projectile while in line with the turret’s barrel. It was a dead simple mechanism, and by using the spring shooters I was able to reduce stress typically involved in firing something – the whole stress was basically contained inside the spring shooter. The only tricky part was aligning the point at which the projectiles would be fired with the barrel, and making sure that the entire barrel, reaching deep inside the turret, was perfectly smooth inside, so the projectiles wouldn’t stuck in it.
The model was an interesting experiment, but ultimately a failed one in my opinion. Still, it provided a testing bed for my firing mechanism concept.


