GAZ 3351
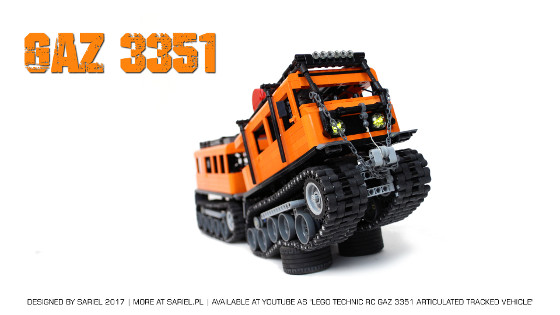 Model of an articulated tracked vehicle. Features remotely controlled drive, steering and front winch as well as tracks custom-built with rubber axle joiners.
Datasheet:
Completion date: 28/05/2017
Power: electric (Power Functions)
Dimensions: length 75 studs / width 15 studs / height 26 studs
Weight: 2.395 kg
Suspension: oscillating bogies
Propulsion: 2 x Lego PF XL motor geared 1.6:1
Motors: 2 x PF XL, 2 x PF L
Ever since I’ve started using custom beams-built tracks for some models, I have been suggested to use the rubber axle joiners instead of the beams for improved grip. As it happens, the joiners are more expensive than the beams, and when tracks require several hundreds of them, the total cost becomes prohibitive. Only recently I’ve come across a clearance sale, which allowed me to buy a few hundred joiners – and then all that remained was to test the all-rubber tracks concept.
I was looking for a simple vehicle that could be built easily and powered with strong motors, and it seemed like an articulated tracked vehicle was the best option. I have, in fact, built two vehicles of this type before – Hagglunds BV 206 with ready-made rubber tracks and Vityaz DT-10 with standard Lego tracks – and both of them had amazing cross-country abilities. After looking through some real-life articulated tracked vehicles, most of which are military, I have picked the Russian GAZ 3351 because it also comes in a civilian variant, so I could build it in arctic exploration version, which was a nice change from building dark gray tracked vehicles again and again.
The model was all about testing the tracks, and its look had lower priority. The chassis was much taller than in the original because I wanted to use unsprung suspension to maintain constant tension of the tracks. The original GAZ is suspended on torsion bars, but I was concerned that Lego torsion bars would yield to the pressure of the elastic tracks, so I used oscillating bogies on the first four road wheels and kept the fifth road wheel fixed. This made the tracks pretty tall, but it kept the tracks tight while being very responsible to obstacles. The model’s body was very simple and crude because it was quite tall and I wanted to keep it as light as possible – a top-heavy vehicle this tall would have terrible sideways stability.
The model performed decently under favorable conditions, but had plenty of problems under unfavorable ones, and several issues about rubber tracks came to light:
- while the traction on the outside of a rubber track is great, the traction inside it is not enough for the track to be driven using only sprockets with tires. I was hoping that the traction between the rubber tracks and rubber tires would be sufficient to climb some serious obstacles, but it wasn’t: under high enough load, the sprockets would start to spin inside stationary tracks. A simple solution would be to add some bars in the sprockets that would engage the track’s inner teeth, but this would require larger sprockets. The ones I’ve used were just a little over 5 studs in diameter, and when tracks wrapper around them, the inner teeth almost touched one another. Using larger sprockets would require re-scaling of the entire vehicle (in fact, they were already oversized in terms of scale).
- the rubber axle joiners come off the axles quite easily and can fall off completely under conditions that wouldn’t make beams budge at all. Again, this could be easily solved by replacing the outer rows of rubber joiners with beams (1 stud or half-stud wide ones), but in 5 studs wide tracks this would reduce the rubber area by half and traction would suffer greatly. With wider tracks, this would be a viable option, but again, wider tracks would require re-scaling of the whole model.
- there’s a lot of stress involved in steering left/right with rubber tracks, especially in a vehicle this long. I have initially used gears to control the turntable in the central articulated joint, but there was a huge backlash because of the stress. I have then replaced the gears with a pair of small linear actuators working in opposite direction, and they proved much more effective – in fact, then could “bend” the model left or right even when not driving. However, then I have added a small vertical turntable between the central joint and the front chassis, to allow the front chassis to tilt left and right independently of the rear chassis, and while the turntable did just that, it has also added a lot of backlash when steering. If the vehicle wasn’t articulated, I suppose standard skid-steering would work reasonably well with rubber tracks.
To sum up, the model was an interesting experiment and I’ve enjoyed building a non-military tracked vehicle for a change. But it also had plenty of issues that would need to be fixed in order to create a proper high-performance model with rubber tracks.


