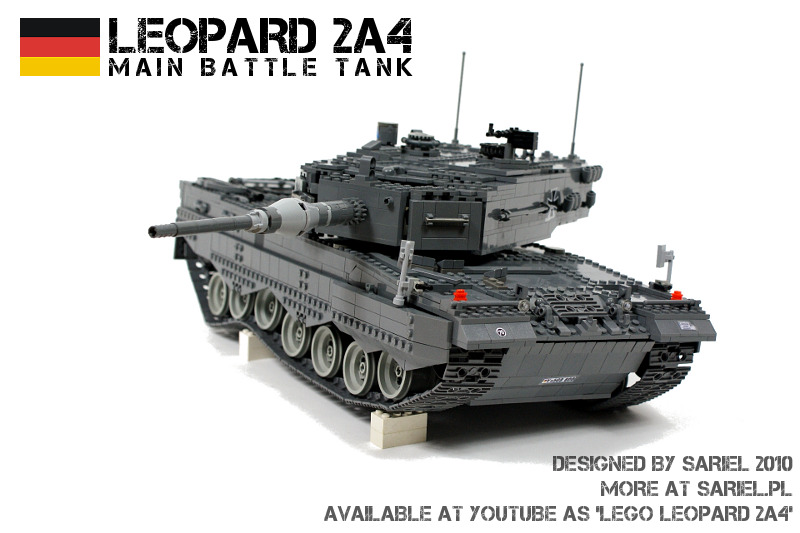
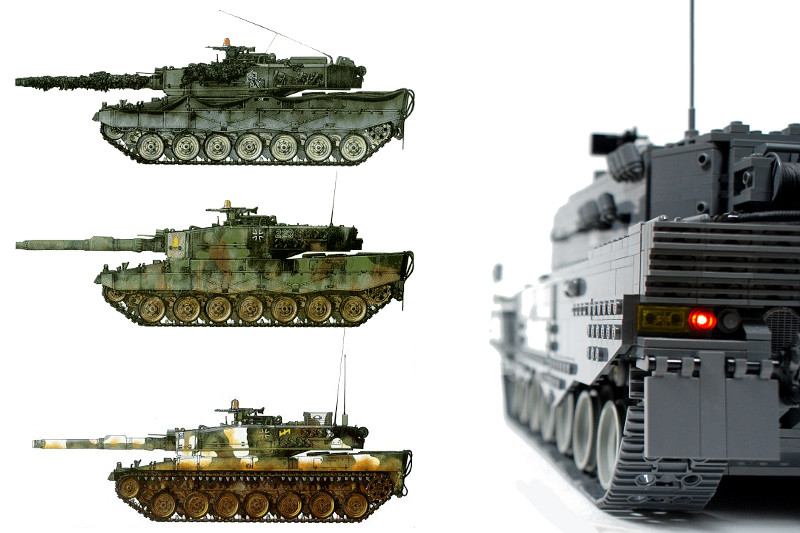
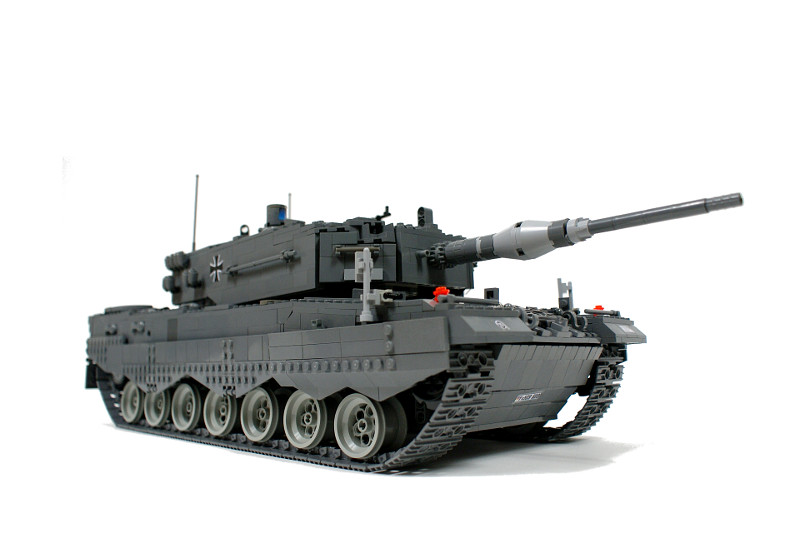
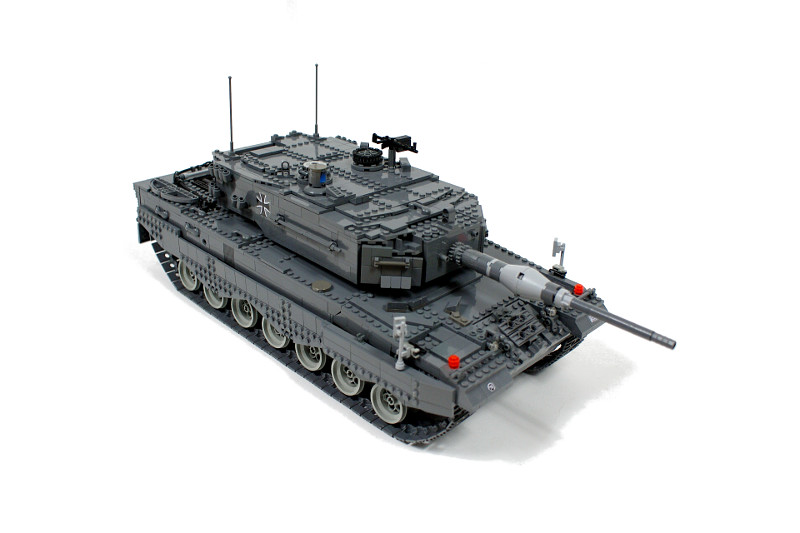
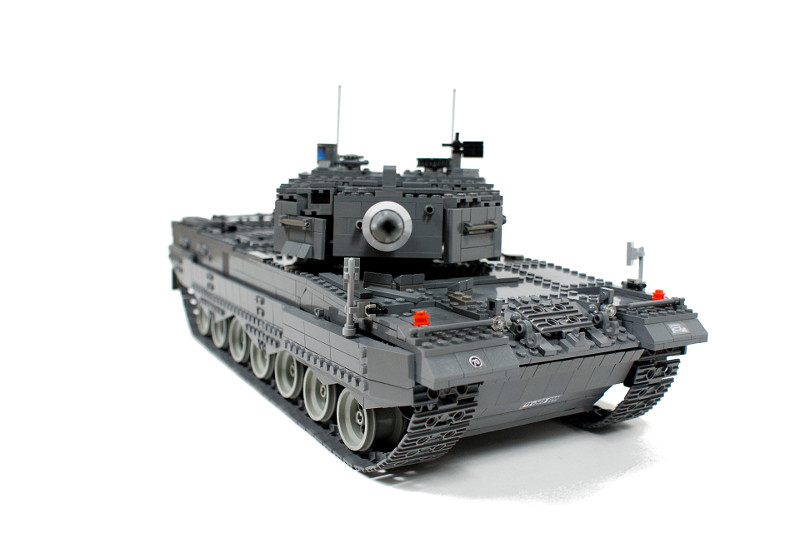
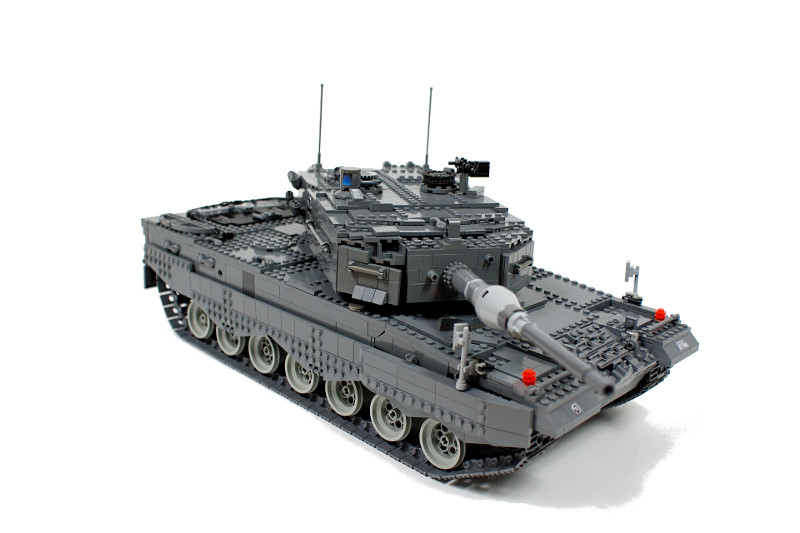
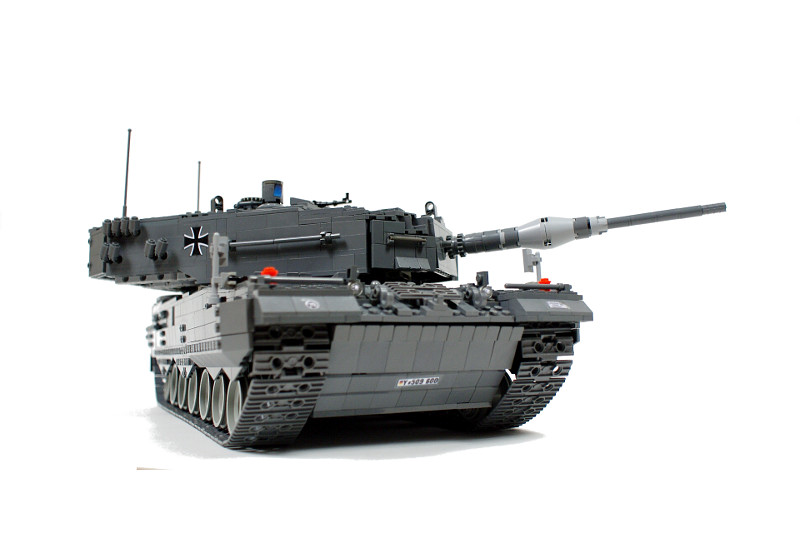
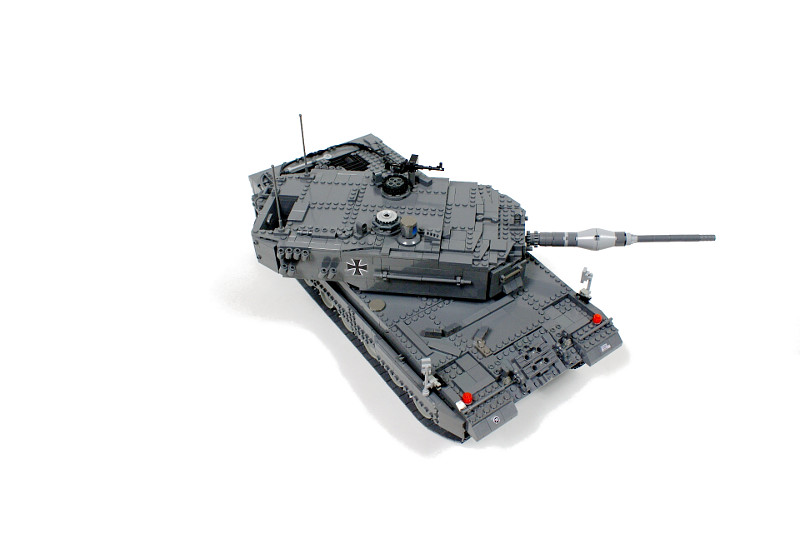
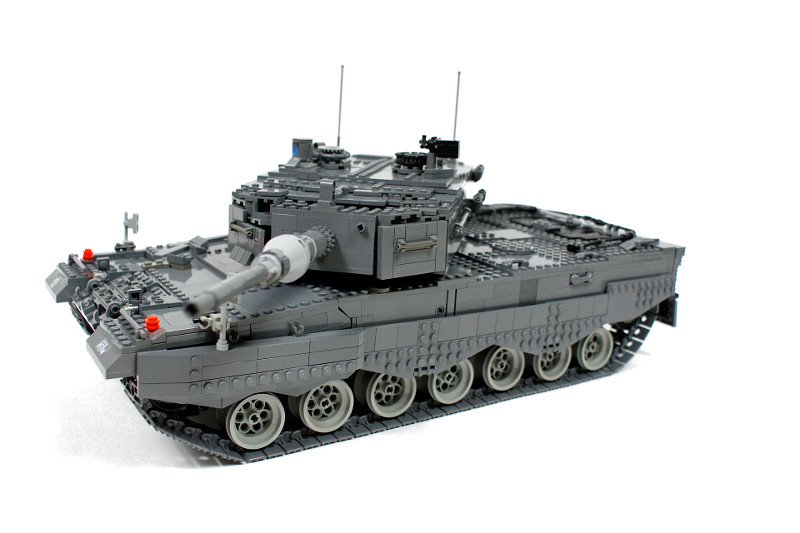
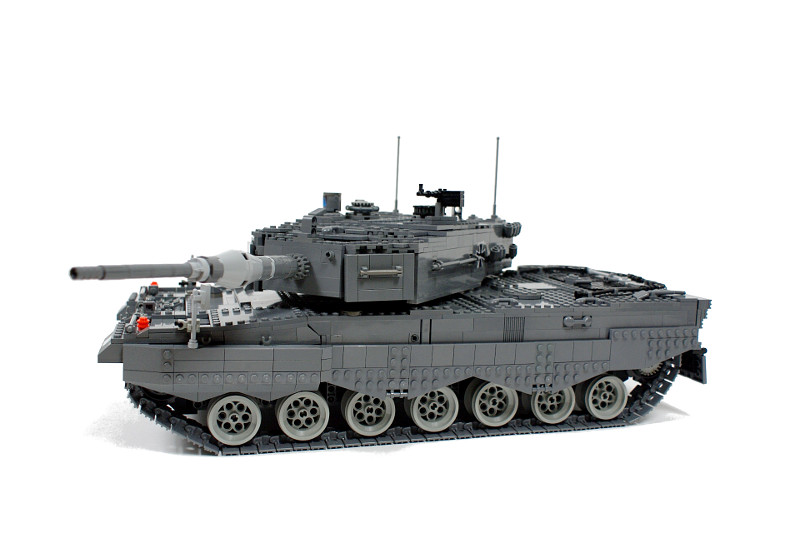
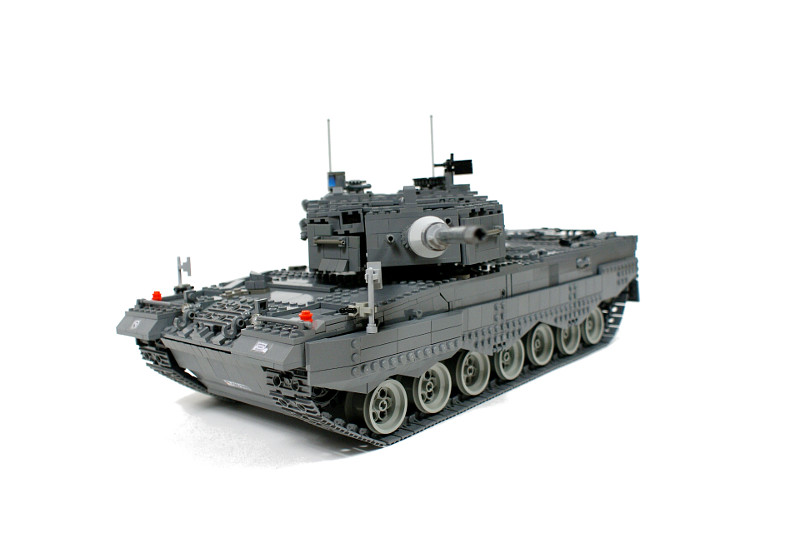
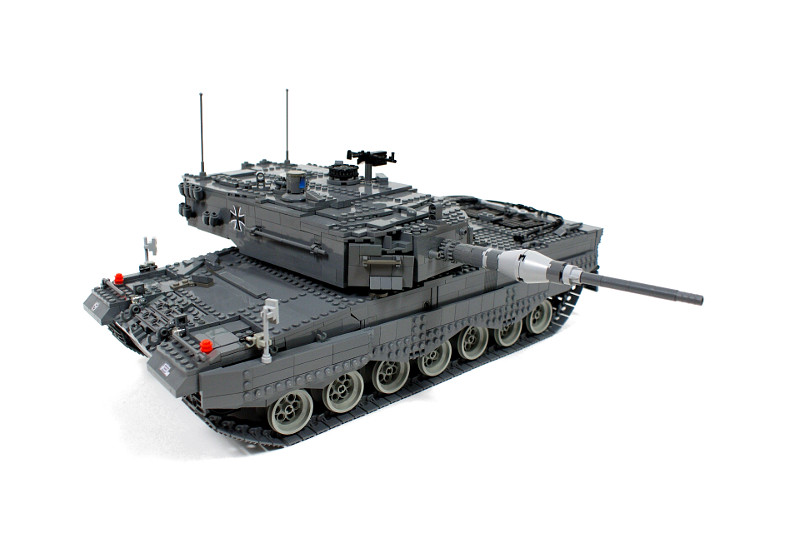
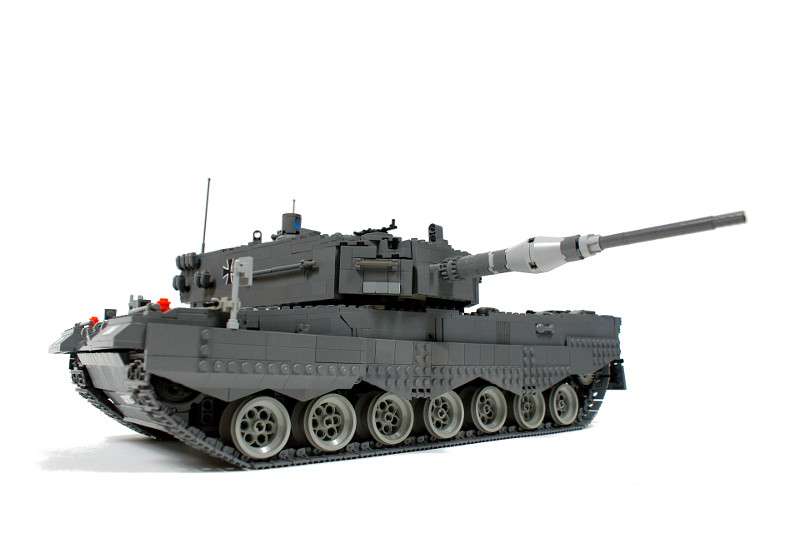
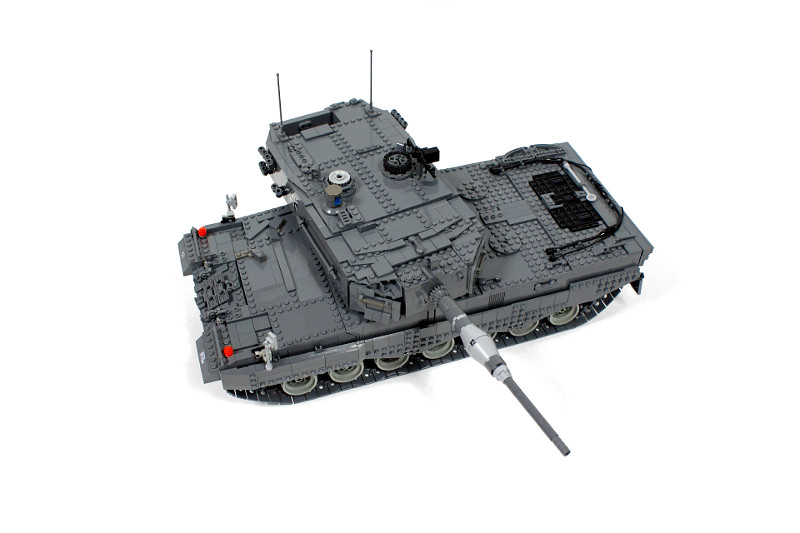
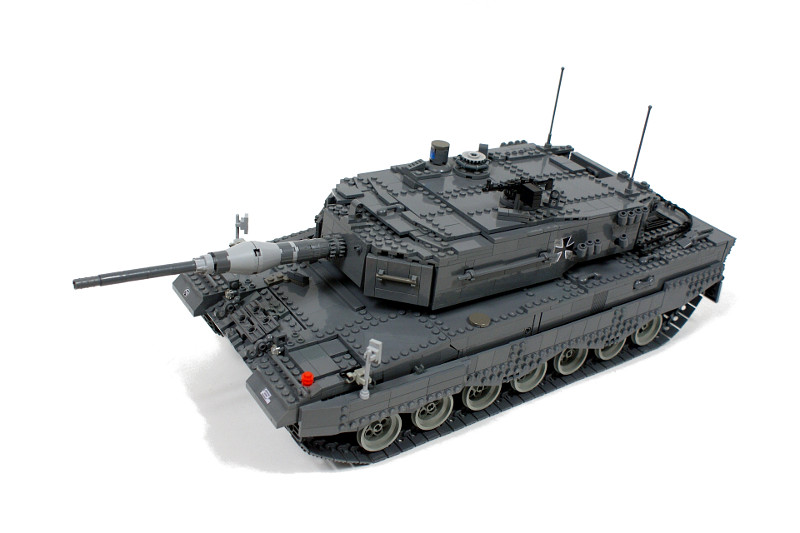
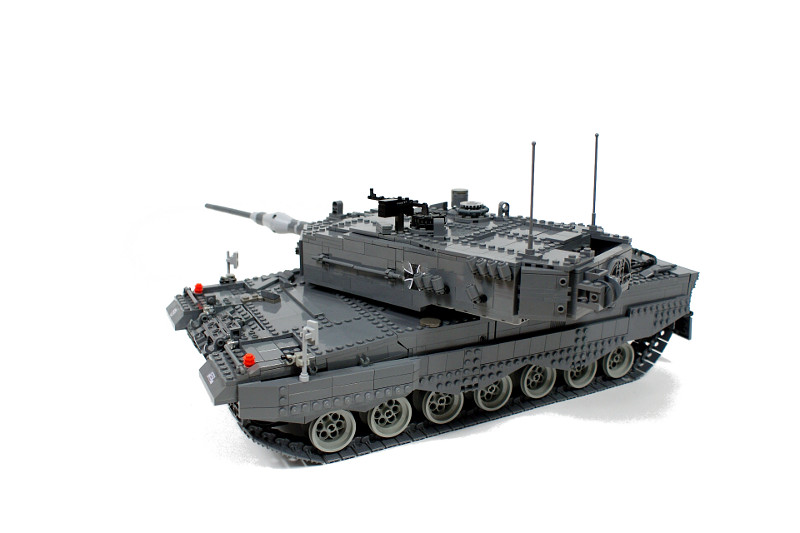
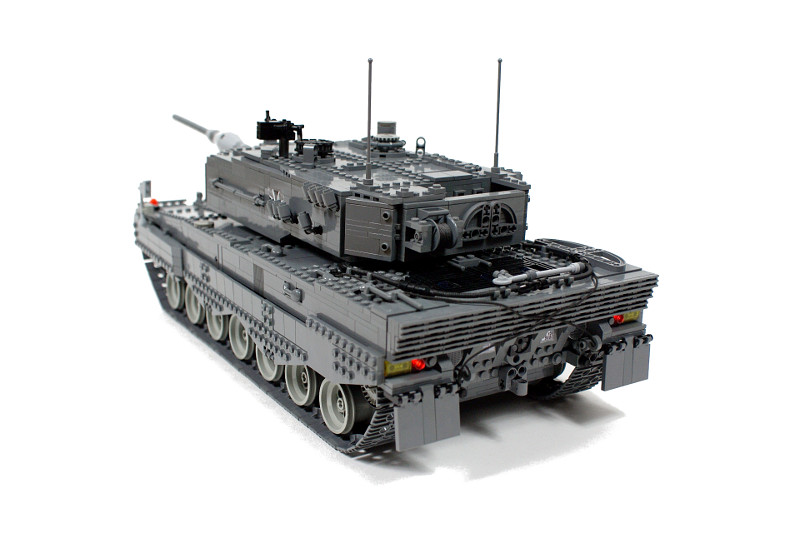
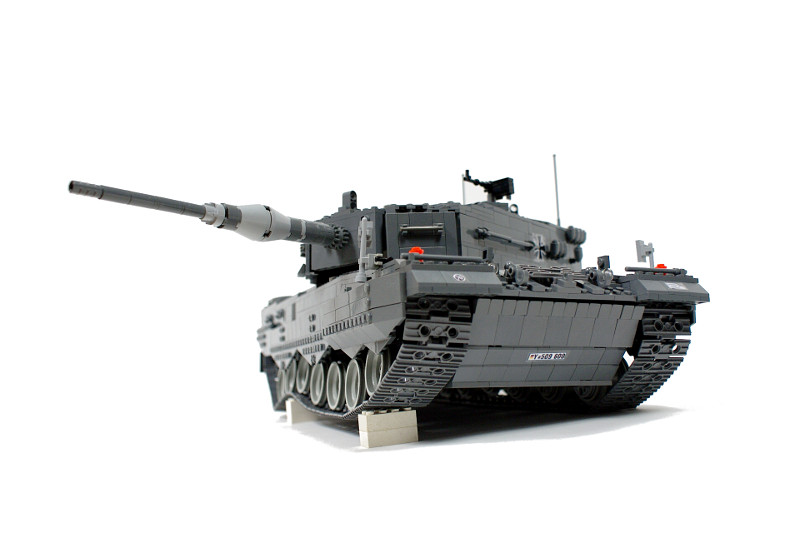
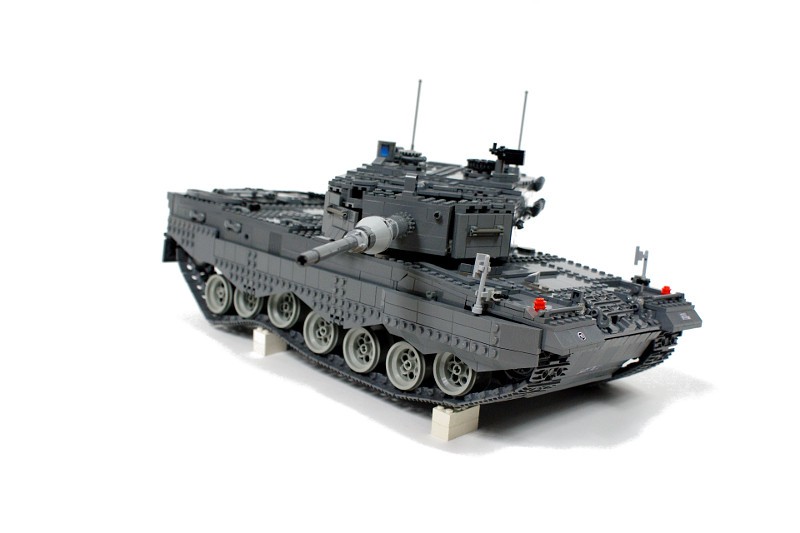
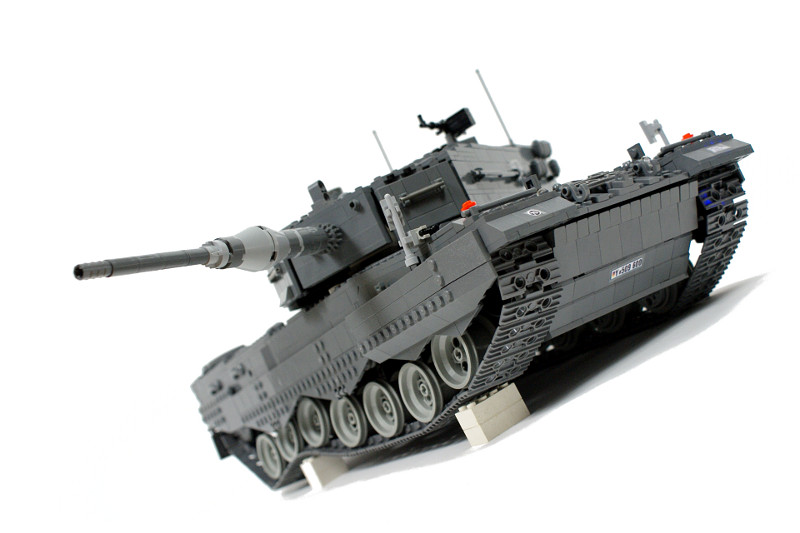
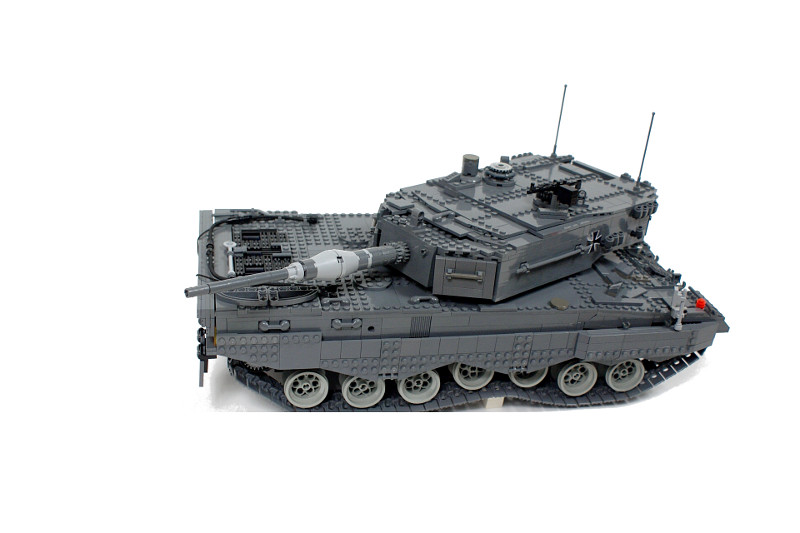
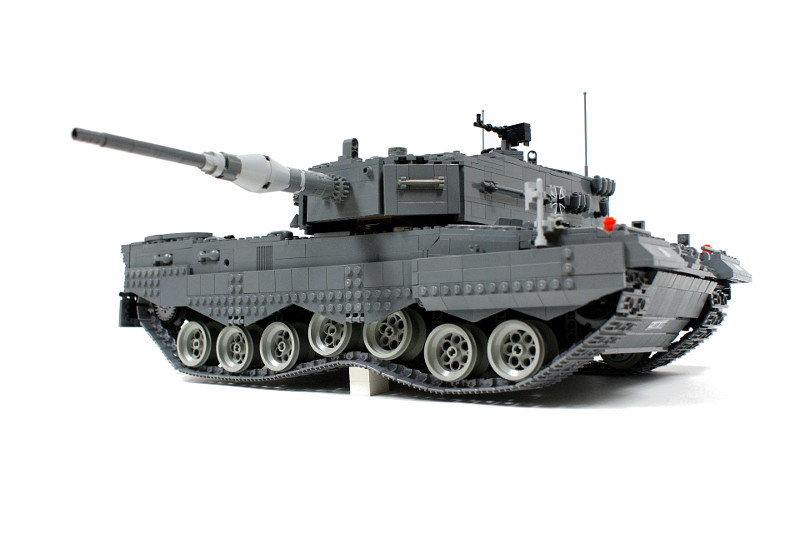
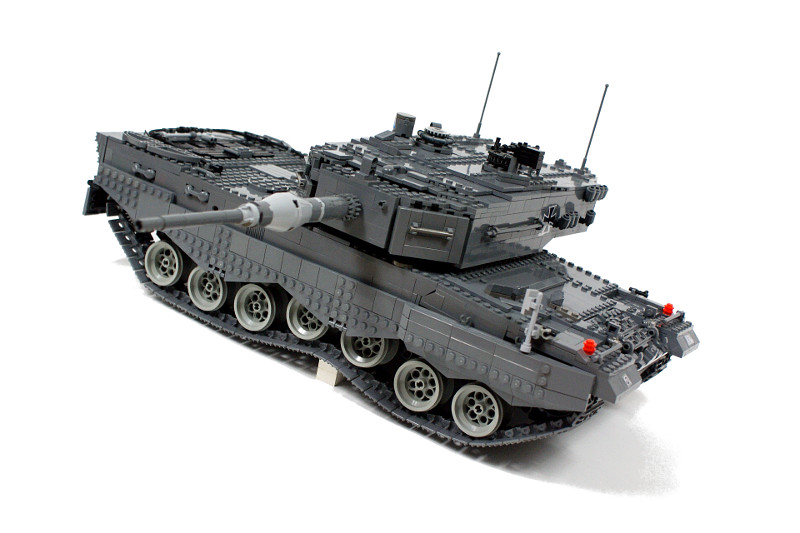
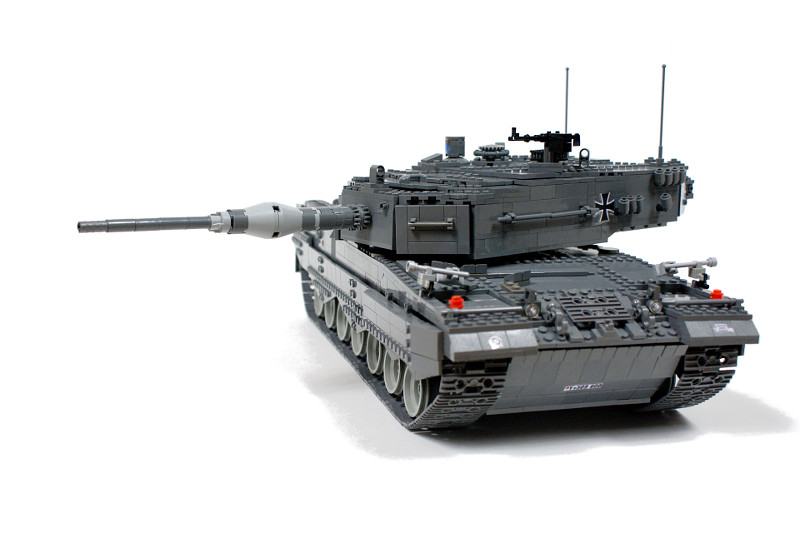
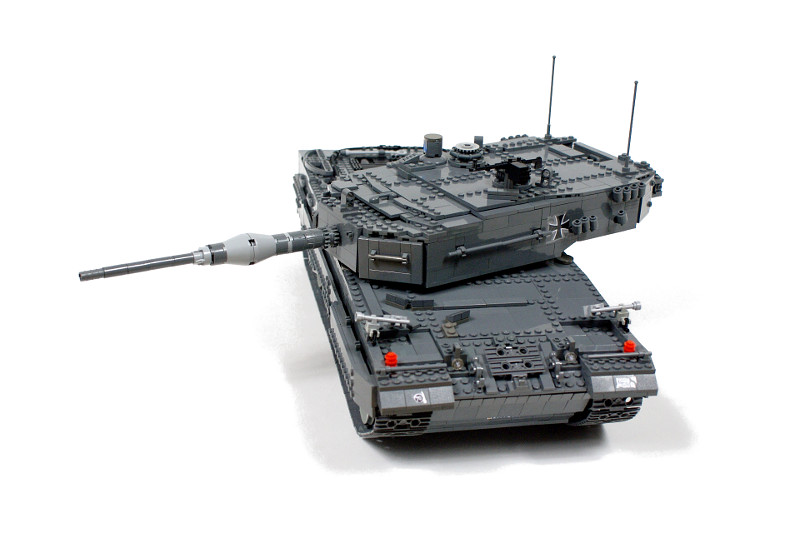
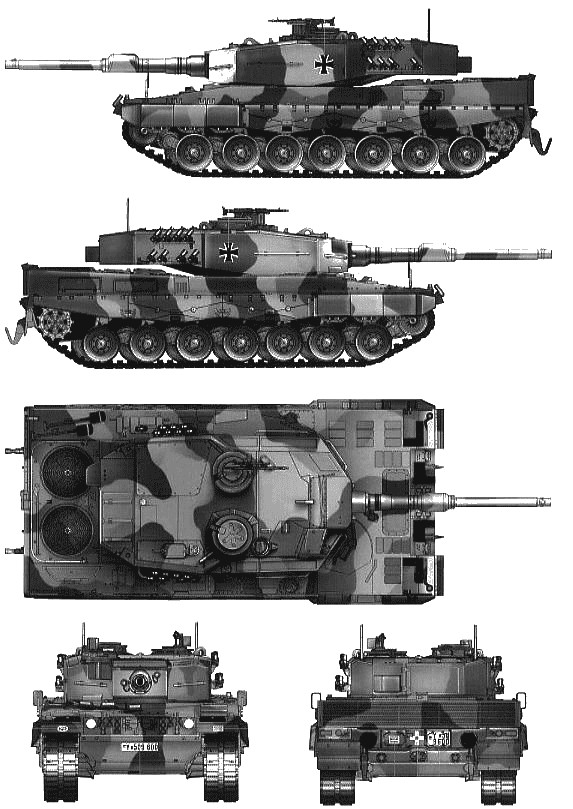
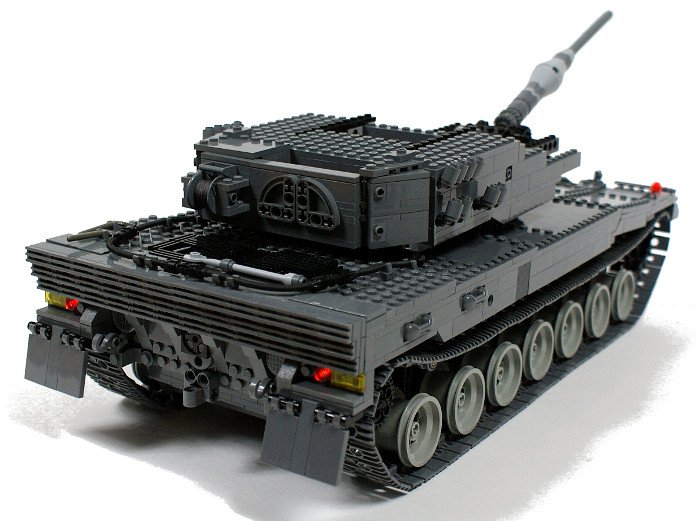
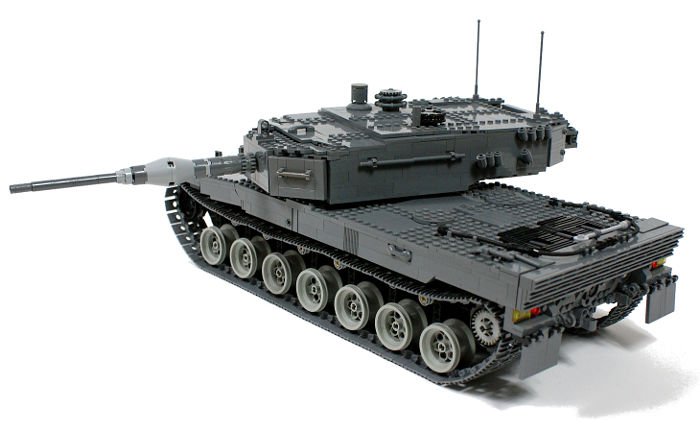
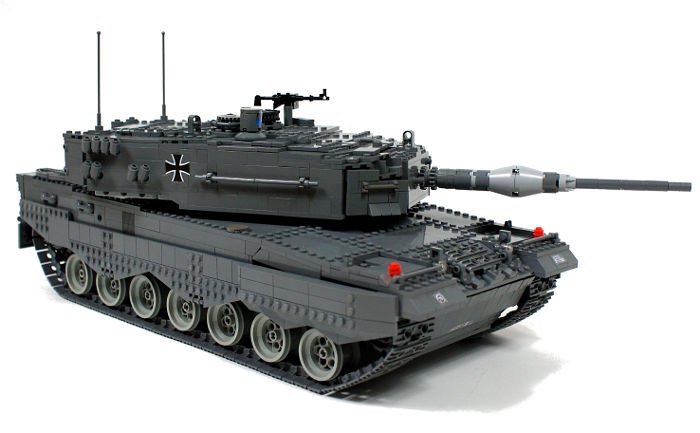
Leopard 2A4
 1/18 model of a German Main Battle Tank, features torsion bars suspension, rotating turret, rotating commander’s cupola, self-levelling main gun, gunner’s gun counter-rotation system, lights and custom stickers.
Datasheet:
Completion date: 28/10/2010
Power: electric (Power Functions)
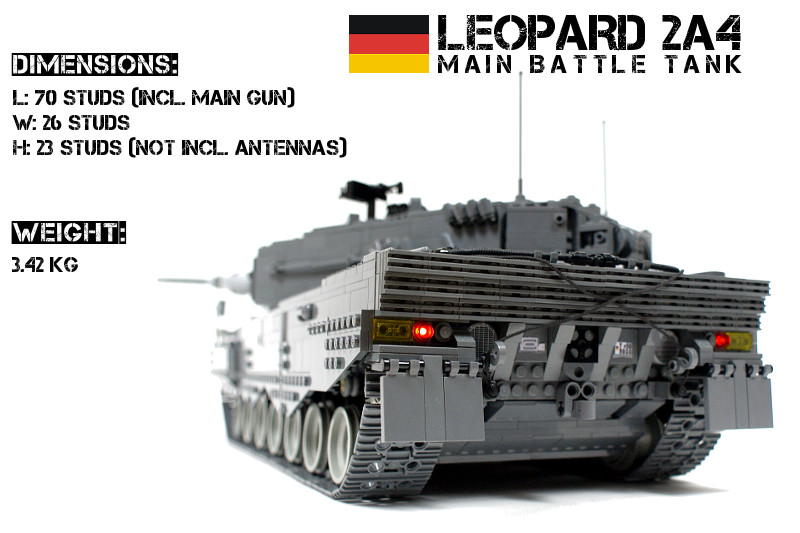
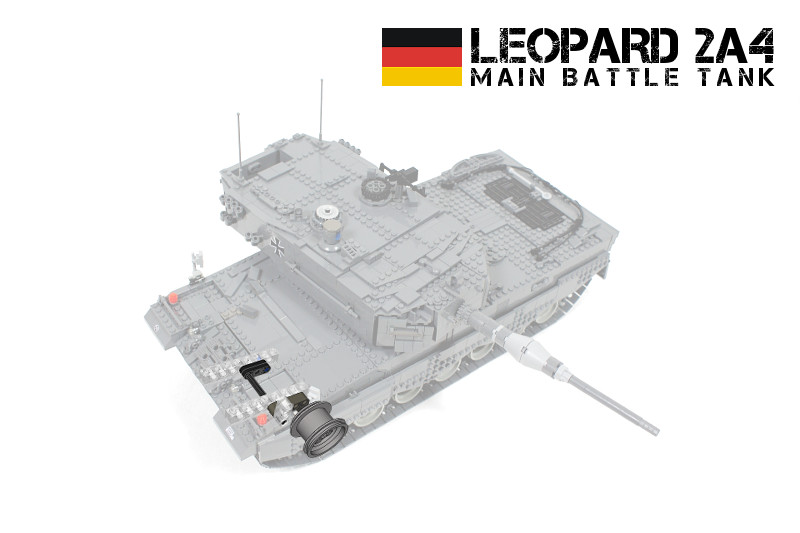
Dimensions: length 70 studs (including main gun’s barrel) / width 26 studs / height 23 studs (not including antennas)
Weight: 3.42 kg
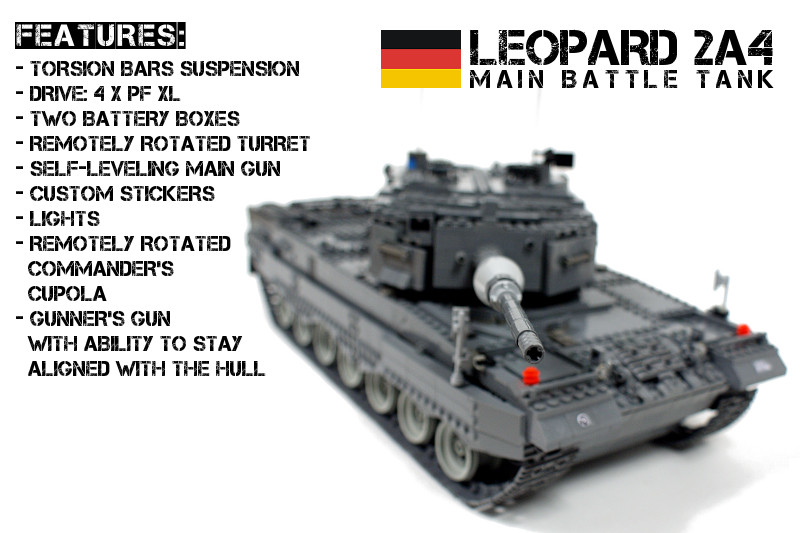
Suspension: torsion bars
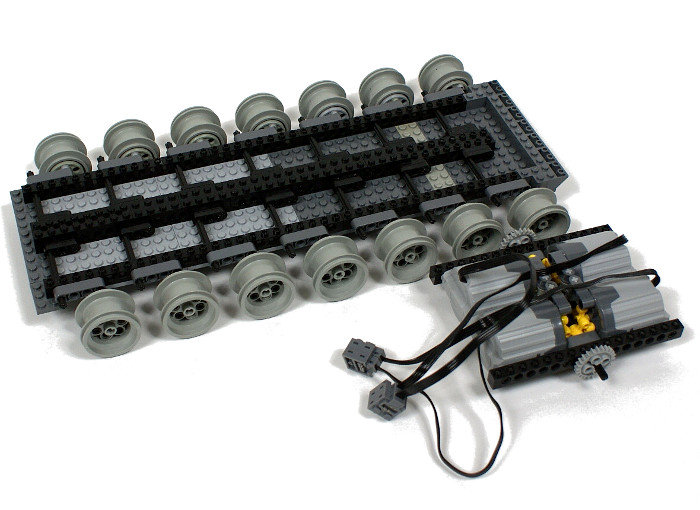
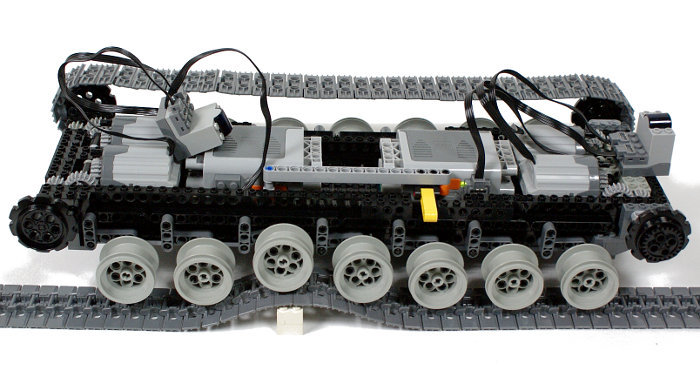
Propulsion: 4 x PF XL motor geared 1:1
Top speed: 1.5 kmph
Motors: 4 x PF XL, 2 x PF Medium, 1 x Micromotor
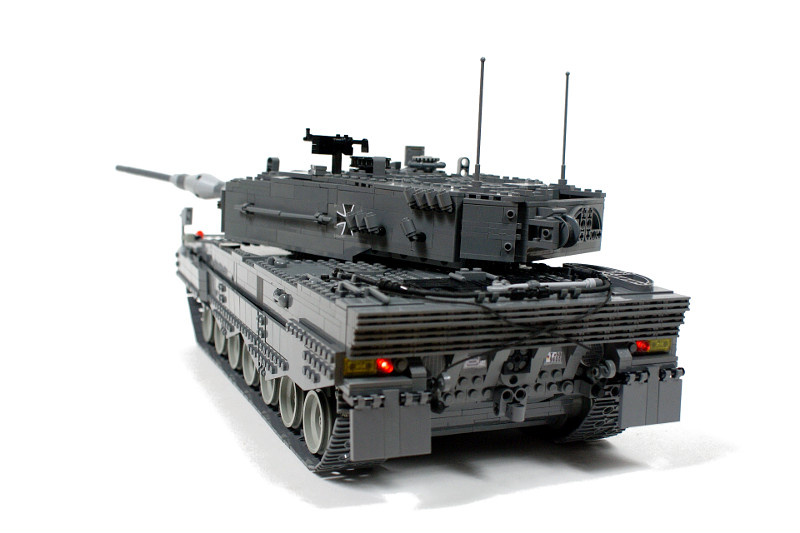
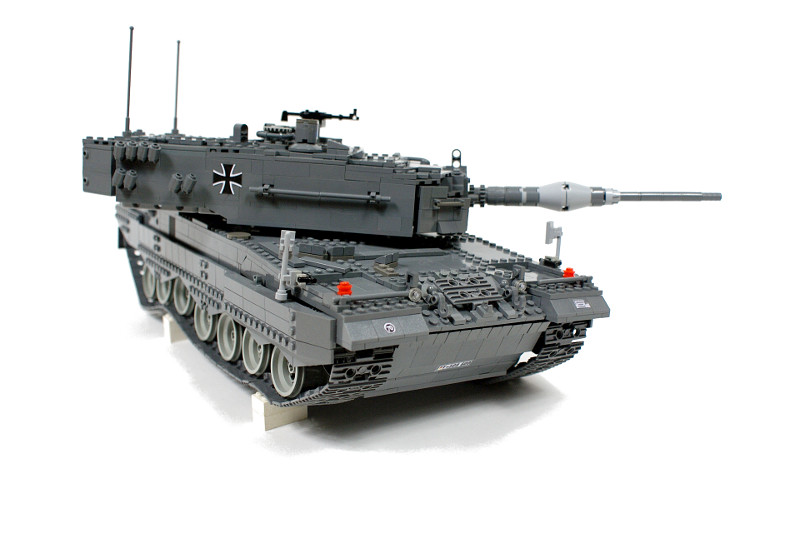
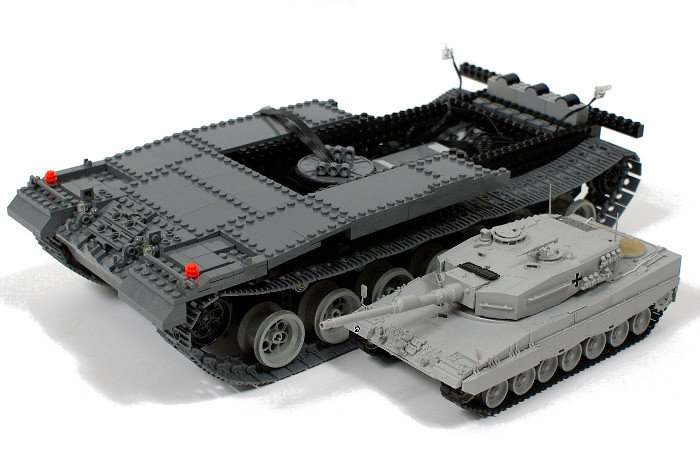
My first dark grey tank with a conventional construction (i.e. with a turret). I broke my ‘no German tanks’ rule, but at least the 2A4 version serves also with Polish army. It’s also the last version of Leopard with it’s original turret, whose distinctive shape (resulting from limitations of then-early modular armour technology) reminds me somewhat of German WW2 tanks. Leopard 2 is the world’s first 3rd generation tank (a brief explanation on tanks generations is available here), resulting from a failed joint German-US Main Battle Tank project (one that gave birth to Abrams M1 too) and introduced in late seventies. It’s a very universal construction with strong focus on mobility, and it has become quite popular, especially within EU. Widely considered as European Abrams’ counterpart, it has seen action e.g. in Kosovo and Afghanistan. The newest version currently in service is 2A6, while a 2A7+ version is under development.
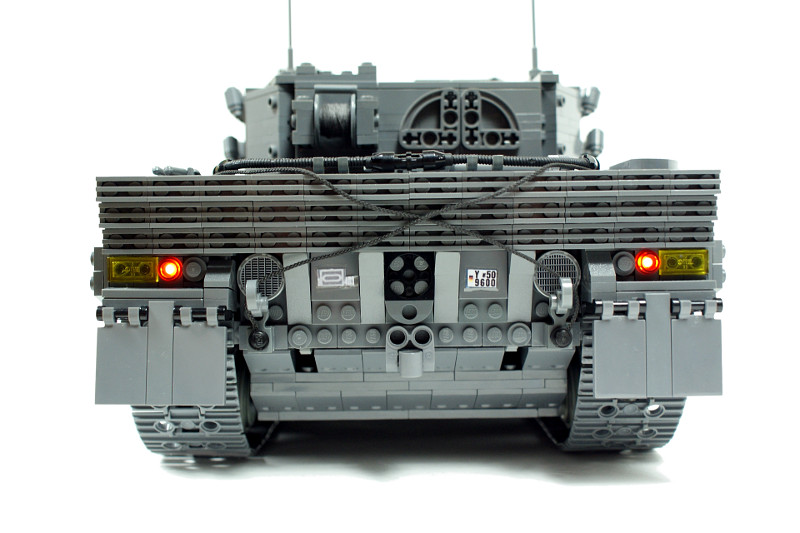
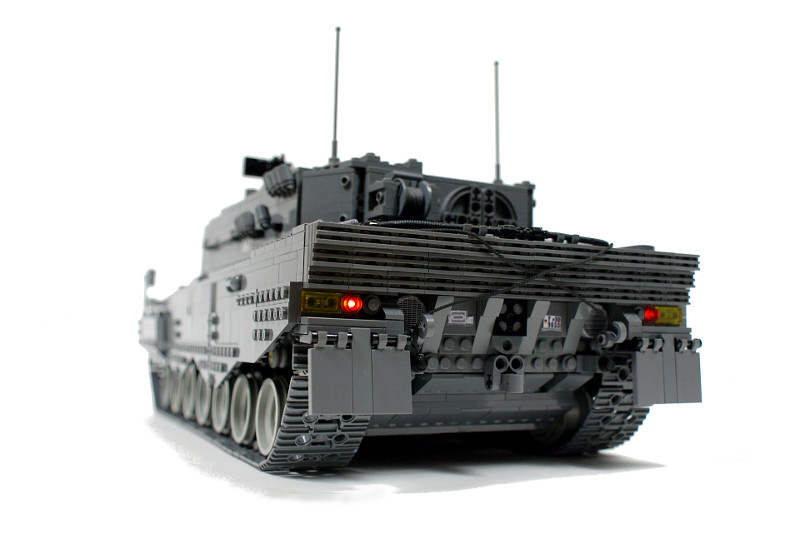
I have started to work on this model in an unprecedented way, that is by buying a 1/35 scale plastic model kit of the Leopard 2A4 (which alone took a couple of months, as models of this versions of this tank at this scale are exceptionally rare, I only found them in Hobby Boss’ catalogue and already out of production) and putting it together for reference. I have obviously used a blueprint for calculating the dimensions too, but the plastic model gave me incomparably better reference, such as details of the portion of the hull that is covered by the turret or the decals compliant with German army’s marking patterns. It also helped me to get the idea of various subtle angles and shapes that were difficult to notice on a blueprint, and provided a clear view of some details that appeared vague on it. I am generally happy with the model’s look which suffered few compromises, except for a single serious one: the two grills on top of the rear hull surface, which should be round. I was forced to place three IR receivers beneath this surface, which made it impossible to accurately model the round shape of these grills – I wish I could do that e.g. like here.
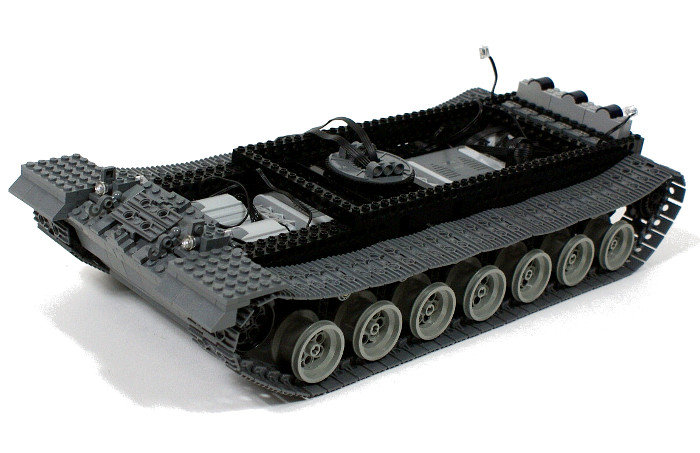
Technically, the model was primarily meant to test a new suspension concept, based on torsion bars – a solution taken straight from the real tanks. Torsion bars suspension uses road wheel mounted on end of short rods, whose other end is set on a flexible element which twists under load, thus allowing the road wheel travel up and down. The simplest application of this solution with Lego pieces was a bit unorthodox: it required regular axles, which have a degree of elasticity, to be twisted.
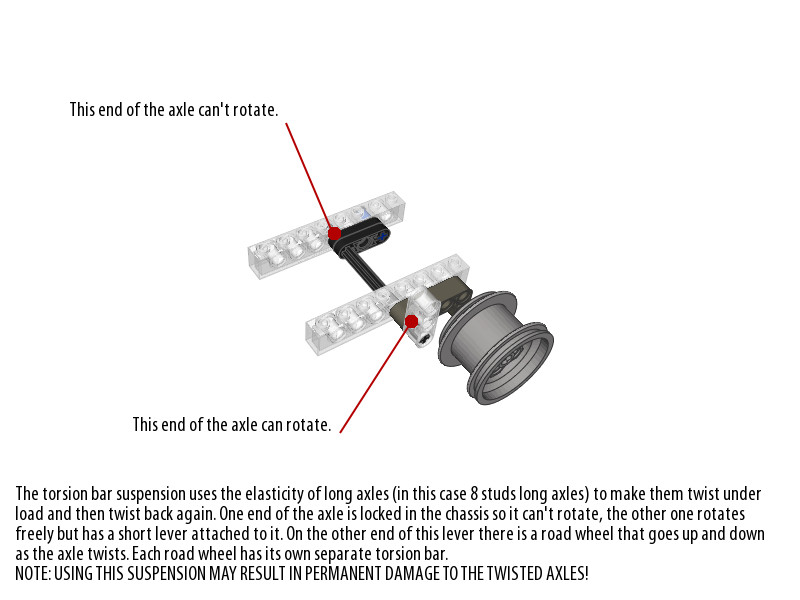
Just like in my previous tank model, the 6595 wheels have been used as the road wheels. They were mounted on bent 2×4 liftarms, so that they could rotate and maintain good ground clearance. The other ends of the liftarms were set on 8 studs long axles inserted transversely into the hull’s floor. Both ends of the axles were supported, but the inner ends, in the middle of the hull, were locked so they couldn’t rotate. Thus the axles were firmly braced in the chassis, with one end still free to rotate – the end with the liftarm and road wheel on it. It resulted in axle twisting slightly under load and then twisting back when the load was gone. Contrary to what I was afraid of, no apparent damage to the axles occurred, and this kind of suspension turned out to work excellently and to be extremely space-efficient (all it took was basically a single stud of hull’s height). Moreover, the hardness of this suspension can be easily adjusted by using shorter axles or by changing the locking point on them. In this model, each road wheel was subject to an average load of almost 250 grams and the suspension worked perfectly well with an 8 studs long axle, given 4 studs of space between the liftarm and the axle’s locking point.
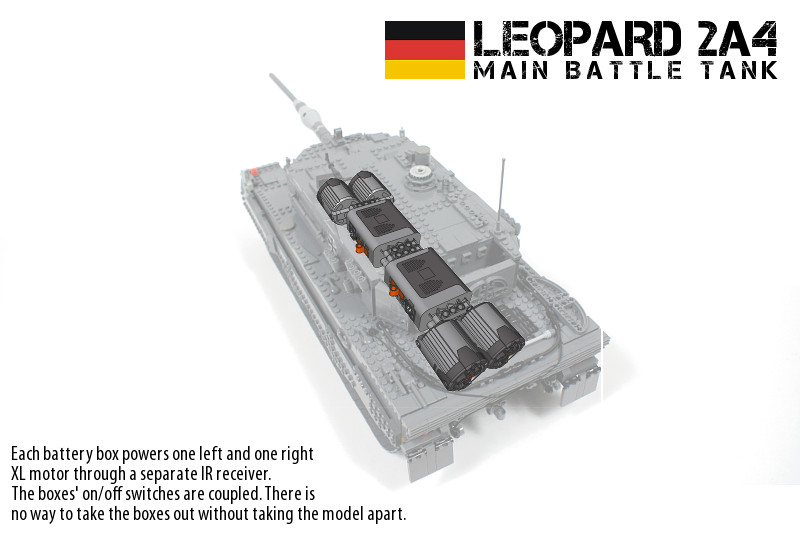
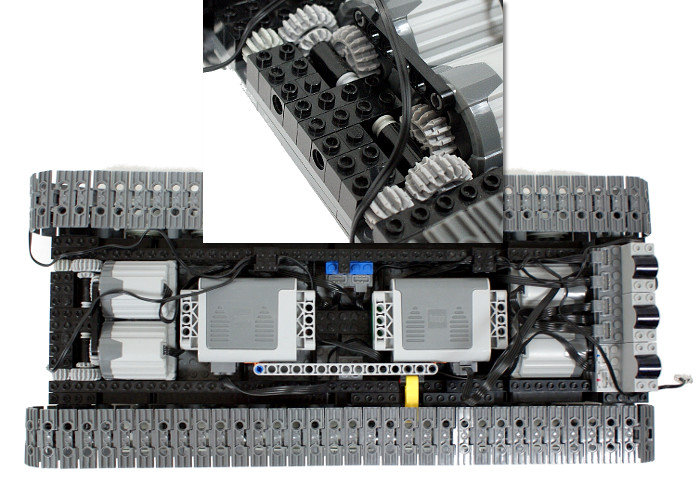
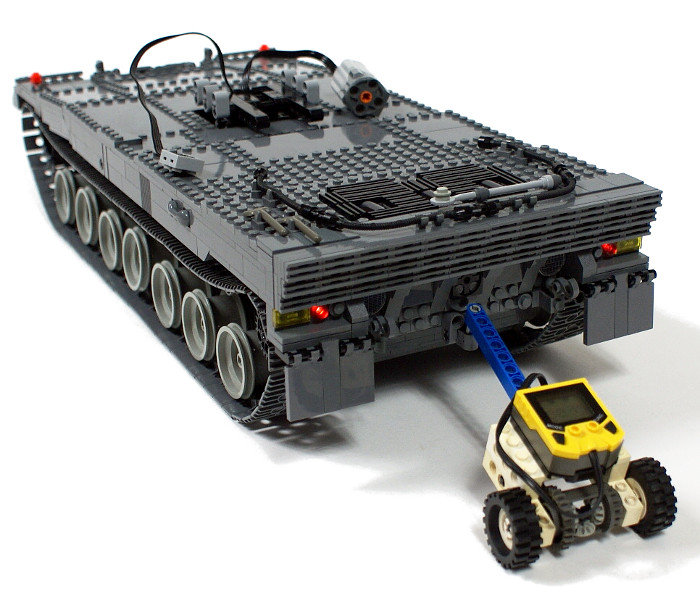
The model is driven by an unusual number of four motors, all XL. Each of its four sprocket wheels is driven by a separate motor, and the whole set is powered from two separate battery boxes through two separate IR receivers (set on the same channel), with each battery box powering one left and one right motor. I hoped that the massive torque provided by all these motors together would make the model fast despite its weight, and early version with almost 3:1 gear ratio proved to be very fast. Unfortunately, the performance degraded rapidly with the growing weight, and at 3 kg the motors were unable to move the model at all. I’ve spent almost 2 hours changing the gear ratio to 1:1, viewing it as the most efficient ratio possible and unwilling to experiment with something between 3:1 and 1:1 lest I spent another 2 hours changing it again. It appears that XL motors, despite all their power, become increasingly ineffective when used with accelerating gear ratio. It is also possible that it takes more torque to move heavy tracked vehicle than it does for a wheeled one of the same weight.
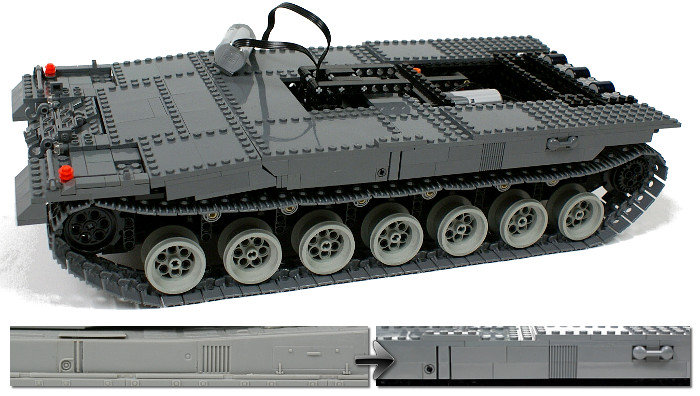
Except for the four XL motors and two battery boxes, the hull houses three IR receivers, a single PF Medium motor that rotates the turret and the entire turret rotation mechanism along with a turntable. Placing the turret’s turntable inside the hull had a number of advantages: most importantly, it made the rotation mechanism simpler and more robust, and made the construction of turret’s base much simpler while leaving plenty of free room inside the turret. There are two wires going through the turntable, so it can’t rotate infinitely, and there is a simple liftarm frame the turret is built around. The frame includes a single roller behind the turntable, which keeps the turret’s rear end from touching the hull.

Inside the turret, I wanted to have a self-levelling main gun with remote elevation control. To put these two features together, I have built a module suspended on a transverse axle, which connected the main gun with its counterweight and had a micromotor in between, so that the angle between the main gun and its counterweight could be changed remotely. It worked as expected, joining the two features: changing the angle between the main gun and the counterweight by e.g. 30 degrees would result in the main gun going up (or down) by 15 degrees and the counterweight doing exactly the same, while the whole module kept self-levelling all the time. Two problems prevented me from using this mechanism: firstly, raising and lowering the counterweight required more space inside the turret than was available, and secondly, the micromotor’s wire kept affecting the module’s position, no matter how I arranged the wire. Eventually, I decided to keep the self-levelling feature and to remove the elevation control at all. Tank model with no main gun’s elevation control is certainly at disadvantage, but I thought that since all my tank models had this feature, I can do something different just this once. So, I removed the micromotor from the module, positioned the counterweight as close to the main gun as possible, and added another counterweight below the pivot point to lower the module’s centre of gravity – as it was apparent that the accuracy of self-levelling increases with the centre of gravity being further from the pivot point.
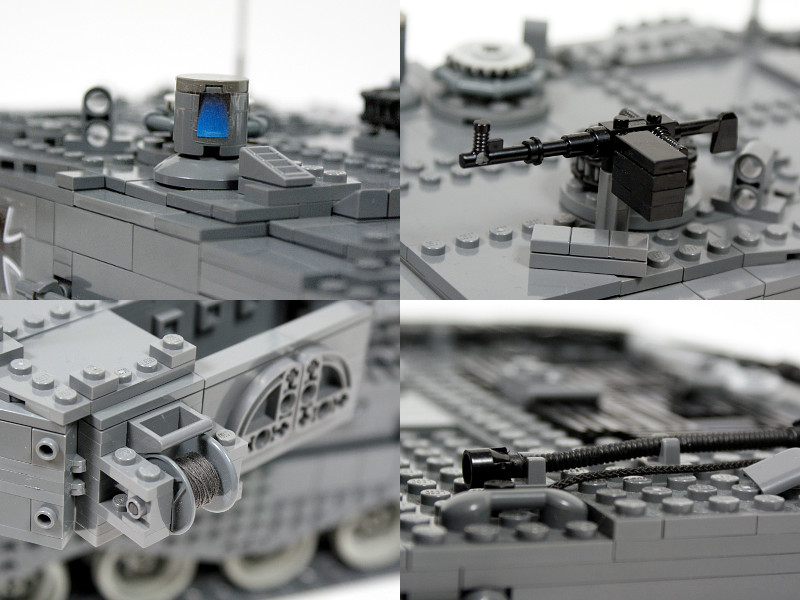
The micromotor which was removed from the self-levelling module served as a propulsion for commander’s cupola. It proved perfectly suited for this purpose, because no gear reduction was needed and the cupola is mounted directly on the motor.
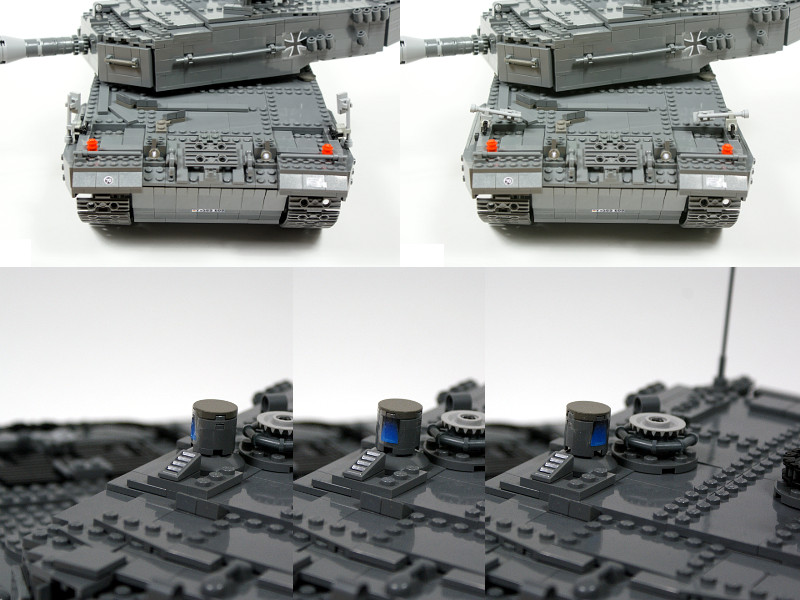
Finally, there is a PF Medium motor in the rear part of the turret. I had a lot of space available in the turret, but all the IR channels were already in use, so I was looking for some additional use of the channel controlling turret’s rotation. Eventually, I have built a copy of turret’s rotation mechanism inside the turret, driven by the aforementioned Medium motor and working in opposite direction. The motor was connected to a switch inside the hull, and the switch was connected to the same IR receiver’s output as the motor rotating the turret. It resulted in a possibility to turn on or off a mechanism that would rotate something on top of the turret against the turret itself, thus keeping it aligned with the hull. The obvious choice was to select gunner’s machinegun as the counter-rotated element. The mechanism worked well, but the difference in resistance met by the motor rotating the whole turret and the motor rotating the machinegun alone resulted in different speeds of rotation, with the machinegun rotating slightly faster than the turret. Thus the machinegun does not really stay aligned with the hull, but slowly rotates in opposite direction that the turret does. It should be noted that since two copies of turret’s rotation mechanism were built, there are actually two turntables in this model: one below the turret and another one inside it.
Despite its few shortcomings, the model met a very positive response, being occasionally called my best tank model yet. I was slightly disappointed by its speed, but delighted at its suspension which worked way beyond my expectations, providing excellent flotation without using a single shock absorber. Personally, I consider this model as a preliminary study for my next tank, the South Korean K2 Black Panther, which will develop some of Leopard’s solutions further and hopefully improve in general wherever possible.
Photos:


Work In Progress photos:

Video:
Media Reference:
Rock’n Tech (Portuguese only), The Brothers Brick

@Samael
Here: http://alpha.bricklink.com/pages/clone/catalogitem.page?P=6595#T=C
Hey men, what’s up
What’s the model of wheel that you used in this model or the set what can i find this wheel?
@petrklier
You can’t buy it. Nor the list.
hello, where i can buy this beautiful tank? or list of all cubes?
@christian
Bricklink.
my qeution is where you buy the wehls?sorry for my bad englisch but i am come from germay
@rick
Sure, go ahead.
do you have any problems with my idea, I want to build a leopard 2a7+, i want to use your hull design. may i do that or don”t you wnat that?
greetzz
@Chris
This is dark bluish grey.
These are both new colors, or am i wrong? 😉
@Chris
The newer one.
Hi
What did you use as the main color?
medium stone gray or dark stone gray?
Thanks
@Zsolti
It’s not for sale and there is no instructions.
Hi Sariel
Deine panzer sieht absolut super aus!Kann ich die Baupläne irgendwie bekommen?Oder kaufen?
Danke für deine Antwort,und grüße Zsolti
@Marc Marcel
There is no parts list and no instruction.
Hi there at Sariel!
I really love this tank. And I am fascinated by the way you built it!
Im interested to build it, too. But it would nice if you could send me a list of parts and a building instruction. I know, you wrote its not a set or so on, but pls… I can’t find the parts…
It would be nice should you read this you send me the lists. Best way: facebook.
My facebook-name is Marc Marcel Ernst. Normally there’s just one with this name. But as hint: my profile pic has to do with Jesus and my profile banner is a screenshot with a tank on it.
I very thank you and hope to a fast response.
CU later 🙂 !
D’accord, merci beaucoup.
@Louis 08
Probably with pins.
Hello! your design is really good, I would like to know if you remember how the batteries were attached to the hull … is that possible? cordially Louis
@Steffen
There is no instruction. As for the knowledge, my book just came out in German, maybe your son would enjoy it: http://dpunkt.de/buecher/4315.html
Moin from Germany.
Is it possibe to get an instruction for the Leo Tank? My eight years old son wants to build one. But i´m not the person who can help him with this projekt. Would be nice to read from you. If there is no possibility to get an instruction, than tell me please how get the basic knowledge to realize such an Project.
Thanks
Steffen
@Sariel
Thanks, i should have read your description.
@Mazbane
It’s right there in the description: “Just like in my previous tank model, the 6595 wheels have been used as the road wheels.”
Can you please tell me the part code for the wheels used in this great tank model, i’m hoping to do Abrams M1. cheers
Thought so but that was years ago, believe me they are interesting tanks to study@Sariel
@nitwity
Well, my country had more than enough experience with German tanks already.
Why did you set a no German tanks rule?
Aha rozumiem szkoda troche bo model jest naprawde piekny, az wierzyc sie niechce ze to z lego, naprawde gratuluje umiejetnosci
@Tomek
Nie, bo taka instrukcja nie istnieje. Dlatego nie ma jej na tej samej stronie co instrukcja Land Rovera.
ok ale czy udostepniasz dokladna instrukcje taka jakie sa do pobrania np. Land rowera?
@Tomek
Owszem, udostępniam informacje – widzisz je na tej właśnie stronie.
moze inaczej jak go zbudowac?Jest to twoj projekt rozumiem ale czy udostepniasz jakies informacje dotyczace jego budowy?
@Tomek
Jaką instrukcję?
Witaj gdzie mozna zdobyc instrukcje do tego czolu?
@jakob
No.
Do you sell it ? When yes please contact me.
@Zappi
No, I don’t destroy them again. I destroy them for the first time.
@Sariel
So, when you did photos and some videos, you destroy your models again?
@Zappi
Sorry, but this is all I have.
Hey, Sariel
Could you send me some more detailed pictures of the torsion bars and the Tank? I´m trying to rebuilt it and it´s not easy if i just have these photos.
Thanks in advance: Zappi
OK właśnie tego szukałem. Szukałem koncepcji na zawieszenie dla mojego czołgu…uważam, że ta zastosowana przez Ciebie jest bardzo udana. Podpatrzę sobie i wracam do budowania 🙂
@Oliver
No, I don’t sell anything.
Hey Sariel, you sell this Modell ???
Whats the price 4 this ???
Greatz Olli from germany 🙂
@Sariel
ok, i replaced the wheels with oter type of some LEGO too, it quite cheap.(in my county i bought it arround $4 each!! But the wheels not quiet good enough but still can be used!
@That guy
No.
is there any way to buy this?
@Joe
6595 wheels. It’s right there in the description.
What is the size or type of the wheel that you used? Thanks
@Denis Eppert
I have no blueprint.
Hello, a question, how is the cost of Leopard2A4, oda only the blueprint for
ask for feedback
@Sjur
Never.
hey
this lego tanks is very cool. when will this lego tanks be in lego stores.
So we can shop it.
Yes that helped a Lot !
I hadnt much free time so i hadnt read the FAQ before. Because of the new wheels i can make my 1/16 Leopard 2a6 looking better than now. Your kind of suspension is great, will use it too, because my momentary suspension is working with rubberbands and its big!
So thanks for all Tricks (and Links) for Building my own tank!
Legos Best Friend
@Legos Best friend
I guess you should recognize this website too: http://sariel.pl/faq/
Ok. I didnt recognized that Website
before. Sorry for
asking ! Damn this Website is perfekt!
Just One Problem: im 15 and my parents don’t wang to Pay lego in US dollars 🙁
Hmm Let’s See if i can “make them Pay” (for legos). What Tank
Is comming Next ? My favourite Tank is the abrahams. Do
you create These things with LDD and buy em piece for piece ? Or do you have a Room full of old Lego Sets ? Would Be interesting to Know.
good luck for Next creation
Legos Best Friend
@Legos Best friend
Does the name Bricklink ring a bell?
Where did you get the wheels for Suspension ? I tried to Build the Leopard 2a6 in White, light gray and Dark grey. It Looks good but the exavator from which you can get the wheels isnt buyable anymore. Perfekt work Guy !!!
(i searched on eBay for those wheels but they cost at the Moment : 30$ per Wheel !!! )
@Peter
Thanks but no.
Can I get an instruction of how to make this please? I can pay if you want.
@Dennis
It’s a track not a chain and it comes only in dark bluish gray and black.
hello, can you teel me the color from the chain (greyblue, darkstone or ???? )…..
The tank is very very nice…..
Best regards Dennis
@Sebastian Müller
I do not have any instructions for it.
Wow, i like your lego model of leopard Tank. The mechanic what you build in this model and your ideas for the advance funktions and details of the design is amazing
my question, have you a build instruction of this model?
how become this bricks?
with friendly greats
Sebastian Muller
@Martin Fellinger
Use English please.
Hallo,eine Frage,wie viel Kostet der Leopard2A4,oda nur die Bauanleitung dafür
bitte um Rückmeldung
mfg.Martin Fellinger
@Beppe
My rule of the thumb is: stretch the track to maximum, then give it half a link of slack. But with some types of suspension, more is needed.
Yes, I am checking the tracks tension already when designing the chassis.
As for height, sorry, I don’t remember. If you can’t see it on the photos then neither can I.
What would you say is the best amount of slack on the tracks? My experience is that if the tracks are too tight a lot of power is lost in overcoming the friction. On the other hand, if the tracks are too loose there’s a big risk that they will come off the sprocket wheels.
Also, adding or removing one link in the track significantly changes the track length. This makes it quite hard to adjust the slack without rebuilding the model. I would say that the possible track length needs to be taken into account already when you’re designing the model. Do you agree?
What is the vertical height in studs between the center of the road wheels and the center of the sprocket wheels in the Leopard tank?
@Haloman
There is no such thing.
hey can I get the lightweight instruction for the Leopard?
@bauke
6595
hey,
wat type of wheels are you using
(like it)